background image

Fraser Gazebo - Assembly Instructions

w w w . c a n a d i a n s p a c o m p a n y . c o m

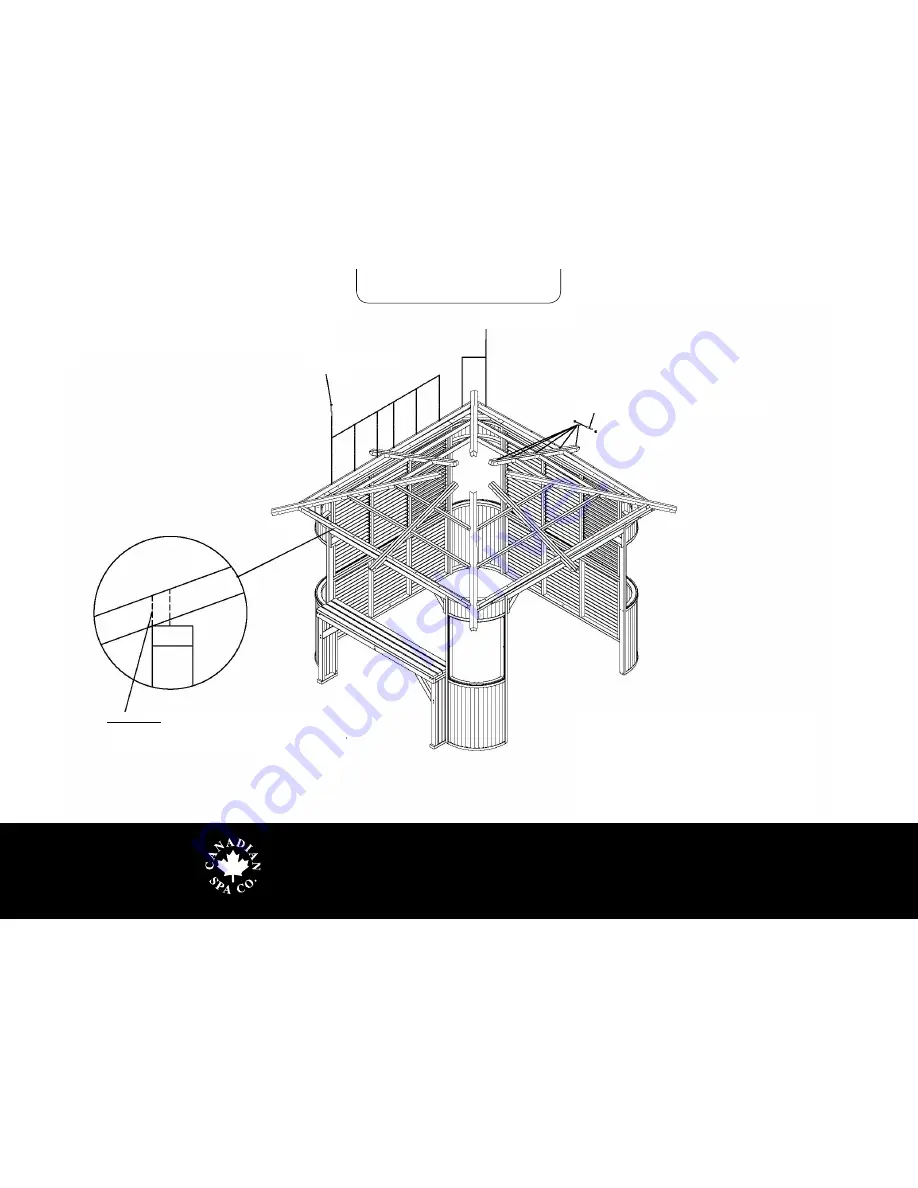
IMPORTANT: Make sure the Roof Frame is level with 
Gazebo body before screwing the remaining frames 
together.

1. Now assemble the remaining 3 Roof Frames on the  
  Gazebo and combine them using M8*90 Bolts, Cap  
  Nuts and Washers
2. Connect Roof Frame(s) onto the Gazebo body using  
  screw CT - M5*60

Screw CT--M5*60

Screw CT--M5*60

M8*90 Bolts, Cap Nuts and Washers

7. Roof frame assembly

Содержание Fraser

Страница 1: ...ners with smoked acrylic windows ABS roof Easy nut and bolt assembly Bar 10 x 10 x 10 290 x 290 x 285 cm 4 stools with seat covers optional Freestanding Gazebo in synthetic wood with Bar counter and Stools optional Fraser Gazebo Assembly instructions Assembly instructions for Fraser Gazebo Bar counter 285 cm 290 cm 290 cm ...

Страница 2: ...5 6 7 8 9 10 11 12 13 14 15 16 17 18 19 CARTON QTY 1 1 1 1 1 1 1 1 1 1 1 1 1 1 1 1 1 1 1 QTY PIECES 4 2 2 5 2 4 50 2 8 8 8 8 8 3 4 4 12 4 22 SCREWS ADDITIONAL PARTS A 90º Bracket 12pcs a1 Straight bracket 12pcs a2 151º Bracket 12pcs a3 B 6mm Allen key 1pc White colloidal part 10pcs Hexagonal bolt M8 50mm 46pcs C Tapping screws M5 60mm 42pcs bag Tapping screw M5 50mm 208pcs bag Tapping screw M4 50m...

Страница 3: ...iles LEFT x 4 Triangular roof tiles RIGHT x 4 Straight roof tiles x 4 Corner Ridge Hip tiles x 4 3 The Bar Bar legs x 2 Bar table top x 1 Brackets x 4 Hexagonal screws M8 50 x 4 Self tapping screws CT M5 50 x 8 4 Bar Stools 4 Stool legs x 16 Stool seats x 4 Stool padded seat cover x 4 Leg braces short x 16 Leg braces medium x 8 Leg braces long x 8 Bar stool foot x 16 Self tapping screws CT M4 50 x...

Страница 4: ...ce or hedge to allow sufficient space for manoeuvring and assembling the structure Orientate Gazebo Decide how you want your Gazebo to be orientated Your spa has two louvred sides and two open sides one of the open sides will have the Bar attached and the other open side is to gain entry into the spa The bar can be positioned between corners A B B C C D Cover lifter clearance As you enter the main...

Страница 5: ...Bar table top Support Brace Hexagon bolt M8 50 Tapping screw M5 50 1 Bar assembly 2 1 1 3 3 Hexagon screw M8 50 Tapping screw M5 50 1 Use M8 50 bolts to connect bar table legs and bar table top 2 Add the Support Brace between the face and foot using screw M5 50 IMPORTANT Make sure the bar legs are at 90º right angle to ensure a perfect fit to Gazebo walls ...

Страница 6: ...here are 7 holes on the left edge and 4 nut holes on the right 3 Corner C There are 7 holes on the right and left edge 4 Corner D There are 2 nuts holes on the left edge and 7 holes on the right 5 Connect the corner connecting beam between corner A and B 6 Connect the louvred panel and bottom window panel between B and C 7 Connect the louvred panel and the bottom window panel between C and D 8 Con...

Страница 7: ...gazebo corners using Hexagon M8 50 bolts Hexagon bolt M8 50 Item No 1 2 3 4 5 Quantity 4 pcs 2 pcs 2 pcs 1 pc 2 pcs 40 pcs 12 pcs Name Corner Louvred window Bottom panel Bar table Connecting beam Hexagon bolt M8 50 Tapping screw CT M5 50 IMPORTANT Please ensure the gazebo walls and corner units are square before continuing to the next stage 1 2 3 C C B B 5 4 B C D A Hexagon bolt M8 50 Hexagon bolt...

Страница 8: ... n a d i a n s p a c o m p a n y c o m Tapping screw CT M5 50 Roof frame joist Corner joist bracket 1 Link the 4 x Roof joists 1 97m with corner joist brackets and connect to Gazebo frame using Tapping screws CT M5 50 4 Roof frame joist s assembly ...

Страница 9: ...crossmembers 1A to the Left Hip Rafter 2A as well as Rafter 3A using Tapping screws CT M5 50 2 Roof right hand side Attach the long and short Roof crossmember 1B to the Right Hip Rafter 2B as well as Rafter 3B using Tapping screws CT M5 50 3 After the 3 x Roof crossmembers have been attached to the hip rafter lay the assembly flat and lock together with the screws Ensure screw holes face upwards R...

Страница 10: ... and Washers Once the two frames have been assembled connect them together using M8 90 Bolts Cap Nuts and Washers Then place the first roof frame on the Gazebo body Roof frame Gazebo body IMPORTANT Make sure the roof frame is level with Gazebo body before screwing together Roof frame 6 Roof frame assembly ...

Страница 11: ...l with Gazebo body before screwing the remaining frames together 1 Now assemble the remaining 3 Roof Frames on the Gazebo and combine them using M8 90 Bolts Cap Nuts and Washers 2 Connect Roof Frame s onto the Gazebo body using screw CT M5 60 Screw CT M5 60 Screw CT M5 60 M8 90 Bolts Cap Nuts and Washers 7 Roof frame assembly ...

Страница 12: ... light Frame on the Gazebo Roof and align the screw holes with the Roof Rafters and screw together using screw CT M5 50 2 Please ensure the Skylight Frame is level with the Roof Rafters Centre Roof Rafter Centre Roof Rafter Centre Roof Rafter Centre Roof Rafter Keep the contact surface flat Screw CT M5 50 8 Roof frame assembly ...

Страница 13: ... m 1 Place the 90º Bracket on the Roof Hip Rafters and screw together using screw DB M4 35 2 Place the Straight Bracket on the Centre Roof Rafter s and screw together using screw DB M4 35 90º Bracket 90º Bracket Straight Bracket Straight Bracket Screw DB M4 35 9 Roof frame assembly ...

Страница 14: ...hould be kept straight to the ground when installing then it should re align to 70º with the top of the roof Screw DB M4 35 Roof top Washer Roof Frame 1 Place the centre roof tile onto the roof frame using screw DB M4 35 and Washer 2 Align the left and right triangular roof tile with the centre roof tile and bolt together using DB M4 35 IMPORTANT Please do not stand directly on these roof tiles st...

Страница 15: ...de the aperture at the top of the roof and screw together using screw DB M4 35 and washers 2 Place the Roof Hip tile s on to the roof hip s and screw together using screw DB M4 35 and washers 3 Using the brackets screw the Skylight to the inside of the Skylight frame 11 Roof frame assembly Use a sharp knife to cut around window frame and remove sticker Use Sealant included to seal window edges ...

Страница 16: ...ng leg brace Location nuts in stool seat Location nuts Tapping screw CT M4 25 Tapping screw CT M4 50 Align the leg brace to the stool leg Connect the long leg brace to the stool legs Item No 1 2 3 4 5 Quantity 16 pcs 16 pcs 16 pcs 4 pcs 4 pcs 32 pcs 64 pcs Name Leg brace short Leg brace long Stool legs Bar seat Padded seat cover Tapping screw CT M4 50 Tapping screw CT M4 25 11 Bar Stool s assembly...

Страница 17: ...of America Telephone 1 801 696 5677 www canadianspacompany com France Office Canadian Spa Company sarl 29 avenue de Grande Bretagne 66000 Perpignan France T 33 9970 4448004 E support canadianspacompany com www canadianspacompany com Sweden Office SbaoBad i Sverige AB Munkarp 601 24391 Höör Sweden Tel 46413400400 www canadianspacompany com Norway Office Canadian SPA AS Lønningsflaten 39 5258 Blomst...

Отзывы: