CamTron CTNC-5353H Скачать руководство пользователя страница 7

H.264 IP Camera Cywatch

H.264 IP Camera Cywatch

12

13

  Installation

Installation  


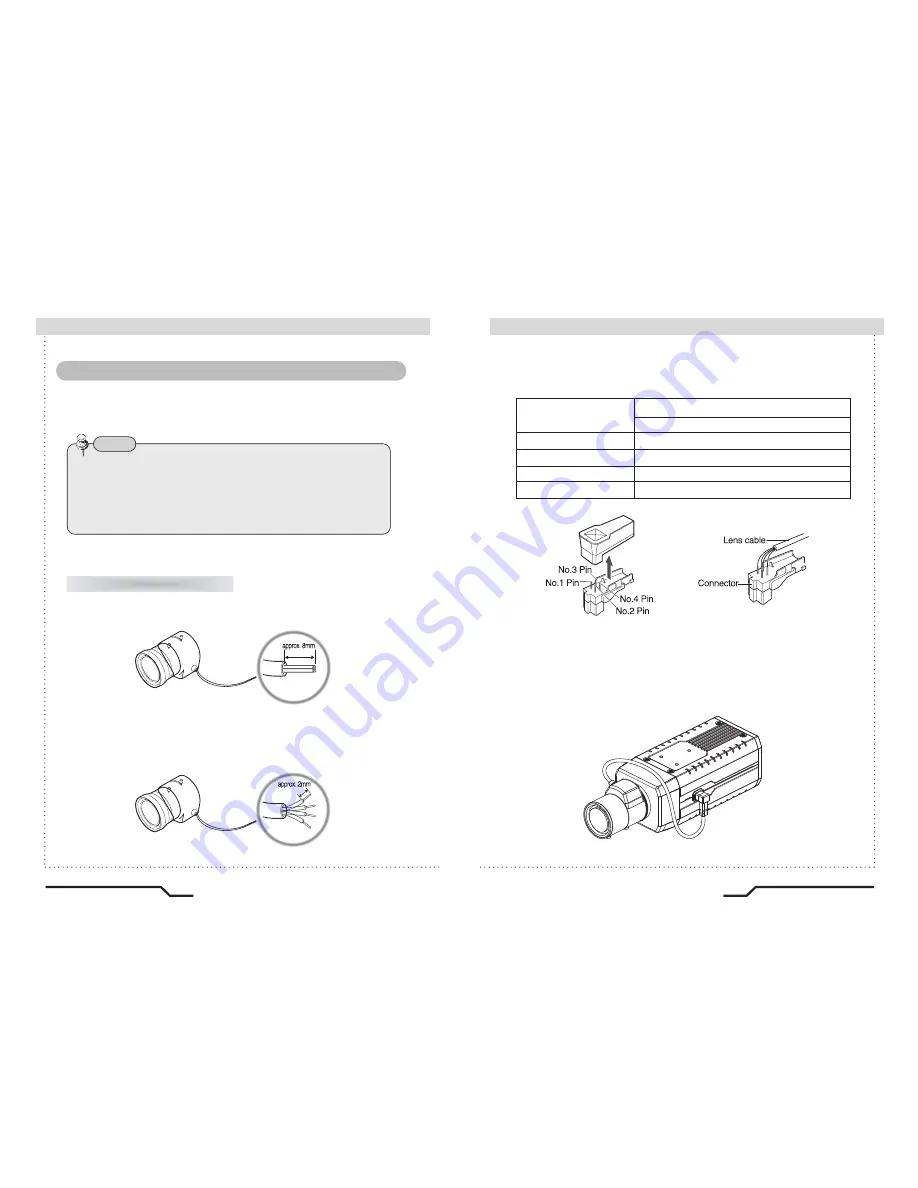
Lenses are sold separately. Lenses such as auto iris lens, CS-Mount lens 

and C-Mount lens can be used.

1. Peel off about 8mm of the outer skin of the auto iris lens cable.

2. Peel off about 2mm of the outer skin of the insulated conductor inside the

lens cable.

Lens

Note

Use of the DC auto iris lens is recommended to achieve the best

results for operating this product effectively.

Keep the lens clean.

Any foreign objects and fingermarks on the lens can cause inferior

image quality in low light level conditions.

When using an auto iris lens

3. Remove the cover of the auto iris lens connection plug and solder the

lens cable to the connector pin in the plug.

4. Replace the auto iris lens connection plug cover and take off the lens

protection cap, and then attach the auto iris lens to the camera by

screwing it in clockwise.

5. Insert the connection plug that is connected to the auto iris lens cable into

the auto lens connector, which is located on the side of the camera.

Pin No.

LENS

DC

No.1 Pin

Damping-

No.2 Pin

No.3 Pin

Drive+

No.4 Pin

Dreve-

Содержание CTNC-5353H

Страница 1: ...own expense Do NOT use power sources other than those specified Do NOT expose this appliance to rain or moisture This installation should be made by a qualified service person and should conform to al...

Страница 2: ...ris Using a C CS mount lens Connecting to a monitor Connecting to power 12 15 15 Components 08 How to Use the Camera Troubleshooting Function Menu Structure How to Set up the Functions LENS SHUTTER WH...

Страница 3: ...in clear and sharp images displayed even in low light Controlled by OSD Menu The camera functions are controlled by selecting text displayed on the monitor screen Additional Functions SENS UP MOTION D...

Страница 4: ...mera Be careful not to leave fingerprints on the lens cover Do not install or use the camera in an environment where the humidity is high If the camera is exposed to spotlight or an object reflecting...

Страница 5: ...AUTO IRIS LENS CONNECTION PLUG 3 L WRENCH 4 C MOUNT ADAPTOR Front Lens protection cap Cover the lens when not using it CS Mount lens adaptor Attach the CS Mount lens here Back Focus clamp screw Loosen...

Страница 6: ......

Страница 7: ...the lens clean Any foreign objects and fingermarks on the lens can cause inferior image quality in low light level conditions When using an auto iris lens 3 Remove the cover of the auto iris lens conn...

Страница 8: ...lect Av mode if possible when adjusting the automatic light control ALC of an auto lens Use of PK mode may cause hunting When using a CS Mount lens 1 Take off the lens protection cap and attach the C...

Страница 9: ...r down by using the UP and DOWN buttons Position the cursor to point to the function requiring adjsutment SETUP menu LENS selection SHUTTER condition and speed control WHITE BALANCE control BACKLIGHT...

Страница 10: ...djust the Lens VR to an appropriate brightness Adjust the Lens VR adjust the BRIGHTNESS and then check if the screen brightness changes properly Otherwise adjust the Lens VR again How to Use the Camer...

Страница 11: ...nction 1 Position the cursor to point to WHITE BAL on the SETUP menu by using the SHUTTER condition and speed control UP and DOWN buttons 2 Select the mode you wish to adjust by pressing the LEFT or R...

Страница 12: ...42dB MIDDLE The gain varies between the range of 6dB 30dB LOW The gain varies between the range of 6dB 18dB OFF The gain is fixed at 6dB When there is a strong backlight behind the object clear image...

Страница 13: ...clear screen image by automatically detecting changes in the level of light in low light level conditions When AGC is turned off DNR does not operate Note 1 Position the arrow to point to SENS UP on...

Страница 14: ...RIGHT button The available ID number of the Camera is 0 255 1 Position the cursor to point to SPECIAL on the SETUP menu by using the UP and DOWN buttons 2 Select the mode required by pressing the UP o...

Страница 15: ...for the camera TITLE Move the cursor to the letter required by using the UP and DOWN button Select an TITLE from A B Y Z a b y z 0 1 8 9 by using the UP DOWN LEFT and RIGHT buttons Lock in the charac...

Страница 16: ...DZOOM mode Please press the SET button The available range of level is 10 X1 0 80 X8 0 When the AGC is turned off COLOR does not operate When an infrared light is used there may be a problem with foc...

Страница 17: ...utton Please press the SET button to save the changes and complete the setting PRIVACY Thismodeconcealstheareasyoudonotwishtoappearonthescreen OFF Cancels the PRIVACY mode ON Operates the PRIVACY mode...

Страница 18: ...ems Nothing appears on the screen The video image is not clear There is a problem with the camera operation The camera surface is too hot and black stripes appear on the screen Check the power connect...

Страница 19: ...alance BLC AGC DNR Sense Up Auto 2X 128X Off Special Mode Camera ID Color On Auto SYNC Sharpness 0 31 Privacy Motion Detection 4 Programmable Zone Mirror D Zoom POWER Supply voltage 12V DC 10 Consumpt...

Страница 20: ...Printed in KOREA H 264 IP Camera Cywatch H 264 IP Camera Cywatch Instruction Guide...

Отзывы: