background image

122

C

AL.

 7

76

4. Correcting the Time Difference of the 

Local Time

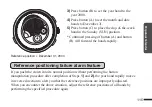
Perform operation with the crown in the normal position.

Pressing the button (A) or the button 

(B) corrects the time difference in 

1-hour increments for each time the 

button is pressed.

(Pressing the button continuously 

causes the hand to advance 

continuously.)

 • Button (A) : Correction is performed 

in clockwise direction.

• Button (B) : Correction is performed 

in counter-clockwise direction.

* Please be sure to press the button until 

the hand starts moving.

* When correcting the time difference, 

please set correctly for AM or PM 

(color of the AM/PM mark)

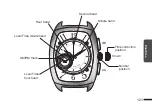
Local Time 

minute hand

AM/PM 

mark

Local Time 

hour hand

(A)

(B)

Содержание 776

Страница 1: ...CAN12 CAN12 2 W205 H70 W100 H70 CAN12 INSTRUCTION MANUAL...

Страница 2: ...equipped with external features calculation scale tachymeter etc Visual guides for operation of such external features can also be found on the website To check the movement number A case number 4 al...

Страница 3: ...depicted in this manual as follows Important instructions are categorized and depicted in this manual as follows DANGER Highly likely to cause death or serious injury WARNING Can cause serious injury...

Страница 4: ...ective stickers and the parts which may result in a skin rash and or corrosion of the metal parts Band adjustment We recommend seeking the assistance of an experienced watch technician for sizing of y...

Страница 5: ...ior to operate your watch Unlock Lock Screw down crown Rotate the crown counterclockwise until it releases from the case Push the crown in to the case With gentle pressure towards the case rotate the...

Страница 6: ...ustomer Registration Card and at the same time we will mail the Campanola Customer Card to you Be sure to keep the Customer Registration Card a tentative warranty with care until the Campanola Custome...

Страница 7: ...r your watch 1 Main Features 78 2 Names of Components 79 3 Before Use 82 4 Setting the Reference Position 84 5 Setting the Time 86 6 Setting the Calendar 89 7 Using the Chronograph 92 8 Troubleshootin...

Страница 8: ...After Sales Service 134 Customer Support Center 136 Service Information Dual time C P 117 Cal 776 1 Features 102 2 Component Names 103 3 Viewing the Watch Indications 105 4 Before Using the Watch Refe...

Страница 9: ......

Страница 10: ...No 677 Grand Complication A 1 Main Features 78 2 Names of Components 79 3 Before Use 82 4 Setting the Reference Position 84 5 Setting the Time 86 6 Setting the Calendar 89 7 Using the Chronograph 92...

Страница 11: ...nd analog quartz watch equipped with minutes repeater function using an electronic tone perpetual calendar function which corrects the date for each month including leap years and a chronograph functi...

Страница 12: ...manual may differ from the actual appearance of your watch 2 Names of Components Moon age Minute hand Chronograph second hand Crown 24 hour hand Button B Button A Second hand Year hand Hour hand Moon...

Страница 13: ...r Chronograph Continuously indicates hours Continuously indicates minutes Continuously indicates seconds Continuously indicates the 24 hour clock Chronograph seconds Continuously indicates the date Co...

Страница 14: ...chime Clockwise direction 1st position 2nd position Button B Chime Start Stop Yearly Monthly correction Counter clockwise direction Setting of chime Counter clockwise direction Button C To chronograph...

Страница 15: ...that the hands are at the positions indicated below Chronograph second hand 00 00 seconds Year and month hands 00 00 12 00 position Press button A for at least 2 seconds and check that the date hand...

Страница 16: ...83 Grand Complication A B C...

Страница 17: ...orming the All Reset procedure the reference position failure alarm will be activated At this time the date hand will turn counter clockwise indicating that the reference position has not been set Whe...

Страница 18: ...second hand to 00 00 seconds 3 Press button C and set the date hand to the position Pressing button A B or C continuously causes the hands to advance rapidly 4 Always make sure to return the crown to...

Страница 19: ...crown to the 2nd position so that the second hand stops at 0 seconds 2 Turn the crown in the clockwise direction so that the hour and minute hands rotate clockwise to set the day The day can be corre...

Страница 20: ...nuosly causes the hands to advance rapidly 3 The basic time and minutes repeater time can be synchronized with a telephone time service or other official time service by pushing in the crown to the 1s...

Страница 21: ...s from 1 00 to 12 00 there is no distinction between AM and PM Minute tone A combination high pitch and low pitch tone will sound for every 15 minutes past the hour The number of minutes past that 15...

Страница 22: ...t is pressed Button B The hand moves backward by 1 month each time it is pressed A B C Moon age correction button Determination of the number of years that have elapsed since the most recent leap year...

Страница 23: ...button C is pressed Pressing button A B or C confinuosly causes the hands to advance rapidly 4 Return in the crown to the normal position Since the day is linked with the operation of the basic clock...

Страница 24: ...n of moon age is shown to indicate the age of the moon and not its shape It can be used as a general indicator of moon age New moon Moon age 0 spring tide First quarter Moon age approx 7 neap tide Ful...

Страница 25: ...nograph Press button C for least 2 seconds to switch from the calendar display to the chronograph display At this time the month and year hands move to the 00 00 position 12 00 position and stop Inter...

Страница 26: ...ss button B to start measuring time 2 Press button B again to end measurement and display elapsed time 3 Pressing button B again restarts measurement and that time is integrated with the previous time...

Страница 27: ...ment continues with the time that elapsed during display of split time added to the measured time the chronograph hands begin to move again Repeat steps 2 and 3 in the case of repeatedly displaying sp...

Страница 28: ...95 Grand Complication B B A A B A B A Reset Measurement End split time measurement Split time display display of final elapsed time Split time End measurement display elapsed time...

Страница 29: ...1st place competitor is being displayed 3 Press button B when the 2nd places competitor crosses the finish line Time measurement will stop at this point The time of the 1st place competitor is still...

Страница 30: ...each mode The hand reference positions may shift if the watch is subjected to a strong impact and so forth Perform the All Reset and Reference Position Setting procedures by referring to 4 Setting th...

Страница 31: ...ry Always make sure to perform the All Reset and Reference Position Setting procedures by referring to 4 Setting the Reference Position after replacing the battery If these procedures are not performe...

Страница 32: ...ange 10 C to 60 C Display Functions Time Hours minutes seconds 24 hour clock Calendar Year month date day moon age Chronograph 12 hour time measurement 1 4 second units split time measurement function...

Страница 33: ...Battery no 280 44 SR927W Battery Life Approx 2 years assuming that the minute repeater sounds for 17 seconds day and chronograph measurement is used for 1 hour per day Specifications are subject to ch...

Страница 34: ...02 2 Component Names 103 3 Viewing the Watch Indications 105 4 Before Using the Watch Reference position verification 107 5 Setting the Time 108 6 Setting the Calendar 109 7 Calling the Calendar 110 8...

Страница 35: ...hours on a 24 hour basis and furnish calendar information year month date and day of the week The calender is a perpetual calender which automatically adjusts the end of each month including the mont...

Страница 36: ...on during normal use of the watch Using the watch with the crown pulled to the first or second click position will shorten the battery life Even while not using leave the crown in the normal position...

Страница 37: ...button B Calls a future calendar forward Adjusts the year Normal position First click position Second click position Calls a past calendar backward Adjust the month and day of the month Pressing butt...

Страница 38: ...105 Perpetual Calendar 3 Viewing the Watch Indications Viewing the time Viewing the calendar Hour hand 24 hour hand Second hand Day of the week Year Date Month Minute hand...

Страница 39: ...ained by dividing by 100 is not divisible by four e g years 1900 and 2100 During the period of 1901 to 2099 a leap year occurs at 4 year intervals according to this regularity and the same calendared...

Страница 40: ...d in the normal position hold down button C for about 2 seconds The year month date and day of the week hands then quickly move to their reference positions 2 Verify that the hands are placed in the r...

Страница 41: ...ng procedure the time and calendar do not coordinate with each other Therefore the calendar indication remains unchanged even if the 24 hour hand passes the 12 midnight point Precautions when Setting...

Страница 42: ...olding down this button rapidly advances the year 3 Press button A to set the month and date The month and date hands coordinate with each other The date hand advances by one day at each press of butt...

Страница 43: ...t is automatically corrected to indicate the first day of the next month after you push the crown into its normal position e g February 30 March 1 The month hand position may slightly deviate from nor...

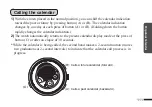
Страница 44: ...A or B Holding down the button rapidly changes the calendar indication 2 The watch automatically returns to the present calendar display mode at the press of button C or after an elapse of 30 seconds...

Страница 45: ...ure alarm feature is activated Properly adjust the reference positions of all hands as directed in Section 9 Adjusting the Reference Positions The calendar indication is incorrect If the watch is seve...

Страница 46: ...ely shocked In this instance properly adjust the reference positions of all hands as directed in Section 9 Adjusting the Reference Positions After battery replacement After battery replacement be sure...

Страница 47: ...r perform the following procedure to adjust the reference position of each hand This procedure must also be completed after battery replacement 1 Pull the crown out to the second click position 2 Simu...

Страница 48: ...d the hands rapidly Reference positioning failure alarm feature If you push the crown into its normal position without performing the button manipulation procedure after completion of Steps 1 and 2 th...

Страница 49: ...unctions Time hour minute second 24 hour hand Calendar year month date day of the week Perpetual calendar Additional functions Function to access the past and future calendars Reference positioning fa...

Страница 50: ...Dual time Dual time C 1 Features 118 2 Names of Components 119 3 Setting the Time 120 4 Correcting the Time Difference of the Local Time 122 5 Low Battery Warning Function 123 6 Specifications 124 Ca...

Страница 51: ...function that simultaneously displays time using an ordinary three hand display home time as well as local time The Local Time enables adjustment in 1 hour increments through a simple button operatio...

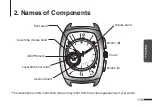
Страница 52: ...f Components Local time minute hand AM PM mark Local time hour hand Button B Crown Button A Second hand Hour hand The illustrations in this instruction manual may differ from the actual appearance of...

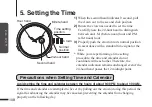
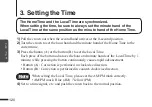
Страница 53: ...and of the Home Time to the current time 3 Press the button A or the button B to set the Local Time Each press of the button advances the hour and minute hands of the Local Time by 1 minute while pres...

Страница 54: ...121 Dual time B A Second hand AM PM mark Local Time hour hand Minute hand Time correction position Crown Normal position Local Time minute hand Hour hand...

Страница 55: ...utton is pressed Pressing the button continuously causes the hand to advance continuously Button A Correction is performed in clockwise direction Button B Correction is performed in counter clockwise...

Страница 56: ...ion the second hand switches to two second interval movements the second hand moves in two second interval movements every two seconds Even at this time the watch runs accurately however please have t...

Страница 57: ...5 C to 35 C Operating Temperature Range Watch operating temperature range 10 C to 60 C Display functions Hours minutes seconds Local Time hours minutes AM PM mark Additional functions Dual time funct...

Страница 58: ...hargeable cell with ordinary garbage Please follow the instructions of your municipality regarding collection of batteries to prevent the risk of fire or environmental contamination CAUTION Battery Re...

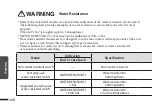
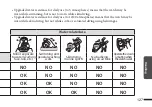
Страница 59: ...nce Refer to the watch dial and the case back for the indication of the water resistance of your watch The following chart provides examples of use for reference to ensure that your watch is used prop...

Страница 60: ...nwhen thewatchiswet NO NO NO NO NO OK NO NO NO NO OK OK NO NO NO OK OK OK NO NO Upgraded water resistance for daily use to 5 atmospheres means that the watch may be worn while swimming but is not to w...

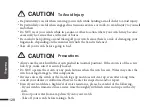
Страница 61: ...re going to bed CAUTION Precautions Always use the watch with the crown pushed in normal position If the crown is of the screw lock type make sure it is securely locked Do NOT operate the crown or any...

Страница 62: ...g to the properties of the material Moreover wet leather may cause a rash It is recommended to take off the watch if it gets wet even if the watch itself is water resistant Do not wear the band too ti...

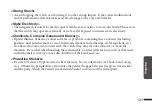
Страница 63: ...the watch may be impaired in extremely high or low temperature Do not use the watch in places where the temperature is outside the operating temperature range as stated in the specifications Magnetis...

Страница 64: ...her solvents or products containing these solvents including gasoline nail polish remover cresol bathroom cleaners and adhesives water repellent etc are allowed to come into contact with the watch the...

Страница 65: ...ation and dirt can soil sleeves and other portions of clothing Keep your watch clean at all times The case and band of the watch come into direct contact with the skin If you think there is something...

Страница 66: ...ion avoiding locations subject to excessively high or low temperatures and high humidity When Luminous Paint is used for your watch The paint on the dial and hands helps you with reading the time in a...

Страница 67: ...d is damaged a spare parts with a different appearance may sometimes be used Repair period You can make use of fee charging repair within the patts stock period after expiration of free guarantee Plea...

Страница 68: ...cleaning once every 5 years as a guide Batteries The battery which was installed in your watch at the factory is a monitor use battery which monitors the functions and special features of your watch...

Страница 69: ......

Отзывы: