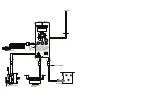
Camp Chef SMOKEPRO PG24-3 Скачать руководство пользователя страница 4

ASH CUP

1. Install Ash Cup as shown in Fig 5.  Never use grill without Ash 
    Cup in place. 

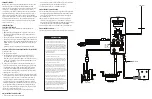
HEAT DEFLECTOR AND DRIP TRAY


1. Install the Heat Deflector and Drip tray as shown in 
    Fig 6 and Fig 7.

3.  Install M6 x 76 Bolt through chimney cap and secure using Qty (1) 

M6 nut. Thread second nut onto bolt leaving approximately 1.5” 
to the top of the cap. Thread cap assembly down into the chimney 
bracket until the lower nut hits the bracket. See Fig 2.

4.  The height of the chimney cap can be adjusted for summer and 

winter. In the summer the gap should be approximately 1-1/2”. In 
the winter the gap should be approximately ½”.

5. Tighten all hardware.
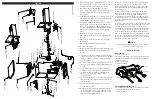
INSTALL HANDLE

1. Install the handle as shown in figure 3.
2. Tighten all hardware.

INSTALL SHELF

1. Install shelf as shown in Fig 4.  
2. Tighten all hardware

GREASE BUCKET

1. Hang grease bucket from tube as shown in Fig 4.

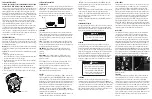
WARMING RACK AND COOKING GRATE

1. Install the Warming Rack and Cooking Grate as shown in Fig 8. 

CLEAN-OUT PORT KNOB

1.  Clean-out Port knob must be pushed in when grill is on. Make 

sure pullout lock is pushed down and locks the knob to prevent 
inadvertent opening of the clean-out port.  See Fig 9.

2. Lift pullout lock and pull clean-out port knob to empty ash into 
    ash cup. See Fig 10
3. See instructions for burner clean-out.

PROBE

1. Plug the Meat Probe into the Probe receptacle on the control 
    panel. Run the probe and wire through the probe access hole on 
    the side of the grill. See Fig 11.  
2. See instructions for Meat Probe.

BURNER CLEAN-OUT

Before each use the burner should be cleaned out by lifting the 
pullout lock and pulling the clean-out port knob on the right side 
of the grill to open the burner clean-out. This will allow the ash 
from previous use to fall into the cup under the grill. The cup 
should be removed and emptied and then reinstalled before 
each use. 

After cleaning out the burner make sure to close the burner 
clean-out by pushing the clean-out port knob in on the right side 
of the grill. Make sure to lift the pullout lock and push the
 clean-out port knob all the way in and lock in place with the 
pullout lock. Every 50 hours of use, remove the grill grates, grease 
tray, and heat deflector and clean the inside of the grill. If you 
notice a lot of ash blowing around in the grill it is time to vacuum
it out.

WARMING RACK

COOKING GRATE

CLEANOUT PORT CLOSED

CLEANOUT PORT OPEN

Fig. 9

WARMING RACK

COOKING GRATE

CLEANOUT PORT CLOSED

CLEANOUT PORT OPEN

Fig. 10

PROBE

PROBE HOLE

Fig. 11

Never Operate the Pellet grill without the 
ash cup in place.

Make sure the burner clean-out port is 
closed and locked before starting the grill. 

Never open the burner clean-out port when 
the grill is hot.

DANGER

WARMING RACK

COOKING GRATE

CLEANOUT PORT KNOB

CLEANOUT PORT KNOB

WARMING RACK

COOKING GRATE

CLEANOUT PORT CLOSED

CLEANOUT PORT OPEN

Fig. 8

Fig. 2

M6 HANDLE SCREW

HANDLE DEFLECTOR

M6 X 15 SCREW

GREASE BUCKET

ASH CUP

Fig. 4

ASH CUP

Fig. 5

Fig. 3

M6 HANDLE SCREW

HANDLE DEFLECTOR

M6 X 15 SCREW

GREASE BUCKET

ASH CUP

Fig. 6

Fig. 7

HEAT DEFLECTOR

DRIP TRAY

HEAT DEFLECTOR

DRIP TRAY

HEAT DEFLECTOR

DRIP TRAY

HEAT DEFLECTOR

DRIP TRAY

M8 X 55 BOLT

M8 FLANGE NUT

M6 X 15 SCREW

M6 NUT

M6 FLAT WASHER

M6 LOCK WASHER

CHIMNEY GASKET

M6 NUT

M6 X 76 BOLT

Содержание SMOKEPRO PG24-3

Страница 1: ...PELLET GRILL AND SMOKER WARNING INSTRUCTION BOOKLET MODEL NUMBER PG24DLX 3 PG24 3 PG24S 3 5003132 Conforms to UL SUBJECT 2728 Certified to CSA STD C22 2 3...

Страница 2: ...nia to cause cancer Avoid inhaling dust generated from wood products or use a dust mask or other safeguards to avoid inhaling dust generated from wood products Wood products emit chemicals known to th...

Страница 3: ...appliance as a heater 5 Do not operate appliance under ANY overhead construction Keep a minimum clearance of 10 feet 3 m from the sides front and back of appliance to ANY construction Keep the area cl...

Страница 4: ...Probe BURNER CLEAN OUT Before each use the burner should be cleaned out by lifting the pullout lock and pulling the clean out port knob on the right side of the grill to open the burner clean out Thi...

Страница 5: ...PELLETS FEED SETTING IS NOT FOR NORMAL USE The first time you use your grill or any time the hopper has ran out of pellets you will need to fill the auger tube This simply means you must fill the auge...

Страница 6: ...nd the auger is not you will need to replace the auger pin If problem cannot be resolved please call customer service DIGITAL READOUT DISPLAYS SENSR 1 Turn the power off and unplug the grill 2 Check t...

Страница 7: ...thick fat caps down to a quarter inch Rinse and pat dry to prepare to apply the dry rub Coat the butt liberally with dry rub being sure to cover all sides and spaces This can be done up to one day bef...

Страница 8: ...4DLX 3 PG24 3 PG24S 3 www CampChef com 1 800 650 2433 Camp Chef is a registered trademark of Logan Outdoor Products 2016 Patent Pending 3985 N 75 W Hyde Park UT 84318 USA Made in China 0216_PG24_Instr...

Страница 9: ...d alimentation Ensemble du r servoir granules Pied gauche Bouchon du pied Rondelle plate M10 2 crou borgne M10 2 R cipient cendres Roulette Axe de roulette Pied droit Boulon M8 x 55 8 Seau de collecte...

Страница 10: ...liser en toute s curit 4 Destin un usage EN PLEIN AIR uniquement NE PAS utiliser l int rieur d un immeuble d un garage ou de tout autre endroit ferm NE PAS utiliser dans un v hicule r cr atif ou sur u...

Страница 11: ...le syst me de blocage de la tige est tir vers le bas et bloque le bouton afin d emp cher l ouverture de la zone de nettoyage par inadvertance Voir la Fig 9 2 Soulever le syst me de blocage de la tige...

Страница 12: ...e fum e HIGH SMOKE Ce r glage est utilis pour fumer des aliments une temp rature moyenne de 104 C 220 F Il produit beaucoup de fum e 175F TO 400F Ce r glage permet d augmenter la temp rature par tranc...

Страница 13: ...UMER Le barbecue refuse de s allumer apr s avoir positionn l interrupteur sur la position Marche 1 S assurer que le barbecue est branch sur une prise secteur aliment e V rifier le disjoncteur et ou di...

Страница 14: ...ommande Sonde RTD Cordon d alimentation Blanc Rouge Blanc Orange Blanc Mauve Tige d allumage Connecteur MOLEX Fusible Allumage en mode bypass Sonde Alimentation Attention Utiliser uniquement le param...

Отзывы: