Camfil – Clean Air Solutions 9
8 Camfil – Clean Air Solutions
9 TAKING INTO OPERATION
First, read the entire Technical Manual.
ONLY APPROPRIATELY QUALIFIED ELECTRICIANS MAY CARRY OUT WORK WITH ELECTRICAL
CONNECTIONS. YOU MUST BE ABLE TO TURN OFF THE POWER SUPPLY WITHOUT TOUCHING
THE UNIT.
Connect the air purifier to the electrical outlet. Ensure that there is nothing obstructing
the air outlets / inlets (see figure below how to operate).
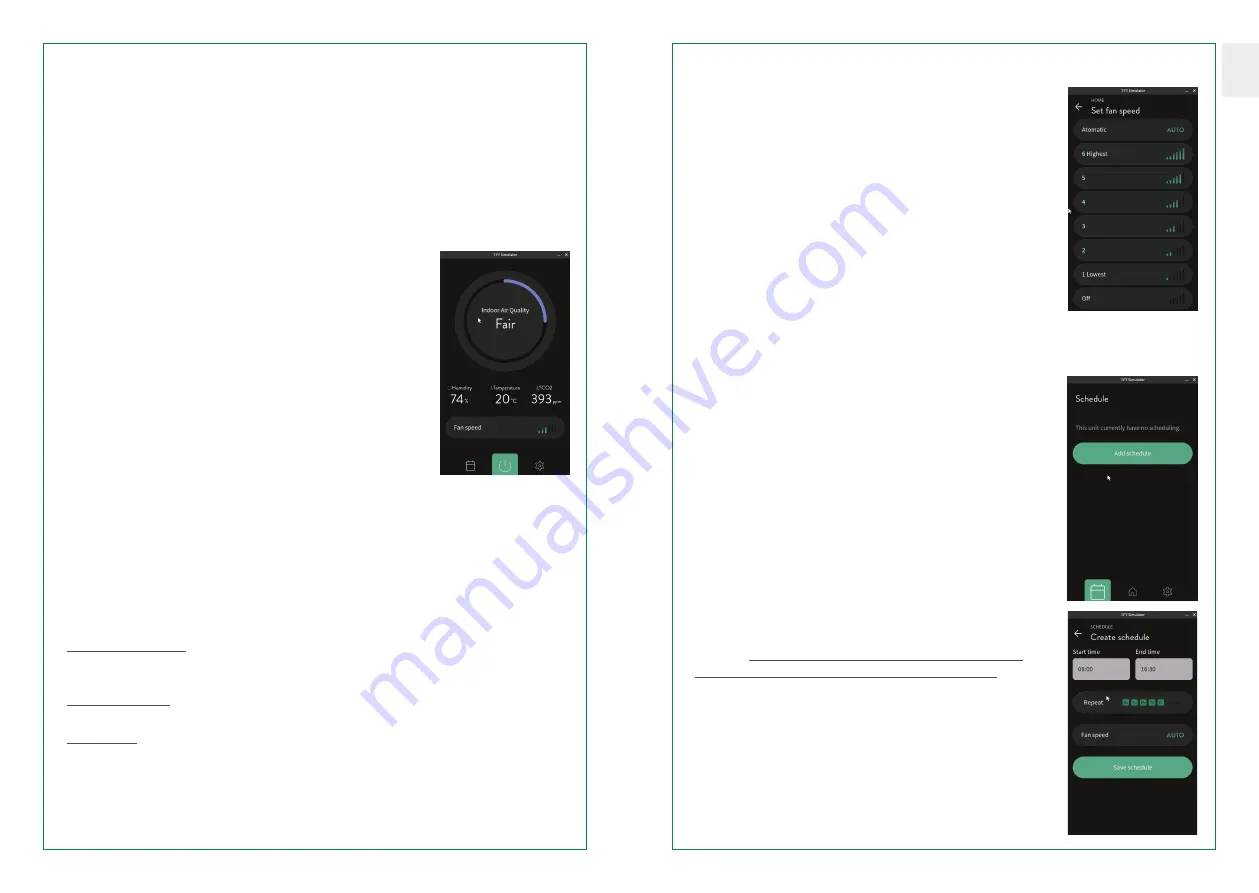
MAIN SCREEN
In the upper half of the display there is an air quality indicator.
This indicator will show ”
fill
” or ”
empty
” depending on the air
quality in real time. The higher the air quality, the fuller the
indicator. At the same time, the colour of the indicator will change
according to the quality.
The higher the quality the colour will change to a light turquoise
and the lower the quality the colour will change to a dark purple.
These colours correspond to the colours used on the dashboard
web page. The change of colour is produced by jumps of 5% in
quality, i.e. from 0% to 100% we have 20 defined colours.
Inside the indicator there is a text that indicates the quality range
we are in:
•
Poor:
< 20%
•
Fair:
< 40%
•
Average: < 60%
•
Good:
< 80%
•
Excellent: > 80%
The text ”
Indoor Air Quality
” is used as a title and does not change at any time.
The lower half is further divided into 3 sections. From top to bottom:
1
Environmental values
:
These are measures of environmental qualities over which the device
has no influence. (
Humidity / Temperature / CO
2
) The unit is capable of displaying these
measurements due to its multiple sensors.
2
Fan speed selector
:
It is an action button, if we press it the application takes us to the fan
speed/operation mode selection screen.
3
Button panel
:
This button panel has 3 buttons, from left to right:
•
Schedule:
when pressed, the application takes us to the schedule display/renewal screen.
•
Shutdown:
when pressed, the application takes us to the shutdown/reset screen.
•
Settings:
when pressed, the application takes you to the device settings screen.
ENG
FAN SPEED/MODE SELECTION
This screen is used to select the speed/mode in which our
fan operates. It can be called from the main screen to set the
current speed/mode or from the calendar edition to select the
programmed speed/mode.
The screen shows the following action buttons:
•
Automatic
:
By pressing this button we indicate the system to
manage the fan speed by itself, that is, depending on the air
quality.
•
From 6 to 1:
We indicate to the system that the speed
management will be manual and the level at which we want
the fan to be set. Speed 6 is highly recomended for short quick
air cleaning situations.
•
Off
:
We indicate to the application to pay the fan.
TIMETABLE
Add timetable
When we click on the timetable button and we have not yet defined
a timetable, the application displays the following screen:
This screen shows a text warning us that the team has not yet
defined a timetable and offers us an action button to add a new
one. By pressing this button, the application will take us to the
timetable editing screen.
EDITING TIMETABLE/SCHEDULE
In this screen we can configure all the aspects related to the
timetable, from top to bottom:
• Start time and end time.
These selectors allow us to choose the
time at which the programmed operation of the equipment starts
and ends. To select a time, simply press the selector and drag
your finger up or down until the desired time is displayed
.
• Repeat.
This is an action button that takes us to the screen for
selecting the days on which our programmed operation will
take place.
• Fan speed.
This is an action button that will take us to the speed/
operation mode selection screen.
• Save schedule.
When we have finished configuring the 3 options
of our timetable, we can click on this button to save them. If any
of the options are not configured, the button will be disabled,
this is to avoid saving a timetable without the necessary
configurations for its operation.


