18
Section 3
Model 289A Differential Pressure Indicating Switch
4. Check the pointer for zero indication. If necessary, set the pointer to zero
by slipping the pointer on the hub, per
Calibration Check
, step 2,
page
15
.
5. Apply 100% pressure. If the pointer exceeds full-scale, lengthen the
movement range arm by adjusting the range adjust screw with a 1/8-in.
open-end wrench.
6. Release pressure. Set the pointer to zero, by slipping the pointer on the
hub, per
Calibration Check
, step 2,
page 15
.
7. Repeat steps 4 and 5, as necessary, to obtain the correct zero/full-scale.
8. Apply 50% DP. If the pointer indicates 50%, proceed to step 9. If the
pointer does not indicate 50% scale, adjust linearity as follows.
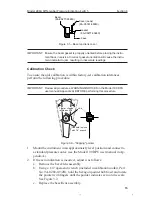
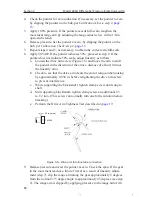
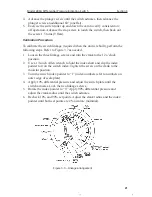
a. Loosen the drive arm screw (Figure 3.5) and move the arm to shift
the pointer in the direction of the error a distance of about 10 times
the linearity error.
b. Check to see that the drive arm clears the end of torque-tube housing
by approximately 0.030 in. before retightening the drive arm screw
to prevent interference.
c. While supporting the block/shaft, tighten clamp screw until snug to
shaft.
d. Still supporting block/shaft, tighten clamp screw an additional 1/3
to 1/2 turn. (This screw can normally turn one full revolution before
breaking.)
e. Perform the Drive Arm Tightness Test described on
page 19
.
1/8” WRENCH
(PN 9A-0163-0044C)
CLAMP SCREW
DRIVE ARM
LINK
SINTERED
CLAMP BLOCK
TO TIGHTEN
.03 (approx)
M224
SHAFT
Figure 3.5—Drive arm to torque tube connection
9. Release pressure and reset the pointer at zero. Check the span. If the gear
in the movement reaches a limit of travel as a result of linearity adjust-
ment (step 7), slip the range arm along the gear approximately 5 degrees
from the normal 37.5 degree angle to approximately 43 degrees (see step
2). The range arm is slipped by applying pressure to the range arm with
Содержание BARTON 289A
Страница 75: ...R U S S I A ms kl c a m com 603 5569 0501 ...


