CAME Wi-Fi PLX V Скачать руководство пользователя страница 27

Page 

27

  - Manual 

 - FA01792-EN

  - 10/2022 © CAME S.p.A. - The contents of this manual may be changed at any time and without notice.  - Translation of the original instructions
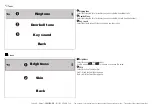
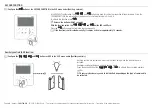
Video toggling

PLX V WIFI

PLX V

PLX V

Where there are calls on more than one device, all devices will ring, but the video will only be 
activated on the Wi-Fi PLX V, which is always confi gured as the MASTER.
Press the 

 button on the secondary PLX V video receiver (SLAVE) you would like to transfer 

the video to.

To answer the call from the secondary PLX V video receiver, press 

.

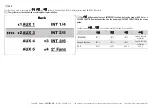
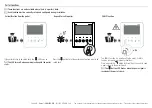
Communication between internal receivers (INTERCOM function)

INT. 1

INT. 2

To start communicating with another internal receiver (INTERCOM), press the button associated 
with the internal receiver you want to call (

 or 

)

Press the 

 button on the video receiver receiving the call to answer.

 If the line is busy, you will hear three consecutive beeps.

 During a conversation between internal receivers, the devices beep every 5 seconds 

to signal a call from the outside.

 Calls between internal receivers cannot be managed via the app.

Содержание Wi-Fi PLX V

Страница 1: ...Wi Fi PLX V Wi Fi PLX V BF OPERATING AND INSTALLATION MANUAL FA01792 EN EN English...

Страница 2: ...rtphone or tablet running the app must not block VoIP apps Remotely controlling the device via the app means consuming your smartphone tablet home network s data traffic The cost of this consumption i...

Страница 3: ...its life cycle in compliance with the laws in force in the country where the product is used The recyclable components are marked with the material symbol and ID THE DATA AND INFORMATION IN THIS MANU...

Страница 4: ...auxiliary control AUX 5 activation button 5 OSD menu activation and browsing button 6 Activate deactivate communication and send PANIC SIGNAL button 7 Activate and select the entry panel video and AU...

Страница 5: ...DOOR RELEASE enabled AUTOMATIC DOOR RELEASE disabled Incoming call Communication in progress PANIC SIGNAL sent Ringtone volume off The porter would like to be called back Incoming call DOOR STATUS act...

Страница 6: ...2 472 Transmission power dBm 16 Material colour White Average life hours 150 000 Before installing the product keep it at room temperature where it has previously been stored or transported at a very...

Страница 7: ...ality Reinforced concrete load bearing stone wall Wooden plasterboard hollow brick wall Install the internal receiver away from metal objects that may shield the signal and from devices that generate...

Страница 8: ...support to the back box Observe the TOP arrow Round back box 60 mm tube Rectangular horizontal back box 503 Rectangular vertical back box 503 Ophera PHI back box The box must be installed at an approp...

Страница 9: ...F ON ON Function of terminals 1 Local power supply input 14 18 V DC 2 BUS line input 3 Landing call 4 Alarm input Function of the DIP switch 5 DIP switch 1 KIT BUILDING mode 6 DIP 2 Closing resistor A...

Страница 10: ...not be called at the same time To use all of the device and VideoEntry app functions power the device locally If communication is active with the entry panel commands can be sent from the VideoEntry a...

Страница 11: ...1 2 KIT KIT KIT SLAVE SLAVE SLAVE 1 2 ON 1 2 ON 1 2 ON 1 3 4 2 Cable length Section Cable type La Lb VCM 1D or UTP CAT5 L1 L2 L3 VCM 2D Section Maximum section length La Lb 100 with VCM 1D 30 with UT...

Страница 12: ...i PLX V Wi Fi 1 2 KIT 1 2 KIT 1 2 KIT 1 2 KIT 1 3 4 2 VAS 101 Lb PLX V Wi Fi 1 2 Lc SLAVE SLAVE KIT 1 2 ON 1 2 ON 1 Section Max section length m Max section length m La Lb 100 with VCM 1D cable 20 wit...

Страница 13: ...ess and hold the button The LED switches on to con rm the function was activated The DOOR STATUS function is active by default It is automatically deactivated when the OPEN GATE and GATE STATUS functi...

Страница 14: ...tems and the button to con rm your choice Select BACK to return to the previous screen at any time Select to exit the menu and turn off the screen During use in systems in BUILDING mode the following...

Страница 15: ...anual may be changed at any time and without notice Translation of the original instructions Menu layout Video voicemail Voicemail messages Settings Language Wi Fi CAMEConnect Voicemail settings Tones...

Страница 16: ...You can add a customised audio message before recording starts See Voicemail settings Select to activate the function or to deactivate it The current activation or deactivation status is underlined Vo...

Страница 17: ...ned Choose your desired con guration mode 1 Con guration via VideoEntry app 2 Con guration via WPS button 1 Con guration from app You need to install the VideoEntry app available from the Apple App St...

Страница 18: ...device by choosing to proceed with a new con guration the old network will be overwritten and the device disconnected Wi FiNetwork_1 Wi FiNetwork_2 Select a network to connect Back A STOP Please pres...

Страница 19: ...ia VoIP Connection to CAMEConnect must be active to receive calls on the VideoEntry app Select to activate the function or to deactivate it The current activation or deactivation status is underlined...

Страница 20: ...sy message OFF Back With voicemail activated select one of the following options A Answer delay For calls the answer delay is the number of seconds after which voicemail is activated and you are consi...

Страница 21: ...elay Use the arrows and to select the answer time and press to con rm B Courtesy message Select to activate the courtesy message when the voicemail service is active or to deactivate it 1 Select Recor...

Страница 22: ...dies you can associate with external calls 2 Doorbell tone Select to display the list of melodies you can associate with calls from the doorbell 3 Key sound Select to activate or deactivate sound when...

Страница 23: ...l may be changed at any time and without notice Translation of the original instructions Time zone Back Thursday 11 Nov 2021 Europe Rome 1 Set the date and time by choosing the continent and time zone...

Страница 24: ...g INTERCOM control The system must be con gured accordingly during installation Back The button cannot have an INTERCOM function but can be used as AUX 5 or as a SECOND FUNCTION activation button See...

Страница 25: ...DEMO mode Demo mode is designed for demonstration systems If Demo mode is activated you are disconnected from the con gured Wi Fi network Device information Model PLX V WI FI HW version 0 0 SW versio...

Страница 26: ...essed from the outside the video receiver rings To answer a call press Press the button to open the door Press the button again to end the call Video activation Press the button to activate video comm...

Страница 27: ...E you would like to transfer the video to To answer the call from the secondary PLX V video receiver press Communication between internal receivers INTERCOM function INT 1 INT 2 To start communicating...

Страница 28: ...e LED on the button The function must be activated during system programming Press and hold the button for more than 3 seconds to send an open or close gate command The DOOR STATUS function is active...

Страница 29: ...ion press Release the button within 2 seconds With the function active the and button LEDs will ash Press the button again to disable the function manually If the function is not disabled manually it...

Страница 30: ...tion from the porter Request for call to porter PANIC function 2s If the porter wishes to be called back the LED turns on The LED turns off when communication with the porter starts Press the button t...

Страница 31: ...receiver When the alarm contact is activated an emergency signal is sent directly to the porter s desk The video receiver will beep intermittently to signal activation Audio settings During a call pre...

Страница 32: ...he arrows and to select the parameter you want to set Brightness Saturation Use the arrows and to increase or decrease the value of the selected parameter Video settings cannot be changed during a cal...

Отзывы: