


-10-
I
T
ALIANO—ENGLISH—ESP
AÑOL
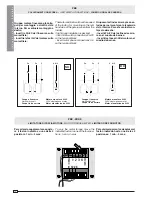
FUSIBILE
ACCESSORI 2A
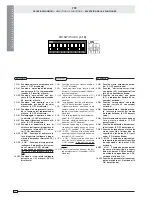
QUADRO COMANDO
12
11
13 14 15 16 17 18 19 20
O
N
2
1
3
4
5
6
7
8
9 10
O
N
FUS. LINEA 8A
ZBK
ZBKE
APRE
CHIUDE
CH2
CH1
EN
CO
D
ER
AF
1
2
3
4
11
7
9
8
5
10
6
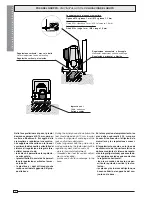
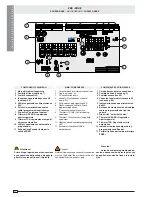
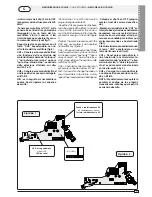
ZBK - ZBKE
COMPONENTES PRINCIPALES
1 Caja de bornes para las conexiónes
2 Fusible de linea (véase pág. 9)
3 Fusibles accesorios 2A
4 Conexión tarjeta radiofrecuencia AF
(vedas pág. 20)
5 Indicador luminoso de alimentación
de 24V
6 Botones de memorización del código
radio y programación de final de
carrera
7 Dip-switch "seleción función"
8 Trimmer AP.PARZ.: Regulación
Apertura parcial
9 Trimmer TCA: Regulación cierre
automático
10 Indicador luminoso código radio y
programación codificador
11 Tarjeta fija Encoder (solo para tarjeta
ZBKE)
Atencion!
Antes de cualquier operación de co-
nexión o desconexión de las tarjetas hay
que quitar la tensión de línea a la instala-
ción.
MAIN COMPONENTS
1
Terminal block for external connections
2
Line fuse (see p. 8)
3
2A accessories fuses
4 Socket AF radiofrequency board
(see p. 20)
5
24V power-supply signalling LED
6
Radio-code save and limit-switch
programming buttons
7
"Function selection" dip-switch
8
Trimmer AP.PARZ.: Partial opening
adjustment
9
Trimmer TCA: automatic closing time
adjustment
10 Radio-code and encoder-programming
LED
11 Encoder mother board (ZBKE
motherboard)
Caution!
Before doing any connection or disconnection
work on the board, the system must be dis-
connected from the power supply.
COMPONENTI PRINCIPALI
1 Morsettiere di collegamento
2 Fusibile di linea (vedi pag. 7)
3 Fusibili accessori 2A
4 Innesto scheda radiofrequenza AF
(vedi pag. 20)
5 LED di segnalazione alimentazione a
24V
6 Pulsanti memorizzazione codice
radio / programmazione finecorsa
7 Dip-switch "selezione funzioni"
8 Trimmer AP.PARZ.: regolazione
apertura parziale
9 Trimmer TCA: regolazione tempo di
chiusura automatica
10 LED di segnalazione codice radio e
prog.encoder
11 Scheda fissa Encoder (solo per la
scheda ZBKE)
Attenzione!
Prima di ogni operazione di connessione
o sconnessione delle schede, bisogna to-
gliere la tensione di linea all’impianto.
SCHEDA
BASE
-
MOTHERBOARD
-
TARJETA
BASE