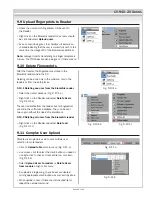
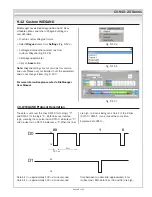
background image

CV-940-20 Series

9.12 Custom WIEGAND

BioManager has defined Wiegand 26 and 34 bit as 
standard options and other 3 Wiegand settings as  
user definable.

• 

To setup custom Wiegand format

• 

Select 

Wiegand

 menu from 

Settings 

(Fig. 9.12 a)

• 

At Wiegand setup window select one from  

  customs Wiegand (Fig. 9.12 b)

• 

Set Wiegand parameter

• 

Click on 

Save

 button

Note:

 Wiegand settings are out of scope for common 

end user. Please ask your installer to set the parameters 
and do not change it later. (Fig. 9.12 c)

For more information please refer to BioManager 

User Manual

Page 19 of 21

Fig. 9.12 a

Fig. 9.12 b

Fig. 9.12 c

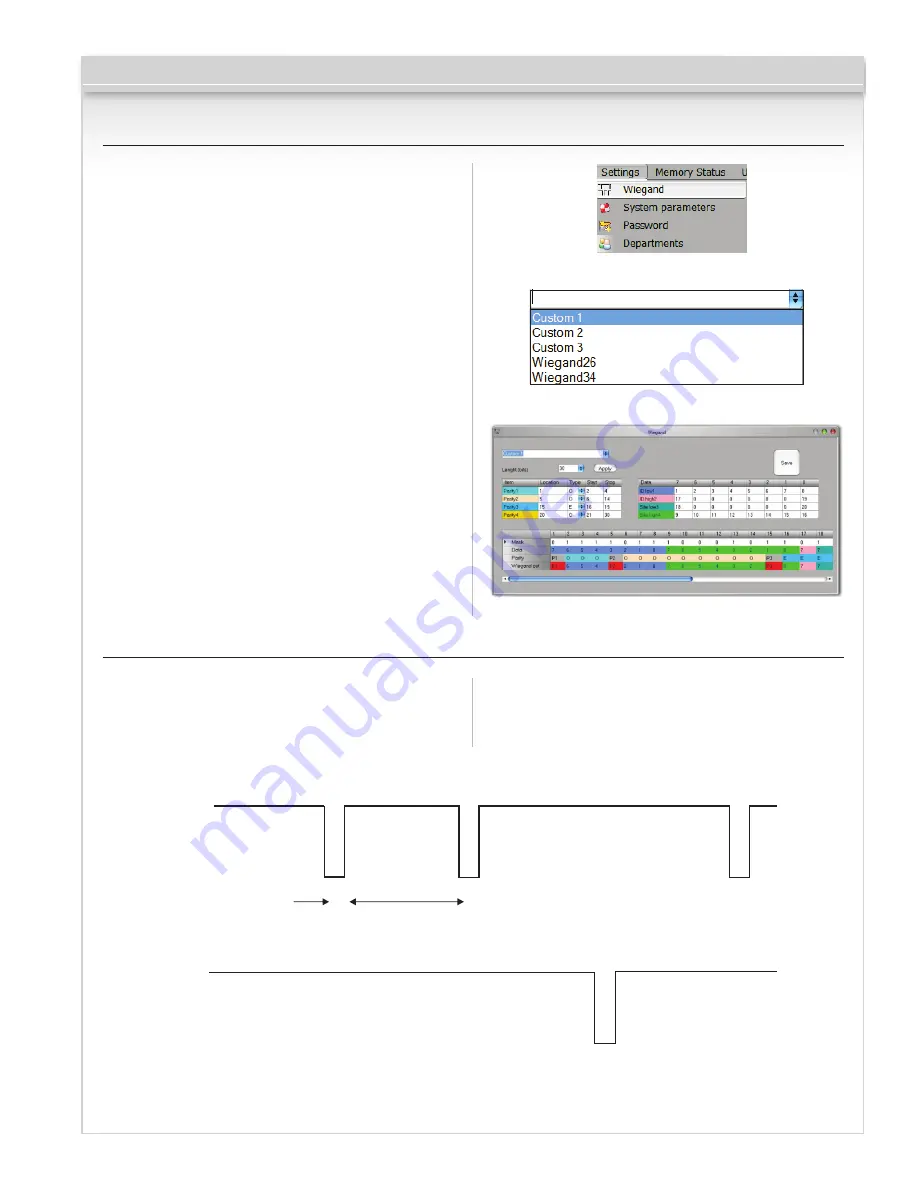
10. WIEGAND Protocol Description

The data is sent over the lines DATA 0 for the logic “0” 
and DATA 1 for the logic “1”. Both lines use inverted 
logic, meaning that a pulse low on DATA 0 indicates a “0” 
and a pulse low on DATA 1 indicates a “1”.When the lines 

are high, no data is being sent. Only 1 of the 2 lines  
(DATA 0 / DATA 1 ) can pulse at the same time.

Example: data 0010....

Data bit 0 = approximately 100 us (microseconds) 
Data bit 1 = approximately 100 us (microseconds)

Time between two data bits: approximately 1 ms 
(millisecond). Both data lines (D0 and D1) are high.

5V

0V

5V

1 ms

100 us

0V

D0

D1

00

1

0

Содержание CV-940-20 Series

Страница 1: ...CV 940 20 Series Biometric Keypad Reader Installation Instructions ...

Страница 2: ...5 Uploading the fingerprints to the Biometric readers 11 8 6 Firmware update 12 8 7 Entry Mode 12 8 7 1 Finger or PIN Code 12 8 7 2 Finger and PIN Code 12 8 7 3 Finger Only 12 8 8 Change PIN Code length 13 8 9 Sensor calibration 13 8 10 Send Configuration 13 8 11 Advanced setting 14 9 Configuring the Biometric Readers in BioManager 14 9 1 add reader 15 9 2 edit reader 16 9 3 delete reader 16 9 4 C...

Страница 3: ...erface Wiegand 8 to 128 bits Default Wiegand 26bit Protocol programming By CAMS software CV 350 system and BIOMANAGER all access control systems Cable distance 50m Fingerprint Sensor Type Capacitive 1 1000 identification time 970 msec including feature extraction time Fingerprint enrolment On the reader or from the USB desktop reader CV 350ER Panel Connection Cable 1m Green and Red LED Externally ...

Страница 4: ...rature can drop below 10ºC or and if the sensor could only be exposed to direct sunlight it is strongly recommended to install the reader inside a third party sealed wall mount box fitted with additional heater if very low temperature to keep a constant sensor level performance Camden cannot guarantee the functionality of the product if measures and advice before are not followed It is also strong...

Страница 5: ...or Sensor1 Exit Button1 Exit Button2 GND GND Free In 2 Free In 2 Free In 1 Free In 1 Rx Tx Busy System OK Door 1 Door 2 Free Out 1 Free Out 2 TCP IP Earth 12Vdc Out 12V gnd D1 D0 12V gnd led2 led1 12V IN1 IN1 IN2 IN2 D1 D0 12V gnd led2 led1 PB2 PB1 DS2 DS1 gnd gnd COM NC1 NO1 NC2 NO2 COM COM NC3 NO3 NC4 NO4 COM GND B A gnd Fuse Ser No 11 04 16 013 Mac 00 04 A3 16 90 D RoHS pink violet green orange...

Страница 6: ...st be twisted and shielded with a min 0 01 in 0 2 mm 2 cross section Connect the ground 0V of each unit in the RS 485 Line using a third wire in the same cable The shield of the communication cable between two devices must be connected to the EARTH from ONE side of the RS485 Line Use the side that has earth connection to the building s grounding network RS485 Jumper for RS485 termination 1 km max ...

Страница 7: ...ust be established The Biometric readers communicate with each other with a RS485 and with the PC Software through a Converter The RS485 Line should be configured in the form of a daisy chain NOT in a form of a star Keep the stubs from the RS485 backbone as short as possible not more than 5 meters Only one converter per installation is needed not per reader BIOMANAGER Software RS485 A RS485 B A B ...

Страница 8: ...will appear Biometric Go to that tab and put the serial number of the Biometric Reader 8 3 Important Note The serial number of the reader can be found on a sticker inside the reader on the packaging box and it can be search from the software right click on the portal search devices readers 8 4 8 5 To check if the reader is On Line right click on the reader and select Check version In the Event Win...

Страница 9: ...lick on Save New and the fingerprint will be sent automatically to all Biometric Readers where that user has access i e to all the readers according to the Access Level assign to that user Example If the user has Unlimited Access level then the fingerprints will be sent to all readers if the user has Access level only for Reader1 and Reader 3 then the fingerprints will be sent only to those two re...

Страница 10: ...rprint will be sent automatically to all Biometric Readers where that user has access i e to all the readers according to the Access Level assign to that user If the reader is off line the fingers will be sent upon the connection is established between CAMS server and the reader No need for additional enrollment or actions The fingerprints will be sent as soon as communication is established Examp...

Страница 11: ...b Go to the fingertip that needs to be deleted right click and select Delete for one finger or Delete All for all fingers of the User Click Save Changes With this procedure the User s fingerprints are deleted from the software and from the reader 8 16 8 14 8 16 8 15 Page 11 of 21 8 5 Uploading the Fingerprints to the Biometric Readers Right click on the biometric reader Select Upload all users to ...

Страница 12: ... of 21 8 7 Entry Mode 8 7 1 Finger or PIN Code Right click on the biometric reader Select Properties and go to the Biometric tab For Entry Mode select Access Code or Finger 8 20 8 7 2 Finger and PIN Code Right click on the biometric reader Select Properties and go to the Biometric tab For Entry Mode select Access Code and Finger 8 21 Use of the double security mode Type the PIN Code ex 3434 in the...

Страница 13: ...n the Users Window the PIN Code will require 6 digits entry 8 26 8 24 8 25 8 26 Page 13 of 21 8 9 Sensor Calibration Right click on the biometric reader and select Calibrate and wait for confirmation message Note It is recommended to do a calibration while commissioning the reader and in cases when there are problems with reading the fingers 8 10 Send Configuration Right click on the reader and se...

Страница 14: ...y Bio sensor sensitivity the recommended value is 7 most sensitive Page 14 of 21 9 Configuring the Biometric Readers in Biomanager BioManager is software for fingerprint management of Camden Biometric readers when used with third party access controllers Main functions Fingerprint Enrollment It can be done by ANY Biometric reader in the network or by Desktop USB Biometric reader Fingerprint Transf...

Страница 15: ...lected portal Right click on reader and select Version info Fill the Reader form Page 15 of 21 If reader is online new line is added on top of the event table If reader is not online following line is added on top of the event table If reader is online right click on reader and select Upload configuration Check at event table if configuration was successful ...

Страница 16: ...lect Calibrate See the events panel to check the calibration flow It is recommended to do sensor calibration once after reader is mounted Clean the fingerprint sensor before calibration 9 5 Add User At user table click on the last empty user field and enter user name Click on ID User code field and enter ID number This number will be sent by the reader to the access controller when user finger is ...

Страница 17: ...nfirm warning message Fig 9 7 a Fig 9 8 a Fig 9 8 b Fig 9 8 c Fig 9 7 b 9 8 Enroll Fingers Select the User in the User Column not the check box the check box is for sending the fingerprints and the User name cell will turn blue Select the Biometric reader or Desktop reader CV 350ER from where the enrollment will be done Fig 9 8 a Right click on the fingertip and select Enroll Fig 9 8 b Swipe the f...

Страница 18: ...ct the users checkbox Fig 9 10 1 a Right click on the Reader and select Delete Users Fig 9 10 1 b The user is deleted from the reader but his fingerprints are still in the software s database They can be sent ones again without the need of re enrollment 9 10 2 Deleting all users from the biometric reader Right click on the Reader and select Delete all Fig 9 10 1 c 9 11 Complex User Upload Complex ...

Страница 19: ...r more information please refer to BioManager User Manual Page 19 of 21 Fig 9 12 a Fig 9 12 b Fig 9 12 c 10 WIEGAND Protocol Description The data is sent over the lines DATA 0 for the logic 0 and DATA 1 for the logic 1 Both lines use inverted logic meaning that a pulse low on DATA 0 indicates a 0 and a pulse low on DATA 1 indicates a 1 When the lines are high no data is being sent Only 1 of the 2 ...

Страница 20: ...ty calculated over the bits 14 to 25 Y E A A A A A A A A B B B B B B B B B B B B B B B B O 11 Safety Precautions Do not install the device in a place subject to direct sun light without protective cover Do not install the device and cabling close to a source of strong electro magnetic fields like radio transmitting antenna Do not place the device near or above heating equipments If cleaning do not...

Страница 21: ... tricolor LED is green but the controller reports other ID number and the access is denied If the user is not deleted from the reader and the same user is enrolled again with new ID the reader will recognize the finger with the first ID To resolve this delete all users from the reader and upload all users to the reader Check the Wiegand Bus yellow white wire Check if the ground of the controller a...

Отзывы: