background image

6

LTR20231170

9/23/2023 

www.calspas.com

7

Chill Spa Quick Start Guide

4.   Water level


Fill the spa up to 4’’ from the rim of the spa. Once the Chill Spa is filled 

reinstall the filter clockwise. 

DO NOT OVER TORQUE/TIGHTEN 

this can 

damage the damage the filter housing over time. once the filter is back 

in its place you can slide the skimmer back onto the filter housing. the 

skimmer slides into the hilter housing with two sliding tabs on the top of 

the skimmer. 


The water level will shift once a person enters the Chill Spa, adjust your 

water level based on the shift of the waterline once the unit is being 

used. 


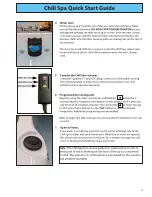
5.   Connect the Chill Spa to power. 


 Using the supplied 15 amp GFCI plug, connect it to the outlet running   

 from the dedicated 15 amp circuit. Once connected press the “jets”  

 button to prime the internal pump.


6.  Programing the Cooling unit. 


Begin by using the main spa controls and hold the           button for 2 

seconds and the temperture will appear on the display. once it does you 

may let go of that button and press the cool button         to lower the spa 

to 39 F, once that is done press the “

Set

” button to save the desired  

temperture. Additional programing may be needed.  


Refer to page 25 if after one hour has passed and the temperture has not 

lowered.  

7.   Open Air Vents.


 Once water is circulating, press the switch on the left hand side of the  

 Chill spa to open and close the air vent. When the air vents are opened  

 this allows more pressure to exit the jets for a deeper massage. this will  

 assist in clearing the plumbing of any air pockets. 

Note: 

The Chill Spa has several paths for condensation to exit. A 

small pool of water forming on the base of the spa is considered 

normal. The amount of condensation varies based on the weather 

and ambient humidity. 

Содержание THE CHILL SPA

Страница 1: ...1 LTR20231170 9 23 2023 www calspas com 1 LTR2031170 9 23 2023 S I N C E 1 9 7 8 THE CHILL SPA PLATINUM SERIES 2023 Owner s Manual QUICK START GUIDE QUICK START GUIDE LTR 117000937...

Страница 2: ...ces such as lights telephones radios televisions and etc within 5 feet 1 5 meters of the spa Never attempt to operate any electrical device from inside the spa Replace a damaged power cord immediately...

Страница 3: ...air from the cooling of the Chill Spa The Chill Spa is designed for outdoor use for proper airflow allow up to 3 5 feet of space around the unit without obstructions DO NOT OBSTRUCT THE EXHUAST VENTS...

Страница 4: ...provide much privacy Think of your spa s surroundings during all seasons to determine your best privacy options Consider the view of your neighbors as well when you plan the location of your Chill Spa...

Страница 5: ...s before reinstallation 3 Filling the Chill Spa Preventing airpockets in the plumbing is essential for this reason insert the hose through the filter canister to prevent air pockets from forming failu...

Страница 6: ...jets button to prime the internal pump 6 Programing the Cooling unit Begin by using the main spa controls and hold the button for 2 seconds and the temperture will appear on the display once it does...

Страница 7: ...he UP TEMP arrow key Controller will display current spa temperature Use the UP or DOWN arrow keys to select desired temperature To enter new temperature press SET key The controller will Lock in the...

Страница 8: ...on knowing when to heat to maintain water temperature The Economy mode starts when the heater is turned off and the spa is not in use Upon entering the ECONOMY mode the message ECON is displayed Durin...

Страница 9: ..._______________________________ ___________________________________ ___________________________________ ___________________________________ ___________________________________ ________________________...

Страница 10: ...________________________________ ___________________________________ ___________________________________ ___________________________________ ___________________________________ _______________________...

Страница 11: ...________________________________ ___________________________________ ___________________________________ ___________________________________ ___________________________________ _______________________...

Страница 12: ...2 23 Contact Information For customer service please contact your authorized dealer immediatly Aditional information or additional assistance contact LMS Customer Service Department 1462 East Ninth St...

Отзывы: