background image

7

LTR20231170

9/23/2023 

www.calspas.com

9

Setting Temperature and Time

This Chill Spa is equipped with a SmarTouch Control System.

SmarTouch Digital comes to you with a universal set of default settings. If you choose to keep these set-

tings, then you only need to remember 2 things: how to set the spa temperature and to press the SET key 

whenever you are done using the spa.

WIRING DIAGRAM FOR SC-1100 (JR.)

WIRING DIAGRAM FOR SC-3000

IN A HURRY - READ THIS

SmarTouch Digital comes to you with a universal set of default

settings.  If  you  choose  to  keep  these  settings,  then  you  only

need to remember 2 things: how to set the spa temperature and

to press the SET key whenever you are done using the spa.

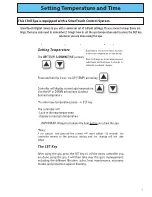
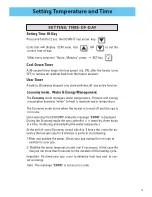
Setting Temperature

The 

UP

(TEMP) & 

DOWN

(TIME) arrows.

Press and hold for 2 sec. the UP (TEMP) arrow key.

Controller will display current spa temperature.

Use the UP or DOWN arrow keys to select 

desired temperature.

*To enter new temperature press 

→ 

SET key.

The controller will:

- Lock-in the new temperature.

- Display current spa temperature.

IMPORTANT: Always turn down the heat before you drain the spa.

*Note:

Both buttons are used to select, increase

or decrease temperature or time setting.

Note: Both keys are active when pressed

individually  and held down 2 seconds, to

eliminate accidental changes.

Page 23

If  no  buttons  asre  pressed  the  screen  will  reset  within    30  seconds  the 

controller  reverts  to  the  previous  setting  and  the  change  will  not  take 

effect.

The SET Key

After using the spa, press the SET key to tell the micro controller you 

are done using the spa. It will then take over the spa’s management, 

including the different filtration cycles, heat maintenance, economy 

modes and protection against freezing.

Page 4

Содержание THE CHILL SPA

Страница 1: ...1 LTR20231170 9 23 2023 www calspas com 1 LTR2031170 9 23 2023 S I N C E 1 9 7 8 THE CHILL SPA PLATINUM SERIES 2023 Owner s Manual QUICK START GUIDE QUICK START GUIDE LTR 117000937...

Страница 2: ...ces such as lights telephones radios televisions and etc within 5 feet 1 5 meters of the spa Never attempt to operate any electrical device from inside the spa Replace a damaged power cord immediately...

Страница 3: ...air from the cooling of the Chill Spa The Chill Spa is designed for outdoor use for proper airflow allow up to 3 5 feet of space around the unit without obstructions DO NOT OBSTRUCT THE EXHUAST VENTS...

Страница 4: ...provide much privacy Think of your spa s surroundings during all seasons to determine your best privacy options Consider the view of your neighbors as well when you plan the location of your Chill Spa...

Страница 5: ...s before reinstallation 3 Filling the Chill Spa Preventing airpockets in the plumbing is essential for this reason insert the hose through the filter canister to prevent air pockets from forming failu...

Страница 6: ...jets button to prime the internal pump 6 Programing the Cooling unit Begin by using the main spa controls and hold the button for 2 seconds and the temperture will appear on the display once it does...

Страница 7: ...he UP TEMP arrow key Controller will display current spa temperature Use the UP or DOWN arrow keys to select desired temperature To enter new temperature press SET key The controller will Lock in the...

Страница 8: ...on knowing when to heat to maintain water temperature The Economy mode starts when the heater is turned off and the spa is not in use Upon entering the ECONOMY mode the message ECON is displayed Durin...

Страница 9: ..._______________________________ ___________________________________ ___________________________________ ___________________________________ ___________________________________ ________________________...

Страница 10: ...________________________________ ___________________________________ ___________________________________ ___________________________________ ___________________________________ _______________________...

Страница 11: ...________________________________ ___________________________________ ___________________________________ ___________________________________ ___________________________________ _______________________...

Страница 12: ...2 23 Contact Information For customer service please contact your authorized dealer immediatly Aditional information or additional assistance contact LMS Customer Service Department 1462 East Ninth St...

Отзывы: