background image

• AC power:
Use the provided power cord, plug one end into the back of the HBC 433DAB-BT and plug
the other end (euro plug) into a wall socket.
• DC power:

1. On the bottom of the radio, remove the battery cover by following the tabs illustrated

[OPEN].

2. Insert 6 pcs. 1.5V size ‘C’/UM-2/R14 batteries (not included).
3. Make sure the polarities of batteries are according to indications marked.
4. Close the battery compartment.
Battery precautions:
• If the radio is not used for a long period of time, remove the batteries to prevent damage
from possible battery leakage.
• Do not try to recharge batteries which are not intended to be recharged, they can overheat
and rupture. Follow the battery manufacturer instructions (Battery compartment has no
charge function!).
• Dispose of batteries safely.
Note: loud music and bass need more energy than e.g. spoken text.

VOLUME CONTROL 

Adjust the volume level by the volume knob 

SETTING THE CLOCK 

The date and time of the radio is automatically set once it receives DAB/DAB+ radio broadcast 
signals (and when such info is available).  
You may also set the date and time in DAB or FM mode manually.    Please see the detail in 
DAB or FM menu 

DAB/DAB+ RADIO 

Press the Source button to DAB mode 
Press Scan button to do auto full scan and some stations are automatically stored with suitable 
signal strength. After the search is complete, the first stored station is broadcast automatically. 

*If the signal is weak or distortion in DAB mode, try to align the telescopic antenna vertically

DISPLAYING DAB INFORMATION 

Press INFO button to the following information (if available). 

Frequency

Ensemble name

Time

Date

CONNECTING THE UNIT

Содержание HBC433DAB-BT

Страница 1: ...ENGLISH...

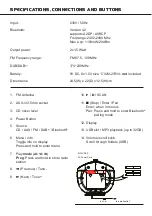
Страница 2: ...ter menu 7 Play mode Prog Press and hold to store radio station 8 5 Previous Tune 9 6 Next Tune 10 1 2 SCAN 11 3 Stop Enter Pair Enter when in menu s Pair Press and hold to enter Bluetooth pairing mod...

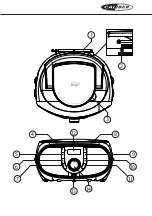
Страница 3: ...USB SOURCE SCAN TUNE TUNE MENU INFO MODE PROG ENTER PAIR VOLUME SCROLL D I G I T A L C O M PACT DISC PLAYER PORTABLE CD STEREO R A D I O S Y S T E M AUX IN 1 2 3 4 6 7 8 9 10 11 12 13 14 5...

Страница 4: ...e unit to control the playback Press the mode button to choose Repeat 1 repeat all random intro Note to switch back to other modes use the SOURCE button 5 Connecting by Bluetooth Choose Bluetooth mode...

Страница 5: ...it 5 Press and hold 5 6 to scan to the previous next available FM radio station Short press 5 6 to fine tune Storing a radio station to a preset 1 Tune to the desired FM radio station 2 Press and hold...

Страница 6: ...ment has no charge function Dispose of batteries safely Note loud music and bass need more energy than e g spoken text VOLUME CONTROL Adjust the volume level by the volume knob SETTING THE CLOCK The d...

Страница 7: ...he asterisk behind the option indicates the current setting 4 Prune Press Previous Next button to choose No or Yes Press the Select button to confirm the selected No or Yes No Return to the previous m...

Страница 8: ...button to choose the instruction then press Enter button to save Timeout 10 20 30 45 60 90 120 180seconds or On On level High Medium or Low Dim level High Medium or Low The asterisk behind the option...

Страница 9: ...hen you tune to an FM radio station that transmits RDS signals the station name is displayed Press Info button the following RDS information if available Radio text Program type such as NEWS SPORT POP...

Страница 10: ...confirm the preset station The DAB or FM station is stored with the selected preset number Repeat steps 1 4 to store more preset stations PRESET STATION RECALL Press the Program button Press the Prev...

Страница 11: ...of sound quickly Press Mode button to choose Repeat 1 Repeat All Random Intro function Press Stop button to stop the playback USB Press the Source button to USB mode Connect the USB memory into the U...

Страница 12: ...Stop button twice to cancel the programmed track list Repeat function is available for programmed track list AUX Press the Source button to AUX mode Use 3 5mm jack Aux In cable not included to connec...

Страница 13: ......

Страница 14: ......

Страница 15: ...genskapskrav och vriga relevanta best mmelser som framg r av direktiv 2014 53 EU RED 2009 125 EC ERP och 2011 65 EU RoHS PL Niniejszym Caliber o wiadcza e HBC433DAB BT jest zgodne z zasadniczymi wymag...

Страница 16: ...WWW CALIBER NL CALIBER EUROPE BV Kortakker 10 4264 AE Veen The Netherlands...

Отзывы: