1. It will be necessary to remove all water from the interior plumbing.
2. Remove the floating weir, basket, and filter cartridge. Clean the filter cartridge and store in a dry place. Attach the vacuum hose to the
vacuum side
of the shop vac
and thoroughly dry the filter compartment.
3. Using the shop vac, remove the water starting with the jets at the top and moving to the ones at the bottom of the spa.
NOTe:
When removing the water from jet openings, you may notice suction coming from another jet. With the help of a second person, block off any suction from
the other jet using a large rag or cloth. This will help pull out the water that is trapped deep inside the main line.
4. Thoroughly dry the spa shell with a clean towel.
5. Using a funnel, pour Propylene glycol
anti-freeze into the filter suction fittings and jet outlets. Add enough anti-freeze until the liquid starts to come out of the bottom
drain.
CaUTION: Use only Propylene glycol as your anti-freeze. This is non-toxic. NeVer use automobile anti-freeze since it is toxic.
6. Close the spa cover and fasten the cover tie downs. If your area receives a lot of snow or ice, it is recommended to cover the spa cover with two pieces of plywood
forming a pitched roof top to prevent snow and ice build-up. Secure a plastic sheet or tarp over the spa cover and one over the plywood.
WarNING:
When not in use, the spa must be covered with an insulating spa cover. Damage caused by either sun exposure or freezing is not covered under
warranty.
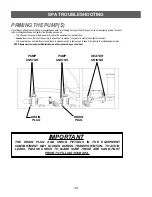
7. In the pump side of the equipment control bay, remove the pump drain plug located on the front of the pump housings. Allow all water to drain out. Place the drain
plug in a reclosable plastic storage bag and store near the pump. Replace the drain plugs on start-up. (Refer to the Figure above)
8. Unscrew the suction/discharge pump and heater unions and allow the water to drain. Leave union loose.
NOTe:
Tighten unions before filling spa.
9. Replace the equipment and pump doors and secure with screws.
OPENINg INSTRUCTIONS:
1. Remove plywood and plastic sheet. Open the spa cover by unfastening the cover tie downs.
2. Follow the Start-up and Refill Procedures in the Operating Instructions section of the Owner’s Manual. Do not install filters to prevent them from exposure to the
anti-freeze.
3. As part of this process, superchlorinate the spa water by adding three teaspoons of chlorine (sodium dichlor) per 250 gallons of spa water into the filter
compartment. This is twice the normal amount of chlorine needed for superclorination. This extra amount of chlorine is needed to destroy the anti-freeze.
NOTe:
A defoamer may be needed to decrease the amount of foam caused by the anti-freeze.
4. Drain your spa to ensure removal of anti-freeze. Do not drain water on grass or plants due to excessive chlorine level.
5. After the spa has completely drained, re-install your filter and follow the Start-up and Refill Procedures in the Operating Instructions section of the Owner’s Manual.
IMPOrTaNT:
Always keep spa covered when not in use, whether it is empty or full.
ACTS INvAlIdATINg wARRANTY
The limited warranty is void if the
Caldera
spa has been improperly installed, subjected to alteration, misuse, or abuse, or if any repairs on the spa are attempted by
anyone other than an authorized representative of Watkins Manufacturing Corporation. Alteration shall include any component or plumbing change, electrical conversion,
or the addition of any non-approved sanitation or water purification device or heating system which contributes to component or unit failure or unsafe operating system.
Misuse and abuse shall include any operation of the spa other than in accordance with Watkins Manufacturing Corporation printed instructions, or use of the spa in an
application for which it is not designed; specifically: use of the spa in a non-residential application; damage caused by operation* of the spa at water temperatures outside
the range of 35°F and 120 °F; damage caused by a dirty, clogged or calcified filter cartridge; damage to the spa surface caused by the use of tri-chloro chlorine, BCDMH,
misuse of chemical tablets in a floater, acid, or any other spa chemicals or spa surface cleaners which are not recommended by Watkins Manufacturing Corporation;
damage caused by allowing undissolved spa sanitizing chemicals to lie on the spa surface (no spa surface material can withstand this kind of abuse); damage to
components or spa surface caused by improper water chemistry maintenance; and damage to the spa surface caused by leaving the spa uncovered while empty of
water and in direct exposure to sunlight (this may cause solar heating distress in warm weather regions). These are considered abuses and may invalidate this warranty.
*Operation of the spa does not mean “use” of the spa! Watkins Manufacturing Corporation does not recommend using the spa if the water temperature is above or below
the spa’s control panel temperature range.
dISClAIMERS
Watkins Manufacturing Corporation shall not be liable for loss of use of the
VaCaNza
series spa or other incidental or consequential costs, expenses or damages,
which may include but are not limited to, the removal of a permanent deck or other custom fixture. Any implied warranty shall have a duration equal to the duration of the
applicable warranty stated above. Under no circumstances shall Watkins Manufacturing Corporation or any of its representatives be held liable for injury to any person or
damage to any property, however arising.
wATkINS CUSTOMER SERvICE
If you have any questions about any aspect of your
VaCaNza
series spa set-up, operation or maintenance that have not been answered by this manual, consult your
Caldera
dealer.
Watkins Manufacturing Corporation can be reached at: 800-669-1881 (Extension 8432), Monday through Friday, 8 am to 5-pm Pacific Standard Time (PST), or e-mail at
MaINTeNaNCe
32
Содержание PLT1S1001
Страница 1: ...VACANZA SERIES 2 0 1 4 O W N E R S M A N U A L ...
Страница 39: ......


