background image

4. Select the desired street name with the correct

prefix from the list (Dr., Ln., St., etc.).

5. Once a street has been selected the Cross Street

screen button will become available. Select the
Cross Street button and start entering the cross
street name.

If five or less names are available, a list will display.
If more than five are available, there will be a
screen button with a number in it, it represents
the number of available cross streets. Select this
button to view the list.

6. Select the street name with the correct prefix from

the list (Dr., Ln., St., etc.). An Information screen
will automatically display.

7. Select the Go screen button. The map screen, with

the destination marked, will display.

8. Select the route preference (Fastest, Shortest, or

Other). The system will calculate and highlight
the route.

9. Select the Start Guidance screen button. You are

now ready to start your route.

See “Getting Started on Your Route” later in this
section for more information.

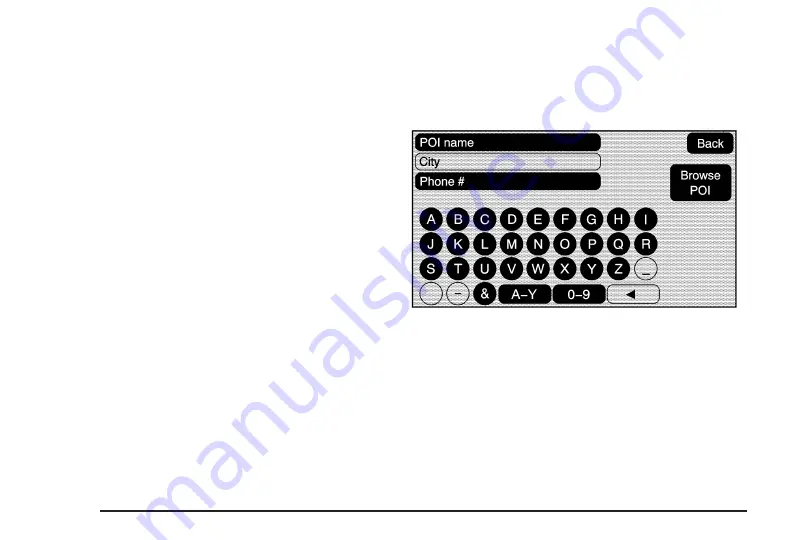
Point of Interest (POI)

The Point of Interest (POI) destination entry method
allows you to select a destination from the POI list.

i

Point of Interest: Touch this screen button to

access the Point of Interest (POI) screen. From this
screen you have two options to select/enter a destination;
enter the name using the alpha keyboard or select a
category from the category list.

2-18

Содержание SRX 2008

Страница 1: ...1 Overview 1 2 Features and Controls 2 1 Features and Controls 2 2 Navigation Audio System 3 1 Navigation Audio System 3 2 Voice Recognition 4 1 Voice Recognition 4 2 Index 1 2008 Cadillac SRX Navigation System M ...

Страница 2: ...ements the owner manual This manual includes the latest information available at the time it was printed We reserve the right to make changes in the product after that time without notice For vehicles first sold in Canada substitute the name General Motors of Canada Limited for Cadillac Motor Car Division whenever it appears in this manual Keep this manual with the owner manual in the vehicle so i...

Страница 3: ...r from Helm Incorporated P O Box 07130 Detroit MI 48207 1 800 551 4123 www helminc com Propriétaires Canadiens On peut obtenir un exemplaire de ce guide en français auprès de concessionnaire ou à l adresse suivante Helm Incorporated P O Box 07130 Detroit MI 48207 1 800 551 4123 www helminc com iii ...

Страница 4: ... NOTES iv ...

Страница 5: ...Overview 1 2 Navigation System Overview 1 2 Getting Started 1 4 Cleaning the Video Screen 1 11 Section 1 Overview 1 1 ...

Страница 6: ...Overview Navigation System Overview Screen shown with Map Disc Inserted 1 2 ...

Страница 7: ...e 2 2 for more information K FAV Favorite Key See Storing Preset Stations under Navigation Audio System on page 3 2 for more information L V Zoom In Touch Screen Button See Map Scales under Maps on page 2 4 for more information M Mark Touch Screen Button See Adding Destinations to the Address Book under Destination on page 2 14 for more information N CD DVD Slot See CD Player on page 3 11 or DVD P...

Страница 8: ...ping your mind on the drive is important for safe driving See Defensive Driving in the Index of your vehicle s owner manual for more information Get familiar with your vehicle s navigation system so you can use it with less effort and take full advantage of its features Your navigation system includes not only navigation but also audio functions While your vehicle is parked Familiarize yourself wi...

Страница 9: ...uently or for too long while driving can cause a crash and you or others can be injured or killed Keep your eyes and mind on the road and avoid looking too long or too often at the moving map on the navigation screen Use the voice guidance directions whenever possible The navigation system allows you to do the following Plan a route with provided turn by turn route and map guidance with voice prom...

Страница 10: ...formation from the map disc When getting started you may set the navigation system to your preference or delete information you may have entered using various options To do so reference the following topics Language English Metric To change the language of the navigation screens see DIC Vehicle Customization in the Index of your vehicles owner manual To change the navigation screens from English o...

Страница 11: ... Entering an Address and Point of Interest and Storing Preset Destinations Before entering an Address Point of Interest Home or Preset Destination select the appropriate region that contains the final destination Your vehicle must be in PARK P to perform this operation Setting the Search Area To set the search area do the following 1 If the radio is already on with a map disc inserted skip to Step...

Страница 12: ...If five or less names are available for the entered characters a list will display If more than five are available there will be a screen button with a number in it it represents the number of available cities Select this button to view the list and select a city 8 Once a city is selected the street name category will automatically be selected for entry Start entering the street name Do not enter ...

Страница 13: ... O power knob to turn the system on 3 Insert the DVD map disc See Installing the Map DVD under Maps on page 2 4 for more information 4 A caution may appear Touch the OK screen button to proceed 5 Press the DEST hard key 6 Press the i Point of Interest screen button 7 Enter the specific title of the POI in the POI name space i e Washington Monument If five or less names are available a list will di...

Страница 14: ...tton from the map screen to add the current final destination as a preset destination The address book screen will appear 7 Select the Name screen button An alpha keyboard will display Enter the name 8 Press and hold one of the screen buttons at the bottom of the screen until a pop up confirmation displays The name will appear in that preset destination screen button and is now available to select...

Страница 15: ... to start your route See Preset Destination under Destination on page 2 14 for more information Canceling Guidance Guidance will be canceled once you arrive at your final destination To cancel guidance prior to arrival at the final destination do the following 1 Press the DEST hard key 2 Press the Cancel Guidance screen button Guidance Volume To adjust the volume of voice guidance prompts do the f...

Страница 16: ... NOTES 1 12 ...

Страница 17: ...ymbols 2 8 Destination 2 14 Configure Menu 2 29 Global Positioning System GPS 2 37 Vehicle Positioning 2 38 Problems with Route Guidance 2 39 If the System Needs Service 2 39 Ordering Map DVDs 2 40 Database Coverage Explanations 2 40 Section 2 Features and Controls 2 1 ...

Страница 18: ...tment Press this knob to access the Sound screen to adjust bass midrange treble and equalization or Digital Signal Processing DSP if the vehicle has the Bose sound system Turn the tune knob to go to the next or previous radio station See Navigation Audio System on page 3 2 for more information Z CD DVD Eject Press the eject button to eject CDs or DVDs NAV Navigation Press this key to view your veh...

Страница 19: ...e information Touch Sensitive Screen Buttons Touch sensitive screen buttons are located on the screen When a screen button has been selected a beep will sound Screen buttons are highlighted when a feature is available Alpha Numeric Keyboard Letters of the alphabet symbols punctuation and numbers when available will display on the navigation screen as an alpha or numeric keyboard The alpha keyboard...

Страница 20: ...restrictions etc A detailed area will include all major highways service roads and residential roads The detailed areas include points of interest POI such as restaurants airports banks hospitals police stations gas stations tourist attractions historical monuments etc The map database may not include data for newly constructed areas or map database corrections that are completed after the product...

Страница 21: ...ng to load it Read the following steps completely before operating this feature 1 Turn the ignition on 2 Press the O power knob to turn the navigation system on 3 Touch the OK screen button to agree to the Caution screen A Map DVD Slot 4 Touch the Insert Map Disc screen button The screen will tilt to access the map DVD slot 5 Load the map DVD partway into the slot The system will pull it in 6 Once...

Страница 22: ...peatedly until Nav is selected or touch the Nav screen button 2 Touch the Map Database Information screen button 3 Touch the Change screen button The screen will tilt exposing the map DVD slot and the map DVD will eject Pull the disc out 4 Touch the Close screen button The screen will close Handling the DVD Map Disc When handling the DVD map disc be careful of the following Handle the disc very ca...

Страница 23: ...across the map Move your finger in any direction on the map screen and the map will continue to scroll in that direction until you remove your finger If scrolling while your vehicle is in PARK P the system will scroll initially at a slower rate It will increase if you continue touching the map screen If scrolling while your vehicle is in motion you have one scroll speed and a limited distance to s...

Страница 24: ...l will appear on the map after a route has been planned marking your final destination The waypoint symbol will display on the map after a waypoint has been added to your route The waypoint symbol will be numbered from one through three depending on how many intermediate waypoints have been set The distance to destination symbol indicates the distance to your final destination It only appears when...

Страница 25: ...own as North Up mode While in North Up mode the vehicle icon will follow the north direction on the map regardless of which direction the vehicle is traveling Select this screen symbol to switch between North Up and Heading Up modes The heading up symbol indicates the map with the vehicle travel direction up known as Heading Up mode The shaded triangle indicates the North direction While in Headin...

Страница 26: ...store the point in the address book See Adding Destinations to the Address Book under Destination on page 2 14 for more information Displaying Points of Interest POI on the Map Screen Touch anywhere on the map to display the POI Point of Interest screen button Select the POI screen button to display or delete POI icons from the map Displaying POI icons on the map let you know where POIs i e restau...

Страница 27: ... categories POI Close to Once a category has been selected select this screen button to display the list of available POIs for the selected POI categories The list provides the POI icon the name the direction and the distance to the POI from your vehicles current position Use the scroll arrows to move up and down the list Use the Sort by DIST distance Icon Name and on Route as desired Go Press thi...

Страница 28: ...p screen Select OFF to remove the POI icons from the map screen List all Categories Select this screen button to list all POIs sorted alphabetically Clear To delete a category do one of the following To delete the last added POI category select the Clear screen button To delete a specific POI category 1 Select the category 2 Select the subcategory 3 A pop up confirmation will display Select the De...

Страница 29: ...ection and how many miles or kilometers you are from it When you are approximately 1 2 mi 08 km from the next maneuver the screen will display the name and a detailed view of the next maneuver Auto Reroute When your destination is set and you are off the planned route the system will automatically plan a new route and begin to reroute You will be able to see the new route highlighted on the screen...

Страница 30: ...page 2 14 or Change the selected region in the search area when entering your destination and route settings See Destination on page 2 14 For example if you were traveling from Michigan to Florida change the region currently selected in the search area to Florida Enter a destination in Florida under the Destination Entry menu Destination Press the DEST key to access the Destination Entry screen Fr...

Страница 31: ...n and to view a list of states included in the region selected The selected area will be highlighted on the map Touch the down arrow to select CAN Canada Touch the back screen button to return to the Destination Entry screen and to store the selected region To enter a destination choose from one of the following destination entry methods Address Entry 6 Address Entry The address entry destination ...

Страница 32: ...Street name category will automatically be selected for entry Start entering the street name If five or less names are available a list will display If more than five are available there will be a screen button with a number in it it represents the number of available streets Select this button to view the list 6 Select the street name with the correct prefix Dr Ln St etc from the list 7 Once a st...

Страница 33: ...here will be a screen button with a number in it it represents the number of available cities Select this button to view the list and select a city 6 Once a city has been selected the numeric keyboard will display allowing you to enter the house number The system will display the house number range that is available for the street 7 Select the Go screen button The map screen with the destination m...

Страница 34: ...ion screen will automatically display 7 Select the Go screen button The map screen with the destination marked will display 8 Select the route preference Fastest Shortest or Other The system will calculate and highlight the route 9 Select the Start Guidance screen button You are now ready to start your route See Getting Started on Your Route later in this section for more information Point of Inte...

Страница 35: ...stination entry method by selecting a category do the following 1 Press the DEST hard key 2 Select the i Point of Interest screen button 3 Select the Browse POI screen button to view the list of POI categories 4 Select a category and then a sub category The system will display available POI names in the selected sub category or if the list is too long the system will display the alpha keyboard If ...

Страница 36: ...e following 1 Press the DEST hard key 2 Select the 7 Previous Destination screen button 3 Select a previous destination from the list Use the arrow to the right of the destination to view the entire destination name as necessary Use the scroll arrows to the left to scroll through the list 4 Select the Go screen button next to the destination The map screen with the destination marked will display ...

Страница 37: ...ress the DEST hard key 2 Select the Address Book screen button A list of your address book addresses will display 3 Select the Go screen button next to the destination The map screen with the destination marked will display 4 Select the route preference Fastest Shortest or Other The system will calculate and highlight the route 5 Select the Start Guidance screen button You are now ready to start y...

Страница 38: ...o find the area that you would like to select as your destination Pressing holding and dragging your finger on the map will activate fast scrolling 4 Press touch once on the area that you would like to set as your destination The map screen will display the address information 5 Select the Go screen button The map screen with the destination marked will display 6 Select the route preference Fastes...

Страница 39: ...enter the direction of the latitude coordinate Enter the numeric portion of the latitude coordinate 5 Touch E east or W west next to Long longitude to enter the direction of the longitude coordinate Enter the numeric portion of the longitude coordinate 6 Once both coordinates are entered select the OK screen button The map screen with the destination marked will display 7 Select the route preferen...

Страница 40: ...s section for information on how to add a preset destination To use the preset destination entry method do the following 1 Press the DEST hard key 2 Select the desired preset destination screen button The screen buttons are labeled with the name that was selected for the destination when it was stored The map screen with the destination marked will display 3 Select the route preference Fastest Sho...

Страница 41: ...cess the Route screen Turn List Turn List Touch this screen button to view the list of turn maneuvers for the entire route and to avoid turns on the route Q R Scroll Arrows Touch the up and down arrow screen buttons to scroll through the list of maneuvers Avoid Touch this screen button next to the adjacent street name to avoid the maneuver 2 25 ...

Страница 42: ... button to scroll to the start point or previous waypoint This button will toggle between slow and fast speed j Pause Select this screen button to pause the route preview while in reverse or fast forward scroll r Fast Forward Scroll Select this screen button to scroll to the next waypoint or to the final destination This button will toggle between slow and fast speed u Fast Forward Skip Select thi...

Страница 43: ...t screen button This button will only appear if a route has been calculated 3 Using the desired method of entering a destination enter the waypoint See Destination previously for more information 4 Select the route preference Fastest Shortest or Other The system will calculate and highlight the route 5 Select the Start Guidance screen button You are now ready to start your route 6 To add the secon...

Страница 44: ...ute Adding Destinations to the Address Book There are two ways to add a destination to the address book To add the current final destination to the address book press the Mark screen button from the map screen The system will automatically save the final destination information in the address book Press the Add to Address Book screen button when available on POI information screens Destination Ent...

Страница 45: ...t the MENU hard key 2 Select the Nav screen button or press the MENU key until the Nav screen button is selected or touch the Nav screen button 3 Select the Edit View screen button 4 Select the address book entry that you would like to store as the preset destination Select the Name screen button to add a name if needed 5 Press and hold one of the buttons at the bottom of the screen until a pop up...

Страница 46: ...n Radio Press the MENU key to enter the Menu options then press the MENU key repeatedly until Radio is selected or touch the Radio screen button to make changes for radio information displayed preset pages XM categories and Automatic Volume Control or Bose AudioPilot See Navigation Audio System on page 3 2 for more information Nav Navigation Press the MENU key to enter the Menu options then press ...

Страница 47: ...s the system to use major roads when calculating a planned route Allow toll road This feature allows the system to use toll roads when calculating a planned route Allow ferry This feature allows the system to use ferries when calculating a planned route Allow time and seasonal restricted road This feature allows the system to use time restricted and seasonal roads when calculating a planned route ...

Страница 48: ...Touch the OK screen button to save your changes To change the map icon of an address book entry 1 Select the MENU hard key 2 Select the NAV screen button 3 Select the Edit View Address Book screen button 4 Select the address book entry to change 5 Select the Icon screen button 6 Select an icon from the list To add a voice tag to an address book entry 1 Select the MENU hard key 2 Select the NAV scr...

Страница 49: ...4 Select the address book entry to delete 5 Press and hold the Delete screen button until the delete all address book entries pop up confirmation displays Select Yes to delete select No to cancel the operation Map Database Information Touch the Map Database Information screen button to change the map DVD and to view the coverage areas of the map DVD Change Touch this screen button to eject or chan...

Страница 50: ...e OK screen button to proceed to the navigation system See Getting Started on page 1 4 for more information Coverage Touch this screen button to view the areas covered by the map DVD Touch the up and down arrow screen buttons to view each region of the map DVD The screen will display the major cities for the selected region 2 34 ...

Страница 51: ...ee the POI information under Symbols on page 2 8 for more information See Fuel in the Index of your vehicle s owner manual Off Road Mode To turn the Off Road Mode on or off do the following 1 Press the MENU key 2 Press the Nav screen button 3 Press the Off Road Mode ON or OFF screen buttons The active button will be highlighted When the off road mode is turned on the navigation system will show th...

Страница 52: ...ton to turn the display off Press any hard key to view the display Brightness Contrast Mode Touch this screen button to change the brightness contrast and mode of the display Brightness Touch the plus or minus screen buttons to increase or decrease the brightness of the screen _ Contrast Touch the plus or minus screen buttons to increase or decrease the contrast of the screen 2 36 ...

Страница 53: ...s sent by the GPS Satellites of the United States Department of Defense When your vehicle is not receiving signals from the satellites a symbol will appear on the map screen Refer to Symbols on page 2 8 This system may not be available or interferences may occur if any of the following are true Signals are obstructed by tall buildings trees large trucks or a tunnel Objects are located on the rear ...

Страница 54: ...is set incorrectly The vehicle is traveling at high speed The vehicle changes directions more than once or when the vehicle is turning on a turn table in a parking lot The vehicle is entering and or exiting a parking lot garage or a lot with a roof The GPS signal is not received A roof carrier is installed on your vehicle The vehicle is being driven with tire chains The tires are replaced The tire...

Страница 55: ...ting may display a route returning to the set waypoint if you are heading for a destination without passing through a set waypoint The route prohibits the entry of a vehicle due to a regulation by time or season or any other regulation which may be given Some routes may not be searched The route to the destination may not be shown if there are new roads if roads have recently changed or if certain...

Страница 56: ...available This helps the center make sure you receive the correct and most up to date DVD map disc for your vehicle See Vehicle Identification Number VIN in the Index of your vehicle s owner manual for more information After receiving the updated disc replace the old disc in the navigation system See Installing the DVD Map Disc and Ejecting the DVD Map Disc under Maps on page 2 4 Dispose of the ol...

Страница 57: ...Navigation Audio System 3 2 CD Player 3 11 DVD Player 3 17 Rear Seat Entertainment RSE System 3 23 Rear Seat Audio RSA 3 34 Auxiliary Devices 3 36 Section 3 Navigation Audio System 3 1 ...

Страница 58: ... the navigation system If that equipment is replaced or additional equipment is added to your vehicle the chimes may not work Make sure that replacement or additional equipment is compatible with your vehicle before installing it See Accessories and Modifications in the Index of your vehicle s owner manual Playing the Radio O Power Volume Press this knob to turn the audio system on and off Turn th...

Страница 59: ... changing functions can be performed from this screen If you do not want to view a split screen or you are not on a map screen press the AUDIO hard key AM FM XM Touch the source AM FM or XM if equipped screen button or press the AUDIO key repeatedly until the desired source is highlighted FM source shown other sources similar FM source shown other sources similar 3 3 ...

Страница 60: ...le to select all of the categories when using the right and left arrow screen buttons on the main audio screen The categories when removed will not be enabled to select from the category list screen FM lists may also contain a category to select if stations in your area support Radio Data Systems RDS Refresh List Touch this screen button to refresh the list of stations When viewing a map screen th...

Страница 61: ...ton press the AUDIO key or press the FAV favorite key 3 Select the band 4 Seek scan or tune to the desired station to select the station 5 Press and hold one of the preset screen buttons for more than two seconds or until you hear a beep 6 Repeat the steps for each preset Sound Menu f Sound Menu Press this knob or press the MENU key to access the Sound menu to adjust the treble midrange bass fade ...

Страница 62: ...P is used to provide a choice of four different listening experiences DSP can be used while listening to the audio system The type of DSP selected is displayed on the status line Select from the following DSP settings Normal Select this screen button to adjust the audio to be in normal mode This provides the best sound quality or all seating positions Surround When listening to stereo sources sele...

Страница 63: ...on 2 CH Channel If a 5 1 CH disk is playing and 2 CH is selected or RSA is turned on the system will downmix the audio from 5 1 CH to 2 CH stereo This feature may not be supported on all DVDs Radio Menu Press the MENU key to enter the menu screen then press the MENU key repeatedly until Radio is selected or touch the Radio screen button to make changes for radio information displayed or to limit f...

Страница 64: ...lling Radio Category Scrolling Navigation Menu Scrolling and some functions See Category earlier in this section for more information See From Map under Destination on page 2 14 for more information Number of Preset Pages Touch the Number of Preset Pages screen button to change the number of preset pages 1 through 6 Each preset page can contain five preset stations Touch the desired numbered scree...

Страница 65: ...ts by AudioPilot To turn it off touch the OFF screen button For more information on AudioPilot visit www bose com audiopilot Radio Data System RDS The audio system has a Radio Data System RDS RDS features are available for use only on FM stations that broadcast RDS information With RDS the radio can do the following Seek to stations broadcasting the selected type of programming Receive announcemen...

Страница 66: ...on is required No XM signal The vehicle is in a location that is blocking the XM signal When the vehicle is moved into an open area the signal should return Loading XM The audio system is processing audio and text data received No action is needed Channel Off Air This channel is not currently in service Channel Unavail This previously assigned channel is no longer assigned No Artist Info No artist...

Страница 67: ...s with an adapter ring Full size CDs and the smaller CDs are loaded in the same manner If playing a CD R the sound quality may be reduced due to CD R quality the method of recording the quality of the music that has been recorded and the way the CD R has been handled There may be an increase in skipping difficulty in finding tracks and or difficulty in loading and ejecting If these problems occur ...

Страница 68: ...k selection You will hear sound at a reduced volume Release this button to stop rewinding The display will show the elapsed time of the track Forward Touch and hold this button to fast forward quickly through a track selection You will hear sound at a reduced volume Release this button to stop fast forwarding The display will show the elapsed time of the track SEEK SEEK Press the right arrow to go...

Страница 69: ...iles on a disc The files can be recorded on a CD R or CD RW with a maximum capacity of 700MB DVD with MP3 are not playable on this system Root Directory The root directory will be treated as a folder If the root directory has compressed audio files the directory will be displayed as ROOT All files contained directly under the root directory will be accessed prior to any root directory folders Howe...

Страница 70: ...ding to their numerical listing After playing the last track from the last folder play will begin again at the first track of the first folder or root directory When play enters a new folder the display will not automatically show the new folder name The new track name will appear on the display File System and Naming The song name that will display will be the song name that is contained in the I...

Страница 71: ...amaged such as cracked broken or scratched the CD will not play properly If the surface of the CD is soiled see Care of Your CDs in the Index of your vehicle s owner manual If there is no apparent damage try a known good CD Notice If a label is added to a CD or more than one CD is inserted into the slot at a time or an attempt is made to play scratched or damaged CDs the CD player could be damaged...

Страница 72: ...the elapsed time of the track qr Folder Select the left or right arrow to go to the previous or next folder on the disc Press the middle screen button with the folder name to sort the MP3 by folder and file name It may take a few minutes for the system to sort the MP3 Sort By Touch this screen button to organize the MP3 to enable you to sort the MP3 by artist album and genre It may take a few minu...

Страница 73: ... can be used for CD MP3 DVD audio and as a DVD video player With the ignition on insert a DVD partway into the slot located at the top of the system label side up The player will pull it in and the DVD should begin playing While playing a DVD the navigation system is available If you insert a DVD with the system off and the ignition on it will start to play This feature will not operate on the nav...

Страница 74: ...p the DVD player and the loading slot free of foreign materials liquids and debris Do not add any label to a DVD it could get caught in the DVD player If a DVD is recorded on a personal computer and a description label is needed try labeling the top of the recorded DVD with a soft marker instead If an error appears on the display see DVD Messages later in this section Playing a DVD There are three...

Страница 75: ...u options Cursor Touch this button to access the cursor menu The arrows and other cursor options allow you to navigate the DVD menu options The cursor menu options are only available if a DVD has a menu 2 CH channel and 5 1 CH channel See Digital Signal Processing DSP under Navigation Audio System on page 3 2 for information on these screen buttons q Q r R Arrow Buttons Use these arrow buttons to ...

Страница 76: ...t information or the previews Top Menu Touch this button to display the first menu of the DVD This is not available on all DVDs Menu Touch this button to display the DVD menu of the current area of the DVD that is playing This button is not available for DVD video Search Touch this button to display the title search screen The keyboard allows you to type in the title number of the title that you w...

Страница 77: ...es Touch the d button to fill the screen on the top and bottom Initial Settings From the DVD Setup screen touch this button to change audio subtitle and menu languages parental level and to view the aspect of the DVD The movie must be stopped to use this menu These settings are not available on all DVDs Audio Language Touch English Francais or Espanol to change the language that you are listening ...

Страница 78: ...n all DVDs This button is not available when the DVD is stopped Subtitle Touch this button to playback the video with subtitles Repeatedly press this button to toggle through the available languages To turn the subtitles off press this button until Off is selected This button is not available when the DVD is stopped This may not be available on all DVDs Angle Touch this button to adjust the viewin...

Страница 79: ...a problem while burning the DVD The label may be caught in the DVD player If the DVD is not playing correctly for any other reason try a known good DVD If any error occurs repeatedly or if an error cannot be corrected contact your dealer retailer Rear Seat Entertainment RSE System Your vehicle may have the Digital Versatile Disc DVD Rear Seat Entertainment RSE system The RSE system includes a vide...

Страница 80: ...o Off when not in use Channel 1 is dedicated to the video screen while Channel 2 is dedicated to RSA selections The infrared transmitters are located at the rear of the RSE center console The headphones will shut off automatically to save the battery power if the RSE system and the RSA are shut off or if the headphones are out of range of the transmitters for more than 3 minutes If you move too fa...

Страница 81: ...side of the headphones 2 Replace the two AAA batteries in the compartment Make sure that they are installed correctly using the diagram on the inside of the battery compartment 3 Replace the battery door and tighten the door screw If the headphones are to be stored for a long period of time remove the batteries and keep them in a cool dry place Audio Video A V Jacks The A V jacks are located on th...

Страница 82: ... use the setup menu 3 Press the display menu button again to remove the setup menu from the screen Audio Output Audio from the DVD player or auxiliary inputs may be heard through the following possible sources Wireless Headphones Vehicle Speakers Vehicle wired headphone jacks if your vehicle has this feature The RSE system will always transmit the audio signal by infrared to the wireless headphone...

Страница 83: ...en is in the closed position the signals will not be available for the operation of the headphones or the remote control Remote Control Notice Storing the remote control in a hot area or in direct sunlight can damage it and the repairs will not be covered by your warranty Storage in extreme cold can weaken the batteries Keep the remote control stored in a cool dry place To use the remote control a...

Страница 84: ...to move the cursor around the DVD menu After making a selection press the enter button This button only operates when using a DVD Q R q r Menu Navigation Arrows Use the arrow buttons to navigate through a menu r Enter Press this button to select the choice that is highlighted in any menu z Display Menu Press this button to adjust the brightness screen display mode normal full or zoom and display t...

Страница 85: ...nning of the next chapter or track This button may not work when the DVD is playing the copyright information or the previews r Fast Reverse Press this button to fast reverse the DVD or CD To stop fast reversing a DVD video press the play button To stop fast reversing a DVD audio or CD release the fast reverse button This button may not work when the DVD is playing the copyright information or the...

Страница 86: ...t and content of this function will vary for each disc 1 through 0 Numeric Keypad The numeric keypad provides the capability of direct chapter or track number selection Clear Press this button within three seconds after entering a numeric selection to clear all numeric inputs 10 Double Digit Entries Press this button to select chapter or track numbers greater than 9 Press this button before enteri...

Страница 87: ...cted but it was pulled back into the DVD player The disc is being stored in the DVD player Press the eject button again to eject the disc Problem Recommended Action In auxiliary mode the picture moves or scrolls Check the auxiliary input connections at both devices Change the Video Format to PAL or NTSC See Stereo RCA Jacks previously for how to change the video format The language in the audio or...

Страница 88: ...ove the disc from the DVD player This could permanently damage the disc and DVD player Problem Recommended Action Sometimes the wireless headphone audio cuts out or buzzes Check for obstructions low batteries reception range and interference from cellular telephone towers or by using your cellular telephone in the vehicle Check that the headphones are facing the front of the vehicle I lost the rem...

Страница 89: ...e will display if no disc is present when the EJECT button is pressed on the navigation system DVD Distortion There may be an experience with audio distortion in the wireless headphones and video distortion in the video display when operating cellular phones scanners CB radios Global Positioning Systems GPS two way radios mobile fax or walkie talkies It may be necessary to turn off the DVD player ...

Страница 90: ...phones You can operate the RSA functions even when the main radio is off Audio can be heard through wired headphones not included plugged into the jacks on the RSA If your vehicle has this feature audio can also be heard on Channel 2 of the wireless headphones The audio system mutes the rear speakers when the RSA audio is active through the headphones P Power Press this button to turn the RSA on o...

Страница 91: ...front seat passengers are listening to the radio When a DVD video menu is being displayed press the seek up arrow or seek down arrow to perform a cursor up or down on the menu Hold the seek up arrow or seek down arrow to perform a cursor right or left on the menu PROG Program Press this button to go to the next preset radio station or channel set on the main radio This function is inactive with so...

Страница 92: ... If your vehicle has rear audio video input jacks located in the rear of the center console they can be used as another source for audio video listening To use a portable audio player connect a 3 5 mm 1 8 inch cable to the auxiliary input jack When a device is connected the system will detect and automatically begin playing audio from the device over the vehicle s speakers If a device is connected...

Страница 93: ...Voice Recognition 4 2 Section 4 Voice Recognition 4 1 ...

Страница 94: ...e one of the commands listed on the following pages Helpful Hints for Stating Commands When a multiple command is available choose the command that best works for you Words that are in brackets are optional For example for the command Radio band select FM stating Radio FM or Radio select FM are both valid commands When the system recognizes the command the system will either perform the function a...

Страница 95: ...l words in brackets To use the voice commands refer to the instructions listed previously Voice Tag Commands The following are voice tag commands you can access by clearly stating the commands exactly as they are written You may have up to 40 voice tag entries for destinations Navigation go to destination voice tag navigation select destination voice tag These commands instruct the system to selec...

Страница 96: ...u can access by clearly stating the commands exactly as they are written The commands are only available when you are in one of the following audio modes AM FM or XM if equipped Radio This command instructs the system to turn the audio system on Radio band select AM radio band select FM radio band select XM radio band select satellite These commands instruct the system to go to either the AM FM or...

Страница 97: ...us folder on the MP3 or audio DVD CD help DVD help Disc help This command instructs the system to assist with CD and DVD commands Auxiliary Commands The following auxiliary commands can be accessed by clearly stating the commands exactly as they are written The commands are available when the auxiliary source is available Aux Auxiliary Use this command to select the auxiliary device when a device ...

Страница 98: ... NOTES 4 6 ...

Страница 99: ... iii Canceling Guidance 1 11 CD Player 3 11 CD Messages 3 17 CD Player 3 11 Cleaning the Video Screen 1 11 3 33 Configure Menu 2 29 D Database Coverage Explanations 2 40 Deleting Personal Information 1 6 Destination 2 14 Detailed Areas 2 4 Display 2 36 Driving on a Route 2 13 DVD Player 3 17 Rear Seat Entertainment System 3 23 DVD Display Error Messages 3 33 DVD Distortion 3 33 DVD Map Disc Messag...

Страница 100: ...arted on Your Route 2 25 Global Positioning System GPS 2 37 Guidance Volume 1 11 H Handling the DVD Map Disc 2 6 Hard Keys 2 2 Headphones 3 24 I Installing the DVD Map Disc 2 5 L Language English Metric 1 6 Limited Guidance Areas 2 4 M Map Adjustments 2 7 Map Scales 2 7 Maps 2 4 Menu Configure 2 29 2 ...

Страница 101: ...with Route Guidance 2 39 Propriétaires Canadiens iii R Radio 2 30 3 2 Radio Data System RDS 3 9 Radio Menu 3 7 Rear Seat Audio RSA 3 34 Rear Seat Entertainment System 3 23 Remote Control 3 27 S Scrolling the Map 2 7 Setting the Search Area Entering an Address and Point of Interest and Storing Preset Destinations 1 7 Setting the Time 1 7 Sound 2 30 Sound Menu 3 5 Storing Radio Station Presets 1 7 3...

Страница 102: ... Across Regions 2 14 U Using an MP3 CD 3 13 Using Your Stored Preset Destinations 1 11 V Vehicle Positioning 2 38 Video Screen 3 27 Video Screen Cleaning 1 11 Voice Recognition 4 2 Voice Recognition Commands 4 3 X XM Satellite Radio Service 3 10 4 ...

Отзывы: