background image

To return to previewing the route to the final destination,
do the following:

1. Touch the Edit screen button.

2. Touch the Next screen button.

3. Touch the OK screen button, then the Back screen

button to return to the Route Preview screen.

Now when you touch the arrow screen buttons to
preview the route, it will trace the route to the final
destination rather than the route to the next POI.

Use the following arrow screen buttons from the Route
Preview pop-up menu to trace a route:

I

q

(Preview to current location): Touch this screen

button to preview the route traveling toward the vehicle’s
current location. Touch this screen button repeatedly to
increase the speed at which the indicator will trace the
route.

r

h

(Preview to final destination): Touch this

screen button to view the route traveling toward the
final destination. Touch this screen button repeatedly to
increase the speed at which the indicator will trace the
route.

I

t

(View current location): Touch this screen button

to view the vehicle’s current location along the current
route.

u

h

(View final destination): Touch this screen

button to view the final destination along the current
route.

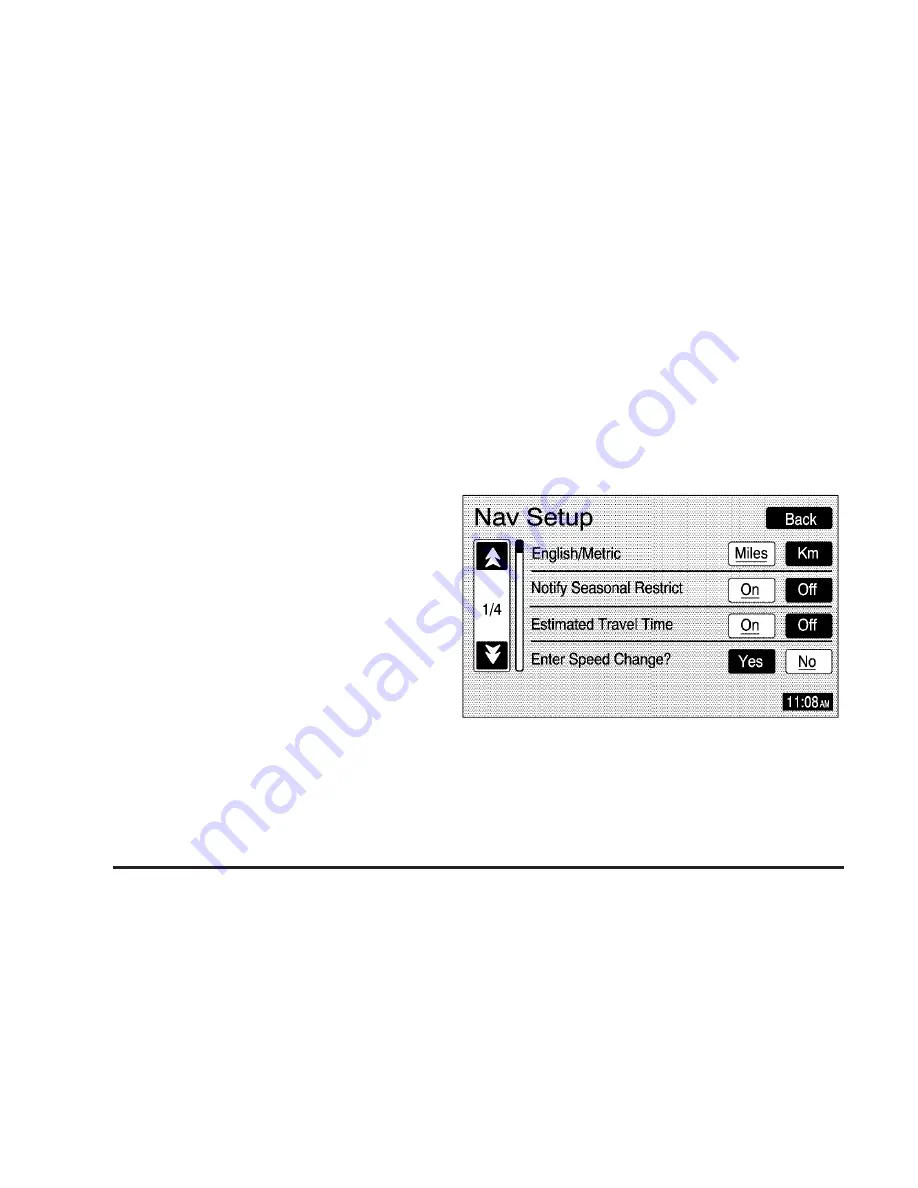
Navigation Setup

x

(Navigation Setup): Select the Nav Setup screen

button to display the Nav Setup menu.

From this menu, several options may be selected,
adjusted, or turned on and off. Touch the up or down
arrow screen buttons to the left of the menu options to
scroll through the list.

2-12

Содержание Escalade

Страница 1: ...w 1 1 Overview 1 2 Features and Controls 2 1 Features and Controls 2 2 Navigation Audio System 3 1 Navigation Audio System 3 2 Index 1 2006 Cadillac Escalade Escalade ESV and Escalade EXT Navigation S...

Страница 2: ...hat time without notice For vehicles first sold in Canada substitute the name General Motors of Canada Limited for Cadillac Motor Car Division whenever it appears in this manual Keep this manual with...

Страница 3: ...Overview 1 2 Navigation System Overview 1 2 Getting Started 1 4 Cleaning the Video Screen 1 10 Section 1 Overview 1 1...

Страница 4: ...Overview Navigation System Overview 1 2...

Страница 5: ...System on page 3 2 K CONFIG Configure Key See Hard Keys under Using the Navigation System on page 2 2 L O Tuning Knob See Finding a Station under Navigation Audio System on page 3 2 M V Zoom In Screen...

Страница 6: ...ns using the presets and steering wheel controls if equipped Set up the navigation features that can only be done before you begin driving such as entering an address or a preset destination Entering...

Страница 7: ...n zones change frequently It is important to consider whether you can follow the directions given by the system for the current conditions When getting started you may set the navigation system to you...

Страница 8: ...Point of Interest Home and Preset Destinations Before entering an Address Point of Interest Home or Preset Destination select the appropriate search area that contains the final destination Your vehi...

Страница 9: ...ype and use the space symbol screen button U between street or city names For example the street name N Royal Oak Rd should be entered as royalUoak Use the backspace V screen button if an incorrect ch...

Страница 10: ...a keypad on the screen If there are POIs with the same name spell out the name and then touch the List screen button McDonald s restaurant vs McDonald corporate office Select the business desired The...

Страница 11: ...ion 8 Touch the Register Point screen button to store the home address as a memory point Setting Preset Destinations 1 Press the power volume knob to turn the system on 2 Insert the DVD map disc into...

Страница 12: ...r if you are already driving you will hear an audio prompt to Proceed to the highlighted route You are now in route guidance mode Canceling Guidance Guidance will be canceled once you arrive at your f...

Страница 13: ...nu 2 7 Destination 2 16 Colors on the Screen 2 29 Configure Menu 2 29 Global Positioning System GPS 2 32 Vehicle Positioning 2 33 Problems with Route Guidance 2 34 If the System Needs Service 2 34 Ord...

Страница 14: ...m NAV RPT Navigation Repeat Press the NAV RPT key to repeat the current voice guidance navigation prompt NAV Navigation If you are in a menu and are not on the map screen press the NAV key to view the...

Страница 15: ...ctuation and numbers will display on the navigation screen as an alpha or numeric keypad The appropriate keypad will automatically display whenever the system needs information from you The alpha keyp...

Страница 16: ...ion Options Touch this screen button to display the Nav Options menu See Navigation Options under Destination on page 2 16 for more information Nav y Navigation Menu Touch this screen button to displa...

Страница 17: ...ou will have the following two language choices ENG English FR French Select the language at this time See Language under Configure Menu on page 2 29 for more information Once a language has been sele...

Страница 18: ...Up mode While in North Up mode North will always be at the top of the map screen regardless of which direction the vehicle is traveling Touch this screen button to switch between North Up and Heading...

Страница 19: ...routes You will be able to select from the following items on the main navigation menu Suspend Guidance Suspend Guidance Select this screen button from the Nav Menu to suspend guidance to all current...

Страница 20: ...p screen regardless of which direction you are driving u Heading Up This feature orients the map with the direction you are driving at the top of the map screen regardless of which direction is North...

Страница 21: ...ouch the plus or minus sign screen buttons to increase or decrease the volume The voice prompt will come on with each adjustment to give you an idea of the volume at each level 3 Once you have reached...

Страница 22: ...s and highways which does not necessarily mean it will be the shortest route Route Preference This screen allows you to select your road preferences by setting which types of roads you want to use or...

Страница 23: ...elect a POI as the next destination you would like to preview To preview a POI s destination instead of the final destination do the following 1 Touch the Edit screen button 2 Touch the Select POI scr...

Страница 24: ...s screen button repeatedly to increase the speed at which the indicator will trace the route rh Preview to final destination Touch this screen button to view the route traveling toward the final desti...

Страница 25: ...0 mph 161 km You may also touch the Default screen button to choose factory default speed settings as your choice When your adjustments are complete touch the Back screen button to return to the Nav S...

Страница 26: ...great distance Touch the Yes screen button to calibrate the system or the No screen button to leave the calibration as it is See Vehicle Positioning on page 2 33 for more information Select Defaults T...

Страница 27: ...and enter the destination you would like to store as home Once your entry is complete touch the Register Point screen button to store this point as home Each time you touch the home symbol from the bo...

Страница 28: ...Dest screen button at the bottom of the map screen to display the Destination menu Search Area The Destination menu allows you to select the area to be searched for your destination A map of the 48 c...

Страница 29: ...and Down Arrows Touch the up or down arrow screen buttons on the Destination menu to scroll through the pages of the menu Once your destination entry is complete a screen with the destination preview...

Страница 30: ...tically search for available names and the List screen button will become available Touch the List screen button to view name choices and select the desired city name or touch the Back screen button t...

Страница 31: ...ntered in the city name for the address a list of cities that contain the address will display Touch the screen button by the desired city to select it Point of Interest POI The Point of Interest POI...

Страница 32: ...choices A list of cuisine types will then appear Memory Points The Memory Points destination entry method allows you to select a destination by choosing from a list of marked points on the map that w...

Страница 33: ...rgency The Emergency destination entry method allows you to select a destination by selecting from a list of emergency facilities The list will vary by area Selecting Police Station or Hospital will d...

Страница 34: ...more information However if you zoom out as much as possible and scroll around the map some parts of the map will appear to be missing because they are not readable in larger scales Previous Start Poi...

Страница 35: ...cessary the system may not be able to find the desired location This will bring up a list of streets with that name Select the desired street name from the list Now begin entering the second street na...

Страница 36: ...review Menu Each time a destination is entered a screen with the destination preview menu will appear This screen will display a zoomed in view of the destination as well as the following options Ente...

Страница 37: ...entered your destination by touching the Enter Destination screen button you can do one of the following Press the NAV hard key to begin route guidance Start driving to begin route guidance Touch the...

Страница 38: ...ge the route preferences See Edit Route under Navigation Menu on page 2 7 for more information Press Back at any time to return to the previous screen Navigation Options Once a destination is selected...

Страница 39: ...cted categories will appear at the top of the screen and will display on the map To view a list of local POIs touch the Local POI List screen button The Local POI List screen will list the closest POI...

Страница 40: ...screen button to recalculate to the fastest route Change to shortest Touch the Yes screen button to recalculate to the shortest route Reroute from adjacent road Touch the Yes screen button to recalcu...

Страница 41: ...ghted on the screen in blue Different colors are also used to distinguish between interstate freeways state highways county roads major streets and secondary streets Highways will be shown as a thicke...

Страница 42: ...nd other functions of your vehicle operate through the navigation radio system If that equipment is replaced or additional equipment is added to your vehicle the chimes may not work Make sure that rep...

Страница 43: ...eature allows you to choose whether the time is displayed in standard or military time Touch the 12Hr screen button for standard time or the 24Hr screen button for military time Auto GPS Update With t...

Страница 44: ...of the vehicle and or other circumstances can interfere with the system s ability to determine the accurate position of the vehicle This is when GPS will appear on the map screen The system may not be...

Страница 45: ...een transferred by a vehicle carrier or a ferry The current position calibration is set incorrectly The vehicle is being driven at high speeds The vehicle is repeating a change of direction by going f...

Страница 46: ...e shown See Ordering Map DVDs on page 2 34 If the System Needs Service If you are still experiencing difficulty with the navigation system after reading this information see your GM dealer for assista...

Страница 47: ...Navigation Audio System 3 2 Rear Seat Entertainment System 3 14 Section 3 Navigation Audio System 3 1...

Страница 48: ...with your vehicle before installing it See Accessories and Modifications in the Index of your vehicle s owner manual Your vehicle has a feature called Retained Accessory Power RAP With RAP the audio s...

Страница 49: ...e bottom of each band menu To set preset stations do the following 1 Turn the audio system on 2 Press the BAND hard key to select AM FM1 FM2 XM1 or XM2 if equipped 3 Tune to the desired station using...

Страница 50: ...nd menu Audio Menu e Audio Press this hard key to display the audio menu Several adjustment options are available from this menu Tone Bass Midrange Treble Touch the plus and minus sign screen buttons...

Страница 51: ...nal Processing DSP If your vehicle is equipped with DSP you have a choice of four different listening experiences DSP can be used while listening to the audio system or the CD player Select from the f...

Страница 52: ...he display with the frequency Touch the Info screen button on the band menu to receive information the selected radio station is currently broadcasting XM Satellite Radio Service XM is a satellite rad...

Страница 53: ...category Touch the On screen button next to XM Info Timeout to hide XM information after a certain amount of time has passed Touch Off to turn this feature off While in this menu turn XM Category See...

Страница 54: ...e signal should return Loading XM Acquiring channel audio after 4 second delay The audio system is acquiring and processing audio and text data No action is needed This message should disappear shortl...

Страница 55: ...n another vehicle For security purposes XM receivers cannot be swapped between vehicles If this message is received after having your vehicle serviced check with your GM dealer XM Radio ID Radio ID la...

Страница 56: ...the bottom surface of the CD If the surface of the CD is damaged such as cracked broken or scratched the CD will not play properly If the surface of the CD is soiled see Care of Your CDs in the Index...

Страница 57: ...rack As the CD reverses elapsed time will display to help you find the correct passage Release this screen button to play the passage u Track Forward Touch this screen button to advance to the next tr...

Страница 58: ...ry a known good CD Notice If you add any label to a CD insert more than one CD into the slot at a time or attempt to play scratched or damaged CDs you could damage the CD player When using the CD play...

Страница 59: ...s of the first track on each CD will be play Press one of the SEEK arrows again to stop scanning BAND Press this hard key to listen to the radio when a CD is playing CD Messages CD ERROR If this messa...

Страница 60: ...navigation screen the DVD or CD is not being read by the system The DVD or CD could be dirty scratched wet or upside down You may also be driving on a very rough road When the road becomes smoother t...

Страница 61: ...eo Screen 1 10 Clock 2 31 Colors on the Screen 2 29 Contrast Brightness 2 30 D Database Coverage Explanations 2 34 Destination 2 16 Destination Preview Menu 2 24 Display Off 2 32 DVD Rear Seat Enterta...

Страница 62: ...the Map DVD 2 5 Intersection 2 23 L Language 2 30 M Map 2 22 Map Adjustments and Scales 2 5 Map Appearance 2 8 Maps 2 5 Memory Points 2 14 2 20 Menu Navigation 2 7 N Navigation Getting Started 1 4 Me...

Страница 63: ...Preset Destinations 2 17 Previous Destination 2 21 Previous Start Point 2 22 Problems with Route Guidance 2 34 R Radio 3 2 Radio Data Systems RDS 3 6 Rear Seat Entertainment System 3 14 Route Overvie...

Страница 64: ...sitive Screen Buttons 2 4 U Using Your Home or Preset Destinations 1 10 V Vehicle Chime 2 30 Vehicle Positioning 2 33 Video Screen Cleaning 1 10 Voice Volume 2 9 X XM Options 3 7 XM Satellite Radio Se...

Отзывы: