Cadi Cadi.Sense Скачать руководство пользователя страница 8

Cadi.

Sense

 User Manual 

T-S1-800.900-I10-C01  

8


Figure 4. 

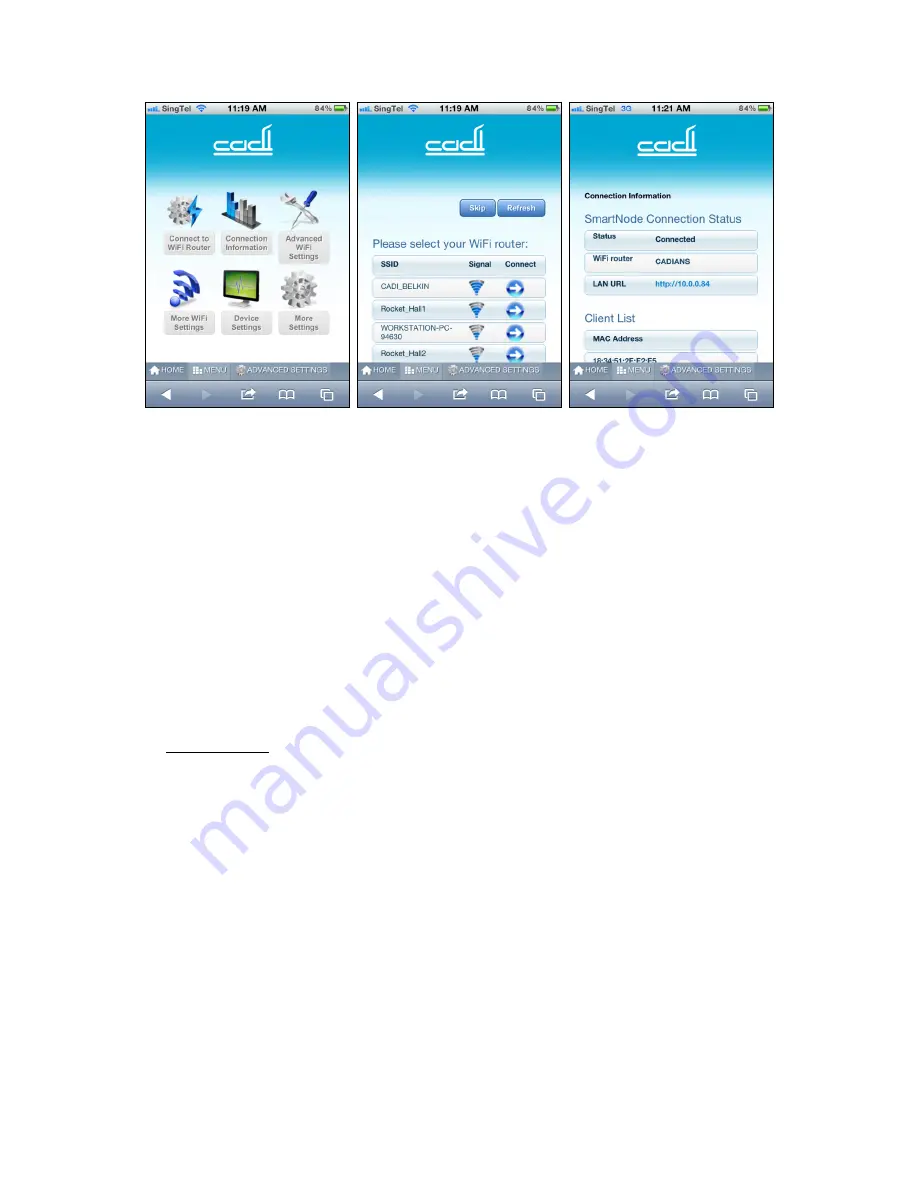
Advanced settings menu. 

Figure 5. 

Connecting to your WiFi router. 

Figure 6. 

Successful connection.


If the connection is 

successful

, the following text will appear: “SmartNode is now 

connected to xxxxxx. To access SmartNode, please go to www.cadisense.com or use the 

LAN URL. Please be patient as SmartNode needs about a minute to reboot.” Figure 6 will 
then appear. However if the connection is 

not successful

, the following text will appear: 

“Connection failed, please reboot SmartNode and try again”. 

 
Note: After successful connection to your WiFi router, the SmartNode will remember your 

router’s SSID and password, unless you have intentionally unmarked the default 

“Remember Settings” during the connection. Therefore, if you were to switch the 
SmartNode off and on again, it will automatically reconnect to your WiFi router in about 2 

minutes. 


Step 2: 

After successful connection to your WiFi router, you may not be able to use 
“http://10.10.10.10” to access your SmartNode anymore, but you can still access it using 

the 

LAN URL

 displayed on the screen (in the example shown in Figure 6, the LAN URL is 

http://10.0.0.84). Record this LAN URL as you may need to use it later. 


Step 3: 

You may now use a mobile device (iPhone, Android phone, tablet or laptop) to access 
your Cadi.Sense from anywhere in the world! Go to “

www.cadisense.com

”, and then 

click “Access Cadi.Sense”. Type in your SmartNode ID (which can be found on your 

SmartNode; you should have written it in Step 1 of Section 2.2). The password is “

cadi

”, 

and the default port is “

50000

”. Then click “Login”. 


If your router is UPnP-enabled or if you have set up port forwarding (see Section 2.4), 
Figure 8 will appear, which means you are able to access SmartNode webpages as you 

would in Section 2.1. If Figure 8 does not appear, Figure 7 will appear.  


Содержание Cadi.Sense

Страница 1: ...Cadi Sense Wireless Thermometer User Manual v3 21 3 T S1 800 900 I10 C01...

Страница 2: ...rding to access your SmartNode from outside your home 9 2 5 Using your iPhone or Android app to access Cadi Sense 10 2 6 Understanding the SmartNode LEDs 11 2 7 Understanding the Cadi Sense icons on y...

Страница 3: ...orce open or attempt to service the Cadi Sense or any electrical part that comes with the package If you encounter any technical problem contact Technical Support DO NOT use the Cadi Sense on users wh...

Страница 4: ...0 900 I10 C01 4 1 4 Intended use The Cadi Sense wireless thermometer is intended for use in children for monitoring body temperature continuously and automatically 1 5 Package contents ThermoSensor wi...

Страница 5: ...Different methods of measuring body temperature generally give different readings and therefore different ranges of normal temperature Temperatures measured with the Cadi Sense are on average higher t...

Страница 6: ...ne tablet or laptop and record the following information shown on your SmartNode plug SSID e g CADI_XXXX ____________________ PWD 8 chars ____________________ SmartNode ID ____________________ Step 2...

Страница 7: ...Internet so that you can access temperature readings from outside your home via the Internet Requirements 1 You must first complete Setup I in Section 2 2 2 You will need to have a WiFi router that i...

Страница 8: ...gain it will automatically reconnect to your WiFi router in about 2 minutes Step 2 After successful connection to your WiFi router you may not be able to use http 10 10 10 10 to access your SmartNode...

Страница 9: ...s only DO NOT PROCEED IF YOU ARE NOT FAMILIAR WITH PORT FORWARDING Requirements 1 You must first complete Setup 1 in Section 2 2 and Setup II in Section 2 3 2 You will need to be physically at the pla...

Страница 10: ...ee Section 2 3 Step 2 which is the LAN IP address of the SmartNode 2 Public Port also called external port 50000 3 Private Port also called internal port local port or host port 80 4 Protocol TCP 5 En...

Страница 11: ...s WiFi LED lights up when the SmartNode WiFi is ready for connection to mobile devices Blinks when there is WiFi activity WPS CadiSense com LED lights up when the SmartNode is connected to the Interne...

Страница 12: ...the default value and cannot be changed 4 Turn on off the Message Alert default OFF If this alert is turned on a message will be displayed whenever the temperature exceeds the threshold For some count...

Страница 13: ...Click these icons and you will see the following screens Main page sensor details Home page temperature monitoring Advanced settings menu Setting date time and timezone Add sensor by entering sensor I...

Страница 14: ...ure threshold 2 8 How to attach the ThermoSensor Step 1 Apply a small amount of body lotion on the left or right side of the lower abdomen Step 2 Take a Stick On and peel off the round paper liner to...

Страница 15: ...exposed adhesive to the inside of the diaper undergarment in such a position that the sensor s metal part will touch the lower abdomen left or right when the diaper undergarment is properly worn Note...

Страница 16: ...or and the SmartNode Step 1 After each use peel the Stick On off the diaper undergarment and then peel the Stick On off the sensor Step 2 important Clean the sensor with a soft cloth moistened with al...

Страница 17: ...dvanced Settings icon MENU icon More WiFi Settings icon and then the Security icon Type the new password in the WPA Passphrase box and then click Apply The password change should complete within 1 min...

Страница 18: ...r icon after performing this hardware reset 3 3 Upgrading the SmartNode firmware Note This upgrading is for advanced users only DO NOT PROCEED IF YOU ARE NOT FAMILIAR WITH FIRMWARE UPGRADING Warning A...

Страница 19: ...ved from its storage case the LED light will blink about every 5 seconds If it is not blinking the sensor is likely to have run out of battery or to be faulty In that case contact Technical Support to...

Страница 20: ...he readings are received you should see 4 readings for each hour If the above does not work ensure that the SmartNode is plugged near the person wearing the ThermoSensor so that the ThermoSensor is wi...

Страница 21: ...N 801 Sends temperature data approximately every 30 seconds 3 to 5 m typical Power Internal battery non replaceable 3 V Battery life 60 days of continuous use OR 3 years of intermittent use based on t...

Страница 22: ...untries WLAN WiFi 802 11b g n Interface Ethernet 1 x 10 100 Auto MDI MDIX Ethernet Port Power Input voltage 100 240 VAC 50 60 Hz Maximum current 0 12 A Mechanical Dimensions 57 mm x 104 mm x 55 mm Wei...

Страница 23: ...Cadi Sense User Manual T S1 800 900 I10 C01 23 4 5 More about port forwarding Port forwarding screens for the following WiFi routers are shown below 1 Aztech DSL1015EW S or DSL1000ER 2 2WIRE 5012NV...

Страница 24: ...Cadi Sense User Manual T S1 800 900 I10 C01 24 3 2WIRE 2701HGV E 4 Linksys E2000...

Страница 25: ...Cadi Sense User Manual T S1 800 900 I10 C01 25 5 Dlink DIR 655 6 ZyXel...

Страница 26: ...Cadi Sense User Manual T S1 800 900 I10 C01 26 7 ASUS RTN16 8 EnGenius ESR9850...

Страница 27: ...s a good idea to identify the areas where you have good WiFi reception and weak or no WiFi signal at all After this assessment you may place the SmartNode between a location where you have good WiFi r...

Страница 28: ...to use http 10 10 10 10 to access your SmartNode anymore Nonetheless you can still access it using the IP address assigned by your router Note c You may need to reboot your PC laptop or unplug the Et...

Страница 29: ...it to the SmartNode using its SSID and password PWD 8 chars both of which can be found on the label on the SmartNode Changing WiFi settings To change WiFi settings Open your PC laptop s web browser a...

Страница 30: ...Cadi Sense User Manual T S1 800 900 I10 C01 30...

Страница 31: ...e SmartNode for 2 seconds to activate WPS Registrar mode Press the WPS button on your wireless client within 2 minutes The 2 devices should then associate with each other automatically within 2 minute...

Страница 32: ...10 C01 32 Reboot Reboot allows you to reboot the device for new settings to take effect Device settings Device Settings includes the following options Device information IP address LAN configuration S...

Страница 33: ...rnet interface MAC address Wireless MAC Address Shows device s wireless interface MAC address Wireless Status Shows the status of the wireless interface IP address LAN configuration This page allows y...

Страница 34: ...guration file to the device Restore To reset the device to factory default settings Firmware upgrade The firmware menu allows you to see the current firmware version and build date as well as upgrade...

Страница 35: ...Static IP address on your PC before you associate the SmartNode with your WiFi router AP Just remember to set it back to Obtain an IP address automatically on your PC after you are done To set a stati...

Страница 36: ...hen click Properties Select Use the following IP address and type in 10 10 10 20 as the IP address and 255 255 255 0 for the subnet mask Leave the other fields blank Click OK to commit the settings No...

Отзывы: