


16
FAMILY
EN
charge and tension specific of every model, as described in the technical datas table (see
).
•
The plug must be easily accessible when the appliance is installed.
•
Please further assure you that your network is endowed with an efficient earth connection: if it does not exist
or if it is not efficient, please endow you with one in compliance with the law.
•
Connect the supply cable first on the back of the stove (see
) and then at a wall electric socket.
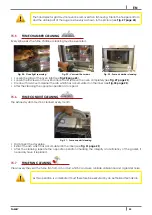
Fig. 15 - Electric socket with master switch
•
The master switch O/I (see
) is to open only to switch the stove on, otherwise it is advisable
to keep it off.
•
Do not use extension cables.
•
If the feeder cable is damaged, it must be replaced by an authorized technician.
•
When the stove is not going to be used for a long period of time, it advisable to remove the plug from the
socket on the wall.
11.5
CONNECTION TO THE EXTERNAL THERMOSTAT
The stove works through a thermostat probe placed in its inner. If you desire, the stove can be connected to an
external room thermostat. This operation must be executed by an authorized technician.
•
External thermostat: "SET TEMP ROOM" a temperature which is round 7°C.
•
External chronothermostat: "SET TEMP ROOM" a temperature which is round 7°C and desable the chrono
functions from the menu 03-01 "CHRONO ENABLE" ("OFF").
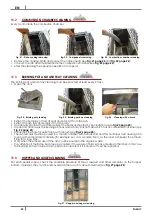
11.6
VENTILATION
•
The stove is endowed with a ventilation system.
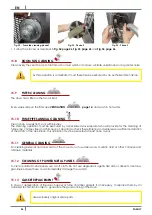
Fig. 16 - Filter position
LEGEND
1
Anti-dust filter
•
The air moved by the motorized fans keeps the stove at a lower temperature, avoiding excessive strain on
the materials comprising it.


