


23
ATENA3 PLUS 12/14 - DUKE 12/14 AIRTIGHT - SABA 12/14 - MITHOS3 PLUS 12/14
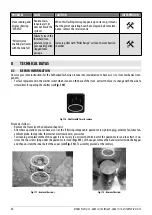
Fig. 61 - Remove cap
Fig. 62 - Remove fan screws
Fig. 63 - Remove fan
• Remove the side panels and cover of the stove (see dedicated chapter).
• Remove the inspection door on the side near the ducting fans (see
Fig. 61
).
• Remove the screws of the fan (see
Fig. 62
).
• Turn the fan with the vent facing upwards and fix it (see
Fig. 63
).
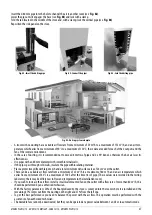
Fig. 64 - Insert pipe
Fig. 65 - Fold the flap
Fig. 66 - Fix the pipes
• Insert the pipes in the specific seats and move it down until it is completely inserted (see
Fig. 64
).
• Bend the flap inwards with your hands (see
Fig. 65
).
• Using a flexible pipe, connect the fan vent and ducting pipe, securing them with the clamps (see
Fig. 66
).
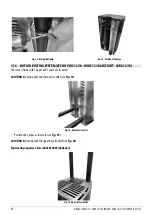
SOLUTION C
: ducting with the upper and rear hot air outlet (see
Fig. 67
and
Fig. 68
).
Top ducting requires 1 kit code 5020003 (optional).
Fig. 67 - Upper hot air outlet (right or left)
Fig. 68 - Rear hot air outlet (right or left)
• Position the pipes as described in
SOLUTION A
and
SOLUTION B
.


