8
INSTALLATION
COMPLETE PRE--INSTALLATION CHECKS
1.
Unpack Unit
-- Store the indoor and outdoor units in the
original packaging until it is moved to the final site for
installation. When unpacking indoor unit, be careful not to lift
unit by condensate drain discharge pipe or by refrigerant
connections.
2.
Inspect Shipment
-- Upon receipt of shipment, check the
indoor and outdoor units for damage. If there is any damage,
forward claim papers directly to the transportation company.
Manufacturer is not responsible for damage incurred in transit.
3.
Inspect Parts Supplied With Units
– Check all items
against parts list (see the PARTS LIST section). If any items
are missing, notify your distributor or manufacturer office.
To prevent loss or damage, leave all parts in original
packages until installation.
CONSIDER SYSTEM REQUIREMENTS
1. Consult local building codes and NEC for special
installation requirements.
2. When deciding the location of the indoor and outdoor units,
ensure that the piping run does not exceed the allowed
distances listed in Table 9.
3. Make sure the indoor and outdoor units are easily accessible
to electrical power.
4. Allow sufficient clearances for airflow, wiring, refrigerant
piping, and servicing the unit (see the ”CLEARANCES --
INDOOR” and “CLEARANCES -- OUTDOOR” sections).
5. Condensate piping can be directed through the inside wall
to an approved drain or straight outside.
INSTALL INDOOR UNIT
Plan the installation carefully before you begin.
1. Select indoor unit location.
S
A location where there are no obstacles near inlet and
outlet area.
S
A location that can bear the weight of the unit.
S
Do not install indoor units near a direct source of heat
such as direct sunlight or a heating appliance.
S
Do not install units too close to humid conditions.
S
Where an optimum air distribution is ensured.
S
Where the condensate can drain correctly and safely.
S
Maintain sufficient clearance around the indoor unit for
maintenance and servicing.
S
Where the air filter can be removed and cleaned easily.
S
Where the piping between the indoor and outdoor units
is within the allowable limits.
S
1m or more away from the TV or radio to prevent the
screen from being distorted or noise from being
generated.
S
As far away as possible from fluorescent and incandes-
cent lights so that the remote control can be operated
well.
2. TXV Installation
S
Location -- The TXV kit can be affixed directly to the
indoor unit or anywhere between 12 to 18 inches from
the indoor unit pipe connection.
!
CAUTION
Failure to follow the following caution may result in equipment
damage or improper operation.
The TXV kit needs to be installation at most 12 to 18 inches
from the indoor unit pipe connection.
S
The TXV kit contains a label specifying the allowed
flow direction. See below for allowed and not allowed
flow directions.
!
CAUTION
Failure to follow the following caution may result in
equipment damage or improper operation. One of the two
arrows on the TXV part number label must point up when
installed.
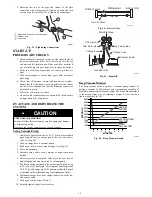
Install unit such that the refrigerant flow directions is in any
of the two allowed directions.
Indoor unit
connection
Outdoor unit
connection
Indoor unit
connection
Outdoor unit
connection
Arrows on TXV label pointing
upward and to the right
Arrows on TXV label pointing
upward and to the left
Fig. 9 – Allowed TXV installation direction per label attached
to TXV
Refrigerant
flow direction
To
indoor
unit
To
outdoor
unit
Fig. 10 – TXV


