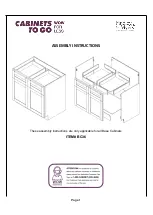
background image

 1

 2


X8 


X4 


Assemble the 

Side

 Panels (

A,B

) onto

 the 

Frame

 (

E

) by connecting the male and 

female cam locks and using a screwdriver 
to turn the lock clockwise. (Figure 1)


{NOTE: 

Lay Frame and Door

s


on a flat smooth soft 

work surface to assemble.}

S

o

ft

S

u

rf

a

c

e

H

a

rd

 S

u

rf

ace

E

E

I

nstall the glide brackets (f) to 

the Back Panel (C)

 using 

screws (b)

. (Figure 

2

)


Page 

3


Figure 

1


Figure 

2


Содержание Findley & Myers BC36

Страница 1: ...ASSEMBLY INSTRUCTIONS These assembly instructions are only applicable for all Base Cabinets ITEM BC36 Page 1...

Страница 2: ...invalidate the warranty and Cabinets To Go will decline any responsibility for any damagescaused Anyinstallationwhichdoesnotcorrespondtotheinstructionsmayresultin defects malfunctioning parts signific...

Страница 3: ...ale and female cam locks and using a screwdriver to turn the lock clockwise Figure 1 NOTE Lay Frame and Doors on a flat smooth soft work surface to assemble Soft Surface Hard Surface E E Install the g...

Страница 4: ...D 3 4 G Figure 3 Insert the Bottom Panel D into the groove of the Side Panels and Frame Figure 3 Figure 4 Install the toe kick G onto the side panels A B and lock the cam locks Figure 4 Page 4...

Страница 5: ...5 Figure 5 Install the Back Panel C onto the side panels A B and lock the cam locks Figure 5 Insert the shelf brackets a into the side panels A B in the location of your choosing Install the shelf F F...

Страница 6: ...he supplied screws c Place bumpers d onto the corners of the drawer front Repeat for both drawers Figure 7 H Figure 8 Page 6 Figure 7 Finish assembling the drawer boxes H Figure 8 You may use a rubber...

Страница 7: ...c I Figure 9 Figure 10 Attach the Drawer Clips g using screws c onto the bottom of the drawers H Figure 9 Attach the Drawer Glides I using screws c onto the frame and glide brackets installed in Step...

Страница 8: ...Install the corner brackets e using screws c in the four top corners Figure 11 e Figure 12 Page 8 Figure 11 Install the remaining bumpers d onto the corner of the doors where they come in contact with...

Страница 9: ...Good ventilation is essential for maintaining the quality and look of this furniture Warranty and Customer Care Information For the most up to date warranty information for your product please visit...

Отзывы: