CAB PX Series Скачать руководство пользователя страница 9

9

Control Panel

3.1 

Structure of the Control Panel

The user can control the operation of the print module with the control panel, for example:

• 

Issuing, interrupting, continuing and canceling print jobs,

• 

Setting printing parameters, e.g. heat level of the printhead, print speed, interface configuration, language and 

time of day (

 Configuration Manual), 

• 

Start the test functions (

 Configuration Manual), 

• 

Control stand-alone operation with a memory module (

 Configuration Manual),

• 

Update the firmware (

 Configuration Manual).

Many functions and settings can also be controlled by software applications or by direct programming with a 
computer using the print modules own commands. 

 Programming Manual for details.

Settings made on the control panel make the basic settings of the print module.

i

Notice! 
It is advantageous, whenever possible, to make adaptations to various print jobs in the software.

1

2

3

4

Ready

6

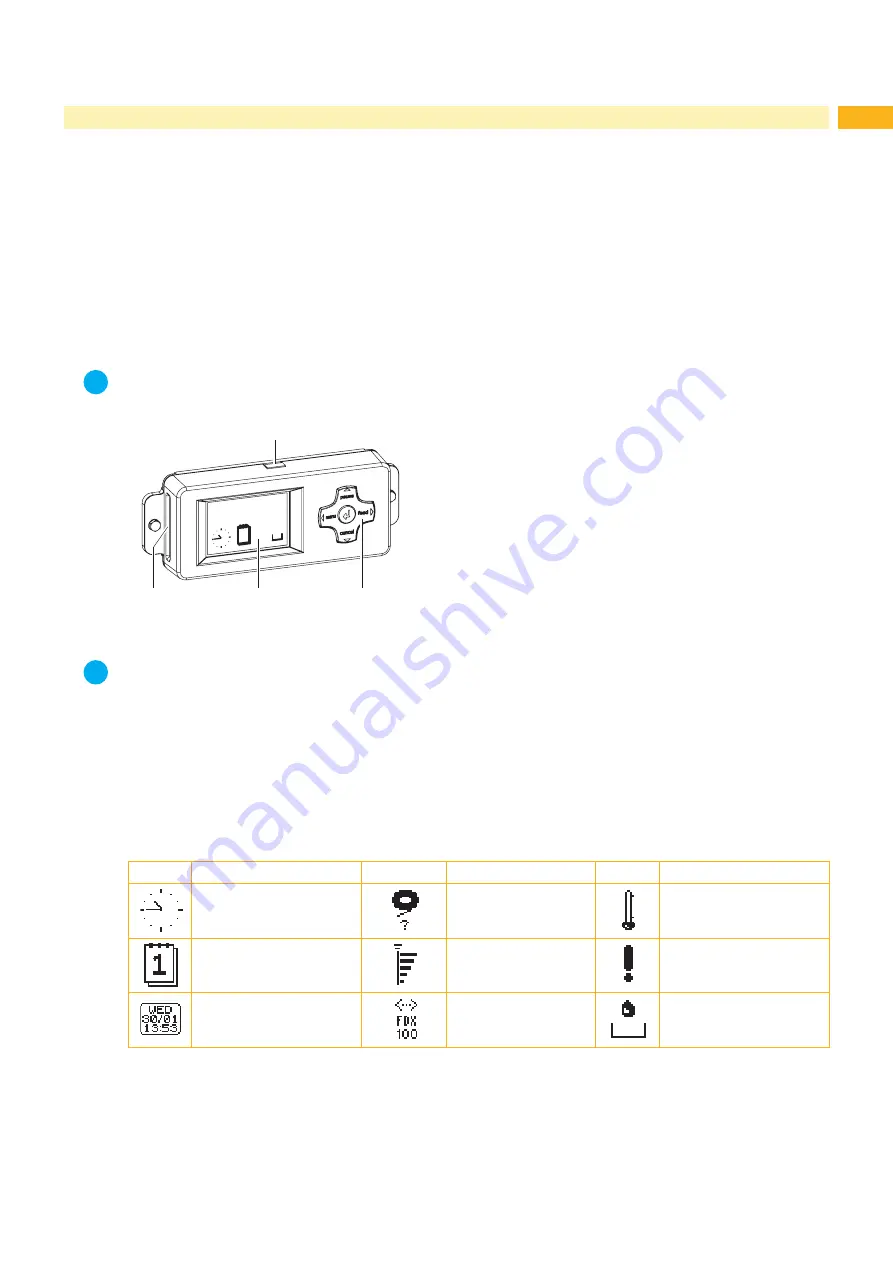
The control panel contains a graphic display (3) and the navigator 

pad (4) with five integrated keys.

The graphic display indicates the current status of the print module 
and the print job, indicates faults and shows the settings in the 
menu.

Additionally the control panel has an USB master port (1) with the 

same functionality like the ports (30 / fig. 4/5) at the back side of the 

print module as well as a slot (2) for a CompactFlash memory card. 
USB port (1) and slot (2) are covered with caps.


Remove the caps if necessary.

Fig. 6 

Control Panel

i

Notice! 
A CF memory card in the control panel has to be used as "Ext. CompactFlash (CFEXT)", a memory card in 

the slot (28 / fig. 4/5) at the back side of the print module as "CompactFlash (CF)". 

 Configuration Manual.

3.2 

Symbol Displays

The symbols shown in the following table may appear in the status line of the display. They enable the current status 
to be seen quickly. The table contains the most important symbols.

For the configuration of the status line 

 the Configuration Manual.

Symbol

Description

Symbol

Description

Symbol

Description


Clock


Ribbon supply


Temperature of the 
printhead


Date sheet


Wi-Fi signal strength


Access to memory card


Date/time digital


Ethernet link status


Print module is receiving 
data

Table 1 

Symbol displays

Содержание PX Series

Страница 1: ...Made in Germany Operator s Manual PX Print Module...

Страница 2: ...product can occur Please check www cab de for the latest update Terms and conditions Deliveries and performances are effected under the General conditions of sale of cab Operator s Manual Translation...

Страница 3: ...3 Setting the Head Locking System 14 4 4 Loading Transfer Ribbon 15 4 5 Setting the Feed Path of the Transfer Ribbon 16 5 Printing Operation 17 5 1 Printhead Protection 17 5 2 Synchronization of the...

Страница 4: ...ond this shall be regarded as improper use The manufacturer supplier shall not be liable for damage resulting from unauthorized use the user shall bear the risk alone Usage for the intended purpose al...

Страница 5: ...his product may cause radio interference in which case the user may be required to take adequate measures 1 4 Safety Marking 2 2 2 1 Fig 1 Safety marking Danger spot Risk of burning on the hot printhe...

Страница 6: ...ry 6 Navigator pad 7 Power switch 8 Cover Fig 2 Overview 20 19 10 12 13 17 16 15 21 18 14 9 11 9 Ribbon supply hub 10 Ribbon take up hub 11 Allen key 12 Printhead retainer with printhead 13 Print roll...

Страница 7: ...ports for keyboard scanner or service key 31 USB high speed slave port 32 Serial RS 232 C port Fig 4 Connections Version with cab I O interface 24 33 27 28 29 30 31 32 24 Power connection jack 27 Slot...

Страница 8: ...own in figures 4 and 5 2 3 1 Connecting to the Power Supply The print module is equipped with a wide area power unit The device can be operated with a supply voltage of 230 V 50 Hz or 115 V 60 Hz with...

Страница 9: ...grated keys The graphic display indicates the current status of the print module and the print job indicates faults and shows the settings in the menu Additionally the control panel has an USB master...

Страница 10: ...t process may be continued by pressing the pause key Correctable error and the type of error and the number of labels still to be printed An error has occurred that can be rectified by the operator wi...

Страница 11: ...abel state cancel lights Ready Ready Delete internal memory the last label can no longer be reprinted Printing label Printing label Short press g cancels the current print job Longer press g cancels t...

Страница 12: ...til it stops The printing side of the label must be shown from above 5 For peel off mode forward the label strip over the peel off edge that the strip reaches back to the locking system 5 Remove the l...

Страница 13: ...ntation 3 on the label sensor retainer X X Loosen screw 2 slightly X X Position label sensor by moving it in such a way that the sensor can detect the label gap or a reflex or cut out mark or if the l...

Страница 14: ...e entire label width prevent wrinkles in the feed path of the transfer ribbon prevent premature wearing of the print roller and printhead 2 1 3 4 Fig 10 Setting the head locking system 1 Turn lever 3...

Страница 15: ...way from the printhead after loading 4 Hold ribbon supply hub 4 firmly and turn knob 5 counterclockwise until the transfer ribbon roll is secured 5 Slide suitable ribbon core 1 onto the transfer ribbo...

Страница 16: ...cause ribbon wrinkling X X Check first the setting of the head locking system 4 3 on page 14 1 2 3 Fig 13 Setting the feed path of the transfer ribbon i Notice The adjustment is best carried out duri...

Страница 17: ...e was switched off 5 3 Printing Attention To start the print operation two steps are necessary X X Send a print job via data interface or load a print job from a memory medium Programming Manual Confi...

Страница 18: ...media transport and the print quality X X Lift the printhead open the transport systems X X Remove labels and transfer ribbon from the print module X X Remove deposits with roller cleaner Part No 920...

Страница 19: ...on Print module prints a sequence of characters instead of the label format Print module is in ASCII dump mode Cancel the ASCII dump mode Print module transports label media but transfer ribbon does n...

Страница 20: ...r the print speed via software Invalid setup Error in the configuration memory Re configure print module If error recurs call service Memory overflow Current print job contains too much information e...

Страница 21: ...n is loaded although the print module is set to direct thermal printing for direct thermal printing remove ribbon for thermal transfer printing set the print module in the configuration or in the soft...

Страница 22: ...peel off mode 12 25 max 5000 4000 1000 5000 4000 4000 3000 A Label distance 2 C Width of liner 25 118 50 178 Dl Left margin 0 Dr Right margin 0 E Label thickness 0 025 0 25 F Liner thickness 0 03 0 1...

Страница 23: ...to the material edge 4 60 SY Distance gap reflective sensor printhead 94 5 Table 9 Device dimensions 8 3 Reflex Mark Dimensions Fig 16 Reflex mark dimensions Dim Designation Dim in mm A Label distanc...

Страница 24: ...ark 2 10 X Distance mark material edge 4 60 Y Sensor recognized virtual label front edge with gap sensor recognition Rear edge cut out Z Distance recognized front edge actual label front edge X X Adju...

Страница 25: ...25 9 Mounting Dimensions Attachment points for screws M5x20 Fig 19 Mounting Dimensions...

Страница 26: ...Device Print Module Type PX Applied EC Regulations and Norms Directive 2006 42 EC on machinery EN ISO 12100 2010 EN ISO 13857 2008 EN 349 1993 A1 2008 EN ISO 13849 1 2015 EN 60950 1 2006 A11 2009 A12...

Страница 27: ...65 EU on the restriction of the use of certain hazardous substances in electrical and electronic equipment EN 50581 2012 Signed for and on behalf of the Manufacturer cab Produkttechnik S mmerda Gesel...

Страница 28: ...ause 11 Key functions 11 offline menu 11 print mode 11 L Label sensor setting 13 Lithium battery 5 Loading labels 12 Loading material 12 Loading transfer ribbon 15 M Mounting dimensions 25 N Navigator...

Отзывы: