background image

34

34

Printer Setting and Control

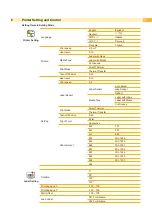
Device

Key tone

Enter

Abbrechen

Device Setting

Options

None

Present Sensor

Cutter

Applicator

Smart Backfeed

Apply

Cancel

Ethernet

Part.

09100

DHCP

Disable

Enable

Gateway

192.168.000.254

Dynamic IP

192.168.102.76

Netmask

255.255.255.0

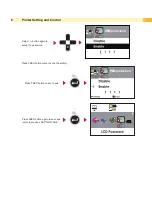
LCD Password

Disable

Enable

RS 232 Setting

Baud Rate

4800 bps

38400 bps

9600 bps

57600 bps

19200 bps

115200 bps

Parity

None

Odd

Even

Data Bits

7 Bit

8 Bit

Stop Bits

1 Bit

2 Bit

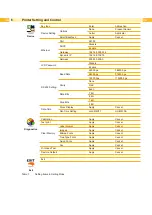
Date-Time

Clock Display

Apply

Cancel

Dat-Time Setting

JJJJ/MM/TT

HH:MM:SS

Diagnostics

Calibration

Apply

Cancel

Test print

Apply

Cancel

Clear Memory

Label Format

Apply

Cancel

Images

Apply

Cancel

Bitmap Fonts

Apply

Cancel

True Type Fonts

Apply

Cancel

Asian Fonts

Apply

Cancel

ALL

Apply

Cancel

Printhead Test

Apply

Cancel

Restore Default

Apply

Cancel

Exit

Exit

Table 3 

Setting Items in Setting Mode

Содержание MACH2

Страница 1: ...Made in Germany MACH2 Operator s Manual Label Printer ...

Страница 2: ...n and product can occur Please check www cab de for the latest update Terms and conditions Deliveries and performances are effected under the General conditions of sale of cab Produkttechnik GmbH Co KG Operator s Manual for the following products Germany cab Produkttechnik GmbH Co KG Postfach 1904 D 76007 Karlsruhe Wilhelm Schickard Str 14 D 76131 Karlsruhe Telefon 49 721 6626 0 Telefax 49 721 662...

Страница 3: ...14 4 3 Loading Replacing the Label Stock on the Printer 15 4 4 Function Test 16 5 Installing Software and configurate the Printer 17 5 1 Installing the Printer Driver 17 5 2 Installing Labeling Software cablabel S3 Lite 18 5 3 Configuration of Printer Settings 19 6 Printer Setting and Control 21 6 1 Operation Panel 21 6 2 LCD Interface Introduction 22 6 3 Ethernet Setting 28 6 4 LCD Password 30 6 ...

Страница 4: ...quipment special fittings Time Information in the display 1 2 Intended Use The device is manufactured in accordance with the current technological status and the recognized safety rules However danger to the life and limb of the user or third parties and or damage to the device and other tangible assets can arise during use The device may only be used for its intended purpose and if it is in perfe...

Страница 5: ...hnicians Unauthorized interference with electronic modules or their software can cause malfunctions Other unauthorized work on or modifications to the device can also endanger operational safety Always have service work done in a qualified workshop where the personnel have the technical knowledge and tools required to do the necessary work There are various warning stickers on the device They draw...

Страница 6: ...bel Printer 1 2 3 7 4 5 6 8 1 MACH2 Label Printer 2 Empty ribbon core 3 Ribbon hubs Set of 2 4 USB cable 5 Power adapter Power cord 6 AC Adapter 7 MACH Quick guide 8 DVD including cablabel S3 software and MACH1 user manual Fig 1 Box Content i Note Please keep the original packaging in case the printer must be returned Attention The device and printing materials will be damaged by moisture and wetn...

Страница 7: ...on rewind mechanism 4 Front cover 5 Cover release catches 6 LCD Display 7 Navigator Pad 8 FEED Button 9 POWER Button Fig 2 Front View 2 2 2 Rear View BP7 00i 5 11 10 12 13 14 15 5 Cover release catches 10 Fan fold label insert 11 Calibration button 12 Power jack 13 USB Port 14 Serial Port 15 Ethernet Port Fig 3 Rear View ...

Страница 8: ...vice bottom are not intended for wall mount use 2 2 4 The Internal View of Printer 2 1 4 2 1 5 3 4 9 7 6 8 9 1 Label guide plate 2 Label supply hub 3 Release catch for opening the label supply hub 4 Label Guide 5 Release catch for closing the printer cover 6 Label sensor 7 Guide track 8 Platen 9 Platen lockers Fig 5 Internal View ...

Страница 9: ... Printing Mechanism 7 3 2 1 4 6 5 1 Cover for ribbon rewind mechanism 2 Ribbon rewind wheel 3 Notch of ribbon rewind wheel 4 Ribbon supply wheel 5 Notch of ribbon supply wheel 6 Paper press bar 7 Print head Fig 6 Printing Mechanism ...

Страница 10: ...th a wide area power unit The device can be operated with a supply voltage of 230 V 50 Hz or 115 V 60 Hz without adjustment 3 1 1 Connecting to the Power Supply BP7 00i 1 3 2 Fig 7 Connecting Printer to the Power Supply 1 Check that the device is switched off 2 Plug the jack of the AC adapter 1 into the power connection socket 2 3 Plug the power cable 3 into the AC adapter 1 4 Plug the power cable...

Страница 11: ...onnect the printer to the computer via USB or Ethernet X X Plug the USB cable 1 into the USB interface 2 on the printer or X X Plug the Ethernet cable into the Ethernet interface 3 on the printer X X Connect the cable to the corresponding interface on the computer 4 3 2 Switching on the Printer When all connections have been made correctly 2 1 Fig 9 Switching on the Printer X X Switch the printer ...

Страница 12: ...catch i Note The printing mechanism is lifted up with the printer cover 4 2 Loading Replacing the Ribbon on the Printer 4 2 1 Ribbon Module Installation 1 2 1 2 3 3 Fig 11 Ribbon Module Installation 1 Attach the ribbon 1 to the empty ribbon core 2 with the adhesive strip at the end of the ribbon 2 Insert the ribbon hub 3 into empty ribbon core 2 and new ribbon 1 3 Wind the ribbon around the empty ...

Страница 13: ...oll 2 into the left side 3 of the ribbon supply module Ensure that the stud on the ribbon hub slots into the recess 3 Insert the ribbon hub with the ribbon roll 2 into the right side 4 of the ribbon supply module Ensure that the stud on the ribbon hub slots into the recess 2 1 Fig 13 Close the Printer Cover 4 Unlock the release catch 1 to close the printer cover 5 Close the cover of the casing 2 a...

Страница 14: ...side 3 of the ribbon rewind module Ensure that the stud on the ribbon hub slots into the recess 3 Insert the ribbon hub with the ribbon core 2 into the right side 4 of the ribbon rewind module Ensure that the stud on the ribbon hub slots into the recess 3 1 Fig 15 Tighten the ribbon and close the printer 4 Turn the ribbon rewind wheel 3 to tighten the ribbon until it has no wrinkles 5 Close the co...

Страница 15: ...upply hub 1 3 Pull to open the label guide plates 2 4 Place the label stock 3 on label supply hubs 4 Make sure the label stock is aligned to both hubs 5 Adjust the label guide plates 2 to fix the label width 6 Release the locking button 1 and let it click into place 8 7 5 6 6 Fig 17 Feed the label through the label guides and close the printer 7 Feed the Label 5 through the label guides 6 on both ...

Страница 16: ...n 1 If the label stock is inserted correctly the labels are drawn in straight i Note If the labels are drawn in skewed check the seating of the ribbon and the label stock and correct if necessary i Note When Leporello labels continuous material are used the labels are drawn in by the feed on the back of the printer It is not necessary to open the device ...

Страница 17: ...nstallation 1 Insert the Product DVD in the DVD drive of the host computer The program should pop up automati cally You will see the Welcome screen first 2 Choose Drivers on the Welcome screen 3 The Drivers screen appears Click Instal driver to continue 4 Follow the instructions on the screen The Driver Wizard guides you through the installation procedure Once the installation is complete a summar...

Страница 18: ...ions e g cablabel S3 Pro from the manufacturer 1 Insert the Product DVD in the DVD drive of the host computer The program should pop up automati cally You will see the Welcome screen first 2 Choose Software on the Welcome screen 3 Select on the product CD the software cablabel S3 Lite and press the icon Install software to start the installation 4 After the start of cablabel S3 Lite the MACH print...

Страница 19: ...1 2 Load by a double click Printer Configuration This tab allows you to configure and edit the settings of the connected printer Almost all important settings of the printer can be configured here X X Click GET to load the settings from the printer X X Click SET to send the settings to the printer When you send only the slected parameters are transmitted Under File you can save the settings in a c...

Страница 20: ... and Configuring the Printer Printer I O Setup On this tab you can make settings for the possible interfaces and send them to the printer Port opens the Port Setting Here you have the possibility to search for all Mach1 2 models ...

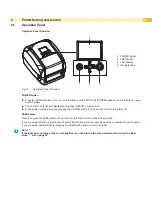
Страница 21: ... READY on the screen X X When printer is turned on keep pressing the POWER button 1 for 3 second will turn the printer off FEED button When you press the FEED button the printer moves the label to the defined stop position If you are using continuous labels pressing the FEED button will move label stock until you release the button again If you are using individual labels pressing the FEED button ...

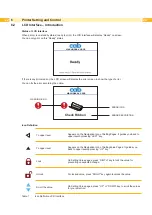
Страница 22: ...k Ribbon MACH2 200 V1 RC0 Icon Definition To upper level Appears on the Navigation Icon of SettingPages It guides you back to upper level bypressing LEFT key To upper level Appears on the Navigation Icon of SettingValue Pages It guides you back to upper levelby pressing UP key Lock On Setting Value pages press RIGTH key to lock the value for preventing unexpected change Unlock For locked value pre...

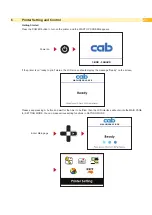
Страница 23: ...428 If the printer is on ready to print status the LCD screen should display the message Ready on the screen MACH2 200 V1 RC0 Please keep pressing button and wait for the timer to be filled then the LCD interface will enter into the MAIN PAGE for SETTING MODE You can make various setting functions in SETTING MODE Enter Main page MACH2 200 V1 RC0 ...

Страница 24: ...lect the functions Select a designated function and press FEED button you will enter the SETTING PAGES for the function or Select Enter On SETTING PAGES press or button to select the setting items Select a designated function and press FEED button you will enter the SETTING VALUE PAGES for the function or Select Enter ...

Страница 25: ...o change the setting values or Select Press FEED button will apply the setting value you just selected and the red tick will appear to mark the value Apply i Note The blue arrow indicates the value you are selected The red tick indicates that the selected value is applied now ...

Страница 26: ...splays the capture of upper level screen and also guides you back to upper level with left or up arrow NAVIGATION ICON On SETTING VALUE PAGES press button will go back to the upper level screen Back to the Setting page On SETTING PAGES press button will go back to the MAIN PAGE screen Back to the Main page ...

Страница 27: ... 6 Printer Setting and Control On MAIN PAGE select Symbol EXIT and press the FEED button The printer now displays again the status Ready or EXIT from Setting Mode MACH2 200 V1 RC0 Back to the Ready status ...
Страница 28: ...ions Select a designated function and press FEED button you will enter the SETTING PAGES for the function Device or Select Device Enter Ethernet Setting Ethernet On Ethernt Setting PAGE press or button to select the setting items or Select a designated funcition Ethernet Select DHCP and press FEED button you will be able to setup DHCP function Ethernet ...

Страница 29: ... DHCP is Disable Press or button to change the setting values Select to enable DHCP Ethernet Ethernet Press FEED button twice to save the setting Press FEED once to exit Press FEED again to save and return to previous SETTING PAGE Ethernet Ethernet ...

Страница 30: ...cursor and select the functions Seclect a designated function and press FEED button you will enter the SETTING PAGE for the function or Select Device Enter LCD Password The default of LCD Setting is Disable Press or button to change the setting values PIN protection Select button to Enable Password function PIN protection ...

Страница 31: ...d Control Select button again to setup the password PIN protection Press FEED button twice to svae the setting Press FEED button onece to exit Press FEED button again to save and reture to previous SETTING PAGE PIN protection ...

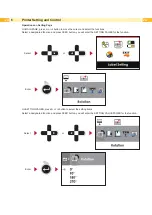
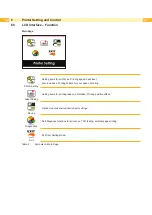
Страница 32: ...evel Also includes a Printing Wizard for your ease of printing Label Setting Setting items for printing label ex Rotation Printing position offset Device Option modules and connection port settings Diagnostics Self Diagnose functions for printer ex TPH testing self test page printing Exit Exit from Setting Mode Table 2 Symbols on Main Page ...

Страница 33: ...0 Setting Heat level 0 19 Print speed 2 5 Label Sensor Label Sensor Auto Select Gap Sensor Reflect Media Type Label with Gaps Label with Marks Continuous Print Mode Direct Thermal Thermal Transfer Tear off Position 0 40 Top of Form Enter Abbrechen Character set 850 737 852 851 437 869 860 Win 1252 863 Win 1250 865 Win 1251 857 Win 1253 861 Win 1254 862 Win 1255 855 Win 1257 866 Label Setting Rotat...

Страница 34: ...e 4800 bps 38400 bps 9600 bps 57600 bps 19200 bps 115200 bps Parity None Odd Even Data Bits 7 Bit 8 Bit Stop Bits 1 Bit 2 Bit Date Time Clock Display Apply Cancel Dat Time Setting JJJJ MM TT HH MM SS Diagnostics Calibration Apply Cancel Test print Apply Cancel Clear Memory Label Format Apply Cancel Images Apply Cancel Bitmap Fonts Apply Cancel True Type Fonts Apply Cancel Asian Fonts Apply Cancel ...

Страница 35: ... below Modell Version MACH1 200 GX XXX USB ID setting USB S N 12345678 Serial port setting Serial port 96 N 8 1 MAC address of Ethernet port MAC Addr xx xx xx xx xx xx IP protocol setting DHCP Enable IP address of Ethernet port IP xxx xxx xxx xxx Gateway setting Gateway xxx xxx xxx xxx Netmask setting Sub Mask xxx xxx xxx xxx Number of DRAM installed 1 DRAM installed Image buffer size Image buffer...

Страница 36: ...nter encountering Media Error during the cases when first time printer start up or change label or ribbon to another type such as change using gap label to continuous or black mark labels Press C button for 2 seconds it will make an auto sensing to calibrate the label and ribbon s parameters Fig 20 Label Calibration Button ...

Страница 37: ...ning of the device Attention The printer can be damaged by aggressive cleansers X X Do not use abrasive cleaners or solvents for cleaning the external surfaces or modules 1 Remove dust and paper fluff from the print area with a soft brush or vacuum cleaner 2 The cover of the printer can be cleaned with a standard cleanser 7 1 2 Cleaning the Print Head Dirt on the print head or ribbon or glue resid...

Страница 38: ... MACH2 200 V1 RC0 Media Error 2 x 3 beeps No ribbon is installed and the printer displays an error Vergewissern Sie sich dass der Druckmodus Thermodirektdruck eingestellt ist The ribbon is finished or the label supply hub is not moving Replace the ribbon roll Check Media MACH2 200 V1 RC0 Media Error 2 x 2 beeps No paper is detected Make sure that the label sensor is positioned correctly If the sen...

Страница 39: ...X Use the internal T command to check whether the thermal print head will carry out a complete print job X X Check the quality of the print medium The printed image is positioned incorrectly X X Check whether there is paper or dust covering the sensor X X Check whether the label stock is suitable Contact your supplier X X Check the paper guide settings A label is missed out during printing X X Che...

Страница 40: ...cannot be combined Open the Printer 2 1 Fig 22 Open the printer X X Place the printer on a flat surface X X Pull the cover release catches 1 on both sides of the printer X X Raise the cover of the casing 2 and lock it into the catch Remove the front cover 3 Fig 23 Remove the front cover X X Pull upward to remove the front cover 3 ...

Страница 41: ...platen 5 4 Fig 24 Remove the platen X X Lift up the release clips 4 on both sides of the platen 5 X X Pull upward the platen 5 i Note Load the ribbon and the label For further information w 4 on page 12 8 Accessories ...

Страница 42: ...Paper sensor 2 Paper feed roller 3 Connection cable of Present Sensor 4 Cover 5 Screws Set of 2 Fig 25 Overview of the Label Dispenser Preparation Steps i Note Please see the Section w 8 1 on page 40 Preparation Steps to complete the preparation steps before installing the Present Sensor Installing the Present Sensor 5 5 3 4 Fig 26 Installing the Present Sensor 1 Pass the connection cable 3 throug...

Страница 43: ...he clips 7 on both sides 8 Fig 28 Closing the and turning printer 7 Release catch for closing the printer cover 8 and close the printer 8 Turn the printer upside down 9 Fig 29 Open the cover of module connection jacks 9 Open the cover of module connection jacks 9 on the bottom of printer 8 Accessories ...

Страница 44: ...back the printer into operating position Loading Label Roll with the Present Sensor Module 11 11 13 12 2 14 12 11 10 Fig 31 Loading label roll 1 Remove the first label 10 from the label liner 11 2 Open the printer and load the label roll w 4 3 on page 15 3 Feed the label stock 11 on both sides through the label guides 12 4 Pull the label liner over the platen 13 and the steel 14 5 Pull the label l...

Страница 45: ...rds until it appears at the underside of the Present Sensor 7 Detach two test labels 10 and feed them over the cover 4 with the paper sensor 1 4 Fig 33 Closing the cover 8 Release catch for closing the printer cover and close the printer 9 Close the cover 4 of the Present Sensor 8 Accessories ...

Страница 46: ... 15 10 11 Fig 34 Function of Present Sensor i Note The label 10 will be peeled from the liner 11 while it passes through the Present Sensor There is a paper sensor on the Present Sensor module It will stop the printing if it is covered by label Remove the last printed label and the printer will then continue to print next label 8 Accessories ...

Страница 47: ...sition to 30 and the E value to 30 The Overview of the Cutter 4 2 4 3 1 1 Cover 2 Feed out slot 3 Connection cable of the Cutter 4 Screws Set of 2 Fig 35 Overview of the Cutter Preparation Steps i Note Please see the Section w 8 1 on page 40 Preparation Steps to complete the preparation steps before installing the Cutter Installing the Cutter 4 4 3 1 Fig 36 Installing the Cutter 1 Pass the connect...

Страница 48: ...platen 5 with the clips 6 on both sides 7 Fig 38 Closing the and turning printer 6 Release catch for closing the printer cover 7 and close the printer 7 Turn the printer upside down 8 Fig 39 Open the cover of module connection jacks 8 Open the cover of module connection jacks 8 on the bottom of printer ...

Страница 49: ...n jacks on the bottom of the printer 11 Turn back the printer into operating position Loading Label Roll with the Cutter 1 Open the printer and load the label roll w 4 3 on page 15 9 10 10 5 1 2 Fig 41 Loading label roll 2 Feed the label stock 9 on both sides through the label guides 10 3 Pull the label stock 9 over the platen 5 and through the feed out 2 slot of the cutter 1 4 Release catch for c...

Страница 50: ...50 50 8 Accessories Function Test 1 Switch the printer on 2 Press the FEED button 11 to set the label position 3 Label is transported forwards and cut 11 Fig 42 Function test of the cutter ...

Страница 51: ... or inside Ribbon Ink side Outside or inside Roll diameter up to mm 68 Core diameter mm 25 4 Variable length up to m 300 Width mm 25 114 Printer size and weights Width x Height x Depth mm 210 x 186 x 280 Weight kg 3 Label sensor with position indication Gap sensor Fixed at center Reflective sensor from below Adjustable Electronics Storage Flash MB 16 SDRAM MB 8 4 MB for the application Battery for...

Страница 52: ...rintout Analysis Finish Label calibration Fonts Font types 11 bitmap fonts including OCR A OCR B Character sets Codepage 437 737 850 bis 852 855 857 860 bis 863 865 866 869 Windows 1250 to 1255 1257 Bitmap fonts Zoom factor up to eight times width and height orientation 0 90 180 270 Graphic formats PCX BMP Barcodes 1D codes Code 39 Code 9 EAN 8 13 Add ons 2 und 5 UPC A E Add ons 2 und 5 Interleave...

Страница 53: ...ww cab de labelprinter 2 Limitations may apply to small labels thin materials or strong adhesives These applications need to be tested and approved 9 2 Interface Pinout Description USB Connector Type Type B Pin No 1 2 3 4 Function VBUS D D GND Table 7 Pinout description USB Interface Serial Port Default settings Baud rate 9600 no parity 8 data bits 1 stop bit XON XOFF protocol and RTS CTS RS232 Ho...

Страница 54: ...https www cab de media pushfile cfm file 2836 9 4 FCC NOTE This equipment has been tested and found to comply with the limits for a Class A digital device pursuant to Part 15 of the FCC Rules These limits are designed to provide reasonable protection against harmful interference when the equipment is operated in a commercial environment The equipment generates uses and can radiate radio frequency ...

Страница 55: ... 16 Lithium battery 5 Loading Material 12 M Mach1 2 Load 19 Main Page 23 27 Material 51 N Navigator Pad 7 21 O Operation Panel 21 52 Overview 6 P Platen 41 43 48 POWER Button 7 11 21 Power cord 6 Power plug 10 Power Supply 10 51 Present Sensor 40 42 Printer Driver 17 Print Head 37 51 Printing Mechanism 9 R Ribbon 12 51 Ribbon Rewind Module 14 Ribbon Supply Module 13 S Safety Instructions 5 Self Te...

Отзывы: