13
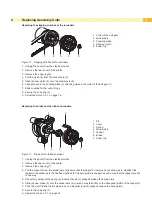
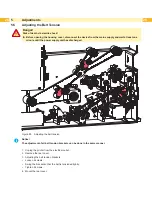
Replacing the slipping clutches at the rewinders
1
2
3
4
5
1 Collar of the belt gear
2 Winder axle
3 Coupling disks
4 Slipping clutch
5 Snap ring
Figure 10 Slipping clutches at the rewinders
1. Unplug the printer from the electrical outlet.
2. Remove the rear cover of the printer
3. Remove the snap ring (5).
4. Pull the clutch (4) from the winder axle (2).
5. Slide the new clutch (4) onto the winder axle (2).
6. Align grooves in the coupling disks (3) with the guides in the collar of the belt gear (1).
7. Slide coupling further until it stops.
8. Secure the snap ring (5).
9. Adjust the clutch
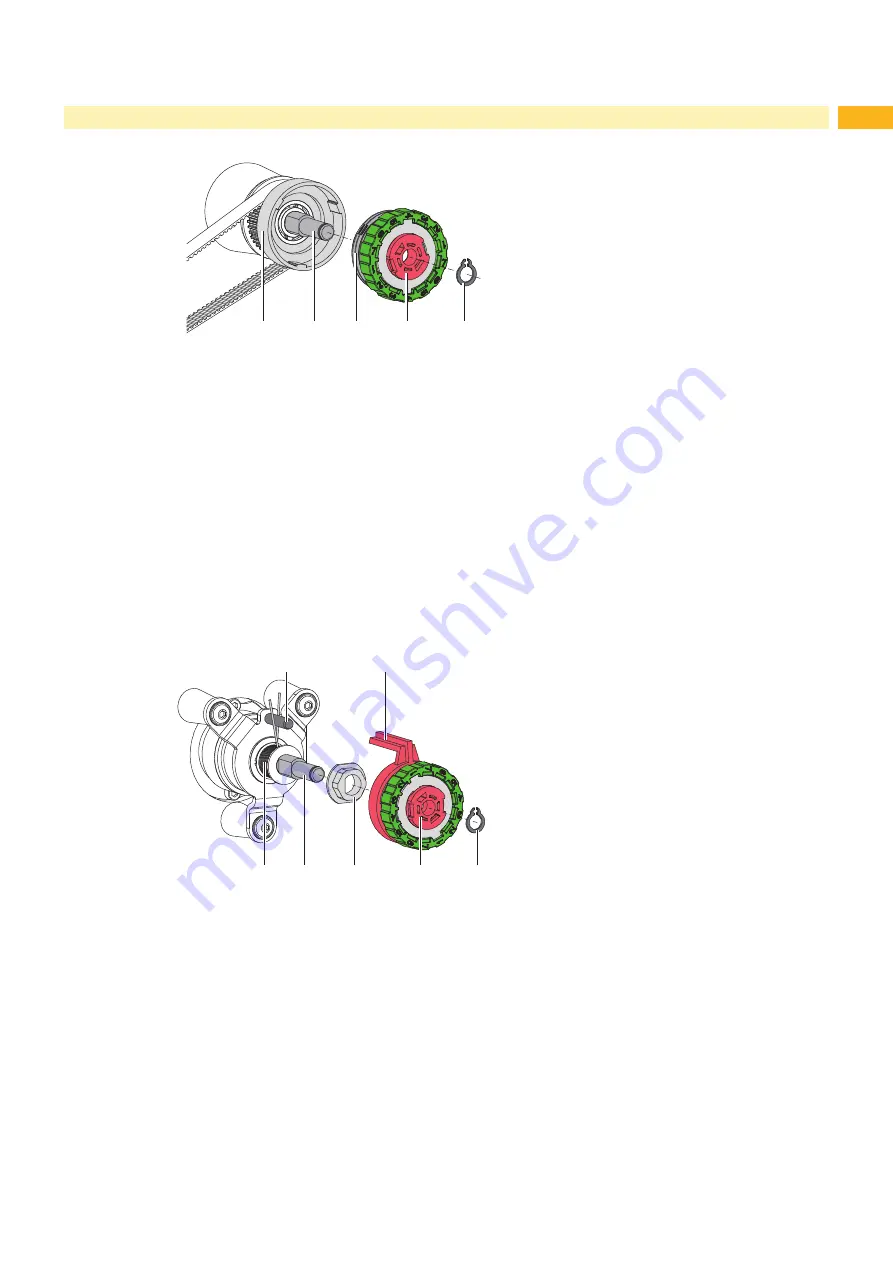
Replacing the brakes at the ribbon unwinders
3
4
5
6
7
1
2
1 Pin
2 Lever
3 Spring
4 Winder axle
5 Tappet
6 Brake
7 Snap ring
Figure 11
Brake at the ribbon unwinder
1. Unplug the printer from the electrical outlet.
2. Remove the rear cover of the printer
3. Remove the snap ring (7).
4. Pull the brake (6) from the winder axle (4).Ensure that the tappet (5) remains on the winder axle. Reattach the
tappet to the winder axle if it has been pulled off. The axle profile is shaped in such a way that the tappet only fits
in one way.
5. Check the position of the spring (3). Ensure that pin (1) grasps between the spring arms.
6.
Slide the new brake (6) onto the winder axle (4) in such a way that it fits on the hexagonal profile of the tappet (5).
7. Push the clutch further until it stops in such a way that lever (2) grasps between the spring arms..
8. Secure the snap ring (7).
9. Adjust the brake
Содержание Hermes C 6L
Страница 1: ...Made in Germany Service Manual Hermes C Label Printer ...
Страница 33: ...33 7 Block Diagram Figure 34 Block diagram Hermes C ...
Страница 34: ...34 34 8 Layout Diagram CPU Figure 35 Layout diagram PCB CPU components side ...
Страница 35: ...35 Figure 36 Layout diagram PCB CPU soldering side 8 Layout Diagram CPU ...


