
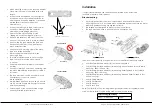

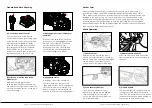
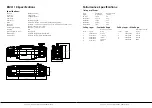


Preparation before Winching
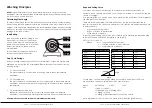
Connect each end of the remote
control lead to the corresponding plugs
on the remote control and control box,
ensuring correct alignment. Tighten
collars to ensure reliable connections.
For wireless controller, press and hold
the POWER Button for 3 seconds to
activate controller. Always disconnect
the remote control when not in use.
Wear appropriate gloves when
handling rope. Hold Pull Strap and pull
or power out enough rope to reach the
anchor point. Keep tension on the rope
when unspooling.
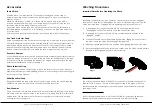
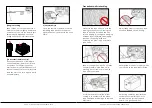
Turn the clutch handle in a clockwise
direction to the “Disengaged” position.
The rope is now free to be unwound
from the drum by hand. Never
disengage the clutch while the rope
is under load. Do not disengage the
clutch if powering out in Step 3.
To engage, turn clutch handle in a
counter-clockwise cirection to the
“Engaged” position. Never engage the
clutch while the drum is rotating. The
drum may need to be rotated slightly
by hand to ensure proper engagement.
1) Connect the remote control
3) Pull or Power Out the rope to the
anchor point
2) Disengage the clutch (for freespool
operation)
4) Engage the clutch
ISOMETRIC VIEW
N.T.S.
FLAT PATTERN
.
SCALE
ISOMETRIC VIEW
N.T.S.
FLAT PATTERN
.
SCALE
ISOMETRIC VIEW
N.T.S.
FLAT PATTERN
.
SCALE
ISOMETRIC VIEW
N.T.S.
FLAT PATTERN
.
SCALE
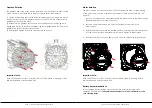
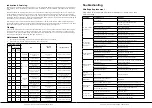
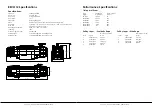
Anchor Point
Winch Operation
When choosing an anchor point, select a firm point such as a tree, stump or
rocks. DO NOT WRAP THE ROPE AROUND THE ANCHOR POINT AND BACK ONTO
ITSELF. Always use a tree trunk protector strap to prevent ring barking the tree and
damage to the rope. If using a winch to retrieve another stranded vehicle, the
rescue vehicle is considered the anchor point and should be made secure. The
anchor point must be strong enough to hold the gross weight of the vehicle and
be positioned to keep the fleet angle between the centre of the anchor point and
the wire rope maintained at less than 15°.
Before winching, ensure the rope is
wound on the drum evenly. If unevenly
wound, there is a possibility of damaging
the rope when under load. Visually
check rope for any signs of damage.
Lay a recovery damper or heavy
blanket over the rope in the middle
third of its length. If a rope failure
occurs, the damper can prevent the
rope from whipping.
Use a shackle to lock both ends of the
tree trunk protector and then attach to
the hook.
The recovery vehicle’s engine should be
running to provide maximum power to
the winch. The transmission should be set
in neutral and the hand brake applied to
prevent the vehicle from moving.
1) Check the rope
3) Use a Recovery Damper
2) Attach shackle and hook
4) Prepare Vehicle
| REVO VEHICLE RECOVERY WINCH
|REVO VEHICLE RECOVERY WINCH
Page 17
Page 18
Содержание REVO 10
Страница 1: ...REVO 10S REVO 10W REVO 12S REVO 12W ...
Страница 24: ......


