background image

56

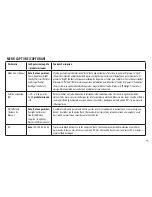
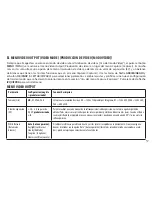
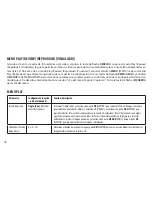
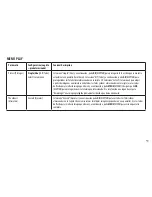
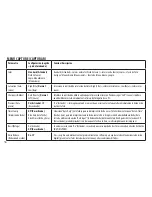
Parámetro

Configuración (negrita 

= predeterminada)

Función/Descripción

Color

Standard (Estándar)

Vivid (intenso), 
Sepia, Monochrome 
(Monocromo)

Standard (Estándar) = colores normales; Vivid (intenso) = colores extra fuertes; Sepia = efecto de foto 
“antigua”; Monochrome (Monocromo) = efecto de foto en blanco y negro.

Saturation (Satu-
ración)

High (Alta),

 Normal

,


Low (Baja)

Selecciona la cantidad de saturación del color. High (Alta) = colores más intensos; Low (Baja) = colores más 
suaves.

Sharpness (Nitidez)

Hard (Fuerte),

 Normal, 

Soft (Suave)

Establece la cantidad de nitidez aplicada por el procesador interno. Puede escoger "Soft" (Suave) si prefiere 
añadir nitidez más tarde mediante el software de fotografía de su PC.

Preview (Vista 
previa)

On (Activado)

, Off 

(Desactivado)

“On” (Activado) = la imagen capturada se muestra unos instantes en la pantalla inmediatamente después de 
realizar la foto.

time Stamp 
(impresión de fecha)

Off (Desactivado)

Date Only (Solo fecha), 
Date&time (Fecha y hora)

Seleccione “Date Only” (Solo fecha) para sobreimprimir la fecha en sus fotos/vídeos. Seleccione “Date & time” 
(Fecha y hora) para sobreimprimir tanto la fecha como la hora. Asegúrese de haber definido la fecha/hora 
correcta mediante la opción “Date input” (introducir Fecha) del menú Setup (Configuración). Seleccione Off 
(Desactivado) (predeterminado) si no desea que la fecha o la hora se sobreimpriman en las imágenes.

Burst (Ráfaga)

On (Activado), 

Off (Desactivado)

Cuando se ajusta como “On” (Activado), se realizará una serie rápida de tres fotos con cada pulsación del botón 
SNAP (DiSPARO).

Noise Reduce 
(Reducción de ruido) 

On

, Off

On = se aplica automáticamente el procesamiento con software para ayudar a reducir la apariencia de ruido 
digital (grano) en las fotos tomadas bajo luz tenue y otras condiciones difíciles.

MENÚ CAPTURE (CAPTURAR)

Содержание ImageView 118328

Страница 1: ...Instruction Manual Lit 98 2384 12 12 Digital Camera binocular Model 118328 ...

Страница 2: ...4 Basic Setup 5 6 Taking Still Photos 7 8 Shooting Videos 9 Using the Capture Still Photo Menu 10 12 The Video Output Menu 13 The Play Review Menu 14 15 The Setup Menu 16 17 Transferring the Photos Videos to Your PC 18 19 Using the Binocular 20 21 General Care and Cleaning 21 22 ...

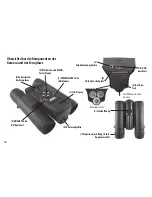
Страница 3: ...splay D Arrow Keys MENU Button F Binocular Focus Knob C POWER MODE Button E OK SNAP Button K Camera Lens I USB Port H Remote Jack B Card Slot A Battery Compartment G Tripod Socket J Diopter Adjustment right eyecup Slidedowntoopen Batterypolarity ...

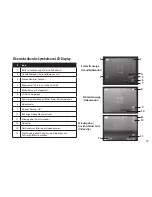
Страница 4: ... Megapixels 6 SD Card Inserted 7 of Photos Remaining based on unused card memory 8 Video Mode 9 Video Resolution HD 10 Elapsed Video Recording Time 11 Playback Review Mode 12 Video Clip 13 File Number Photo or Video 14 Press Up Key to Play Pause the Video clip Live Preview Screen Still Photo Mode 4 3 7 2 1 6 5 8 9 10 Live Preview Screen Video Mode 11 Play Review Screen Video Clip 12 13 14 HD ...

Страница 5: ...gment Inserting An SD Card The ImageView model 118328 requires an SD or SDHC High Capacity memory card with 32GB or lower capacity 64GB or higher cards will not work to store the photos and or videos it captures As there is no internal memory the message INSERT CARD appears on the display after power on and the ImageView cannot be used until a card is inserted Insert a compatible card not included...

Страница 6: ... language using the UP or DOWN keys then press OK SNAP to set it Press the LEFT key twice to exit the Setup and Capture menus Setting the Date and Time Optional only necessary if you want to imprint date time on photos The Date Time Stamp feature is turned off by default If you want to use it first set the date and time by pressing MENU Press the Right arrow key to select the Setup menu then press...

Страница 7: ... display is recommended The ImageView will default to high resolution and quality settings as well as everything on automatic when it is turned on for the first time so you re ready to take photos under normal conditions with no need to change anything If you d like to explore the various available options see the manual section titled Using the Main Menu Options and Settings for directions regard...

Страница 8: ...ds To turn off all digital zoom returning to optical magnification only keep pressing the DOWN key until the zoom bar indicator goes all the way down indicating 1 0 digital zoom To review a photo after you take it press the RIGHT arrow key To see other photos taken previously press the LEFT arrow key each press takes you back one photo and pressing the RIGHT arrow key moves forward to more recent ...

Страница 9: ...SNAP Press OK SNAP again to stop recording Press POWER MODE to switch back to still photo mode The video quality file size can be set by pressing MENU select Size if not already highlighted and press OK SNAP You can the select your preferred video resolution from HD highest quality largest files to QVGA lowest quality smallest files Note regardless of the resolution setting all videos are recorded...

Страница 10: ...escent lights Press the MENU button to enter the main menu Use the UP DOWN arrow keys to highlight an option within the menu then press OK SNAP if you wish to change the settings for that option Use the UP DOWN keys to select the setting you want then press OK SNAP to confirm and activate the new setting Here are all the parameters and settings available in the CAPTURE Still Photo Mode menu along ...

Страница 11: ... motion blur Night preset selects slower shutter speeds to gather more light use tripod Portrait preset opens lens aperture to help blur background Landscape preset closes lens aperture to help sharpen background Backlight preset adds overexposure to avoid dark subject in center EV 2 0 2 0 in 0 5 EV steps default 0 Provides manual under over exposure adjustment Minus values produce darker photos p...

Страница 12: ...rocessor You may want to select Soft if you prefer to add sharpening later using photo software on your PC Preview On Off On captured image is briefly shown on display immediately after snapping photo Time Stamp Off Date Only Date Time Select Date Only to imprint date on photos videos Select Date Time to imprint both date and time Be sure correct date time has been set using Date Input in the Setu...

Страница 13: ...enu Press the LEFT arrow key to exit the menu Parameter Settings Bold Default Function Description Size HD D1 QVGA VGA Selects video resolution HD 1280x720 pixels per frame D1 720x480 QVGA 320x240 VGA 640x480 EV 2 0 2 0 in 0 5 EV steps default 0 Provides manual under over exposure adjustment Minus values produce darker videos plus values lighter When the background is very bright for example snow ...

Страница 14: ...ly described in Using the Capture Menu Press the LEFT arrow key to exit the menu PLAY REVIEW MENU Parameter Settings Bold Default Function Description Delete Single All Select Select Single then press OK to delete the currently displayed last photo or video Select All then press OK to delete all photos videos stored on the SD card Select Select to choose from thumbnail images of all photos videos ...

Страница 15: ...f all photos videos stored on the card use the arrow keys to highlight the image you want then press MENU then press OK to protect the selected image only Use this function a second time to unprotect a previously protected image if you decide you want to erase it Thumbnail Execute Select Execute then press OK to view all photos videos stored on the SD card as thumbnails multiple small images on on...

Страница 16: ... Menu orVideo Output Menu After you first enter any other menu screen press the RIGHT arrow key to switch to the Setup menu The Setup menu provides a variety of basic operating functions that are unrelated to capturing or reviewing photos and videos The SETUP tab at the top right of the menu display will be highlighted after you select it Use the UP DOWN arrow keys and OK SNAP button to select par...

Страница 17: ...Select Off to cancel power stays on unless camera is manually turned off by holding Mode Power button Sys Reset Cancel Execute Press OK Select Execute and press OK to restore all settings for all options in all menus to their original factory default settings Light Freq 60 Hz 50 Hz Set to the AC line frequency used in your country Primarily affects images shot under fluorescent lighting Date Input...

Страница 18: ...Disk with an unused drive letter assigned to it Mac Users the SD card will appear as a new disk drive icon on your desktop Double click this new Disk icon open the DCIM folder inside then the folder s inside that 100DSCIM etc Your photos videos are the files inside they have the prefix PICT__ followed by a number same as seen earlier on the camera s display when you review photos Still photos have...

Страница 19: ...f your photos you can resize the photo to fit the paper if you are printing or save a smaller low or medium resolution version for email or inserting into documents When you are ready to save your edited file you may want to use Save As and give it a more descriptive name than PICT0001 etc Doing this also preserves the original file as a backup to reopen and re edit later Make sure you have succes...

Страница 20: ...his will bring your eyes closer to the binocular lens so you can view the entire image without any cutoff Setting the Diopter Adjustment 1 Rotating the right eyecup pg 3 J allows you to fine tune the binocular focus to your vision diopter adjustment Make sure the right eyecup is set to zero for now arrow on the underside of the eyecup pointing to 0 Keep both eyes open at all times 2 Using your han...

Страница 21: ...w will provide years of trouble free service if it receives the normal care you would give any fine optical instrument Avoid sharp impacts Set the ImageView down gently on hard surfaces Tug on the strap after attaching it to make sure it is securely fastened to the binocular before placing it around your neck Store your ImageView in a cool dry place whenever possible Remove the batteries if the Im...

Страница 22: ...acandMacOSaretrademarksofAppleInc registeredintheU S andothercountries breathe lightly on the lens to provide a slight amount of moisture then gently rub the lens with the microfiber cloth For a more thorough cleaning photographic lens tissue and photographic type lens cleaning fluid or isopropyl alcohol may be used Always apply the fluid to the cleaning cloth never directly on the lens ...

Страница 23: ...this device under Part 15 regulations The shielded interface cable which is provided must be used with the equipment in order to comply with the limits for a digital device pursuant to Subpart B of Part 15 of FCC Rules TWO Year LIMITED WARRANTY Your Bushnell product is warranted to be free of defects in materials and workmanship for two years after the date of purchase In the event of a defect und...

Страница 24: ... Configuration de base 27 28 Prise de photos 29 30 Prise de vidéos 31 Utilisation du menu Saisie photo fixe 32 34 Le menu Sortie vidéo 35 Le menu Lecture Visionnage 36 37 Le menu Configuration 38 39 Transfert des photos et des vidéos sur PC 40 41 Utilisation des jumelles 42 43 Entretien général et nettoyage 43 44 ...

Страница 25: ...Molette de mise au point des jumelles C Bouton POWER MODE E Bouton OK SNAP K Objectif I Port USB H Prise pour la commande à distance B Emplacement pour carte SD A Compartiment des piles G Point de fixation pour trépied J Réglage dioptrique œilleton droit Faitesglisserverslebas pourouvrirn Polaritédespiles ...

Страница 26: ... 6 Carte SD insérée 7 Nombre de photos restantes basé sur une carte mémoire non utilisée 8 Mode vidéo 9 Résolution des vidéos HD 10 Temps d enregistrement de la vidéo écoulé 11 Mode Lecture Visionnage 12 Clip vidéo 13 Numéro de fichier n de photo ou de vidéo 14 Appuyez sur la touche Haut pour lire interrompre le clip vidéo Écran de prévisualisation en direct mode photo 4 3 7 2 1 6 5 8 9 10 Écran d...

Страница 27: ...Go maximum les cartes d une capacité supérieure à 64 Go ne fonctionneront pas pour enregistrer les photos et ou vidéos prises Puisqu il n y a pas de mémoire interne le message INSÉRER CARTE s affiche sur l écran à l allumage et les jumelles ImageView ne peuvent pas être utilisées tant qu aucune carte n est insérée Insérez une carte compatible non incluse dans l emplacement de carte B les connecteu...

Страница 28: ...onfiguration et Saisie Réglage de la date et de l heure choix optionnel uniquement nécessaire si vous souhaitez marquer la date l heure sur les photos La fonction de marquage de la date l heure est désactivée par défaut Si vous souhaitez l utiliser configurez d abord la date et l heure en appuyant sur MENU Appuyez sur la touche fléchée DROITE pour sélectionner le menu Configuration puis appuyez su...

Страница 29: ... paramètre tout sur automatique la première fois que vous allumez l appareil vous êtes alors prêt à prendre des photos dans des conditions normales sans avoir besoin de faire de changements Si vous souhaitez explorer les différentes options disponibles veuillez consulter la section du manuel intitulée Utilisation du menu Saisie mode photo pour des instructions concernant la façon de sélectionner e...

Страница 30: ...chée GAUCHE chaque pression vous fait reculer d une photo et appuyer sur la touche fléchée DROITE vous fait passer à des photos plus récentes Appuyez sur le bouton MODE pour quitter le modeVisionnage et pour revenir à la prévisualisation en direct Consultez la section Menu Lecture Visionnage pour les détails sur la manière d utiliser les fonctions du menu pour effacer des photos afficher un diapor...

Страница 31: ...ouvez sélectionner la résolution vidéo de votre choix de HD qualité la plus haute fichiers les plus larges à QVGA qualité la plus basse fichiers les plus petits Remarque quel que soit le réglage de la résolution toutes les vidéos sont enregistrées à une fréquence d image de 30 i s images par seconde au format avi Les jumelles ImageView n enregistrent pas le son Appuyez sur la touche fléchée DROITE...

Страница 32: ... MENU pour accéder au menu principal Utilisez les touches fléchées HAUT BAS pour mettre en surbrillance une option du menu et appuyez sur OK SNAP si vous souhaitez changer le réglage de cette option Utilisez les touches fléchées HAUT BAS pour sélectionner le réglage de votre choix puis appuyez sur OK SNAP pour confirmer et activer le nouveau réglage Voici tous les paramètres et réglages disponible...

Страница 33: ...turation plus lentes pour attirer plus d éclairage utiliser un trépied Le préréglage Portrait ouvre l ouverture de l objectif pour augmenter le flou de l arrière plan Le préréglage Paysage ferme l ouverture de l objectif pour augmenter la netteté de l arrière plan Le préréglage Rétroéclairage augmente la surexposition pour éviter les sujets sombres au centre EV 2 0 2 0 par paliers de 0 5 EV par dé...

Страница 34: ...lus tard à l aide d un logiciel de photo sur votre PC Aperçu On Off activé désactivé On l image capturée est brièvement affichée à l écran immédiatement après la saisie de la photo Time stamp marquage date et heure Off désactivé Date uniquement Date heure Sélectionnez Date uniquement pour marquer la date sur les photos vidéos Sélectionnez Date heure pour marquer la date et l heure Assurez vous que...

Страница 35: ...mètrespardéfaut sontengras Fonction Description Taille HD D1 QVGA VGA Sélectionne la résolution de la vidéo HD 1280 x 720 pixels par image D1 720 x 480 QVGA 320 x 240 VGA 640 x 480 EV 2 0 2 0 par paliers de 0 5 EV par défaut 0 Permet un ajustement manuel en cas de surexposition ou sous exposition Les valeurs négatives donnent des vidéos plus sombres les valeurs positives des vidéos plus claires Lo...

Страница 36: ...hée GAUCHE pour quitter le menu MENU LECTURE VISIONNAGE Paramètre Paramètres les paramètrespardéfaut sontengras Fonction Description Effacer Un fichier Tout Sélection Sélectionnez Un fichier puis appuyez sur OK pour effacer la dernière photo ou vidéo actuellement affi chée Sélectionnez Tout puis appuyez sur OK pour effacer toutes les photos vidéos enregistrées sur la carte SD Sélectionnez Sélectio...

Страница 37: ...registrées sur la carte utilisez les touches fléchées pour mettre en surbrillance l image de votre choix puis appuyez sur MENU puis appuyez sur OK pour protéger uniquement l image sélectionnée Utilisez à nouveau cette fonction pour ne plus protéger une image précédemment protégée si vous souhaitez la supprimer Miniature Exécuter Sélectionnez Exécuter puis appuyez sur OK pour voir toutes les photos...

Страница 38: ... menus Saisie Lecture ou Sortie Vidéo Aprèsêtreentrédansunautreécrandemenu appuyezsurlatouchefléchéeDROITEpourbasculerverslemenuConfiguration Le menu Configuration propose diverses fonctions opérationnelles qui ne sont pas liées à la saisie ou au visionnage des photos et vidéos L onglet CONFIGURATION en haut à droite de l écran du menu est mis en surbrillance lorsque vous le sélectionnez Utilisez ...

Страница 39: ...este allumé à moins qu il soit éteint manuellement en maintenant appuyé le bouton Mode Power Sys Reset Annuler Exécuter Appuyez sur OK Sélectionnez Exécuter et appuyez sur OK pour restaurer tous les réglages pour toutes les options dans tous les menus à leurs paramètres par défaut prédéfinis en usine Fréq Légère 60 Hz 50 Hz Définit la fréquence du courant alternatif utilisée dans votre pays Affect...

Страница 40: ...sque sur votre bureau Double cliquez sur cette nouvelle icône de Disque ouvrez le dossier DCIM à l intérieur ainsi que le ou les dossiers à l intérieur de celui ci 100DSCIM etc Vos photos vidéos constituent les fichiers à l intérieur du dossier caractérisés par le préfixe PICT__ suivi d un numéro le même qui a été illustré auparavant sur l écran de l appareil photo lorsque vous visionnez les photo...

Страница 41: ... si vous allez l imprimer ou en enregistrer une plus petite de résolution inférieure ou moyenne pour l envoyer par e mail ou l insérer dans des documents Lorsque vous êtes prêt à enregistrer votre fichier modifié vous pouvez utiliser Enregistrer sous et lui donner un nom plus descriptif que PICT0001 etc Cela permet également de conserver le fichier original comme fichier de sauvegarde pouvant être...

Страница 42: ...miner toute lumière parasite Si vous portez des lunettes baissez les œilletons Ceci rapprochera vos yeux des lentilles des jumelles pour que vous puissiez voir l image entière sans qu elle soit coupée Réglage dioptrique 1 La rotation de l œilleton droit p 25 J vous permet de régler avec précision la mise au point des jumelles à votre vision réglage dioptrique Assurez vous que l œilleton droit est ...

Страница 43: ...les ImageView devraient maintenant être ajustées à votre vue personnelle La mise au point pour toute distance peut maintenant être effectuée en tournant la molette centrale de mise au point ENTRETIEN GÉNÉRAL ET NETTOYAGE Entretien des jumelles ImageView Vos jumelles ImageView Bushnell resteront parfaitement fonctionnelles pendant des années si vous les entretenez aussi bien que n importe quel autr...

Страница 44: ...ble est idéal pour le nettoyage régulier de vos optiques Soufflez simplement légèrement sur la lentille pour créer une petite quantité d humidité puis frottez doucement la lentille avec le chiffon microfibre Pour un nettoyage plus en profondeur vous pouvez utiliser des tissus ou des nettoyants pour lentilles spéciaux ou de l alcool isopropylique Appliquez toujours le liquide sur le chiffon jamais ...

Страница 45: ...esseàlaquelleleproduitdevraêtrerenvoyé 3 Uneexplicationdeladéfaillanceconstatée 4 Preuvedeladated achat 5 Leproduitdevraêtreemballésoigneusementdansuncartond expéditionsolidepouréviterd êtreendommagépendantletransportetavecportpayéàl adresseindiquéeci dessous AuxUSAEnvoyerà AUCANADAEnvoyerà BushnellOutdoorProducts BushnellOutdoorProducts Attn Repairs Attn Repairs 9200Cody 25AEastPearceStreet Unit1...

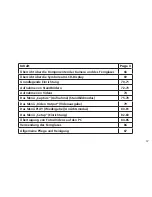
Страница 46: ...ización de fotografías estáticas 51 52 Grabación de vídeos 52 53 Uso del menú Capture Still Photo Capturar Fotografía Estática 54 56 Menú Video Output Producción de vídeo 57 Menú Play Review Reproducir Visualizar 58 59 El menú Setup Configuración 60 61 Transferencia de fotos vídeos a su PC 62 63 Uso De Los Prismáticos 64 Cuidado general y limpieza 65 ...

Страница 47: ...de enfoque de los prismáticos C Botón POWER MODE ENCENDIDO MODO E Botón OK SNAP ACEPTAR DISPARO K Objetivo de la cámara I Puerto USB H Conector remoto B Ranura para tarjetas SD A Compartimento de las pilas G Junta para el trípode J Ajuste de dioptrías ocular derecho Deslicehaciaabajoparaabrir Polaridaddelasbaterías ...

Страница 48: ...jeta SD insertada 7 N º de fotos restantes según la cantidad de memoria no utilizada que quede en la tarjeta 8 Modo Video Vídeo 9 Resolución de vídeo HD 10 Tiempo transcurrido de grabación de vídeo 11 Modo Playback Review Reproducción Visualización 12 Videoclip 13 Número de archivo n º de foto o vídeo 14 Pulse tecla Arriba para reproducir detener el videoclip Pantalla de vista previa en vivo modo ...

Страница 49: ...nferior no funcionará con tarjetas de 64 GB o más para almacenar las fotos y o vídeos que capture Como ImageView no dispone de memoria interna cuando se enciende aparece en la pantalla el mensaje INSERT CARD INSERTAR TARJETA y no se podrá utilizar hasta que se inserte una Inserte una tarjeta compatible no incluida en la ranura para tarjetas B con los contactos metálicos de la tarjeta hacia arriba ...

Страница 50: ...urar Configuración de fecha y hora Opcional solo si desea sobreimprimir la fecha hora en las fotos La función Date Time Stamp Impresión de Fecha Hora está desactivada de forma predeterminada Si desea utilizarla defina primero la fecha y la hora pulsando el botón MENU MENÚ Pulse la tecla de flecha Arriba para seleccionar el menú Setup Configuración a continuación pulse la tecla de flecha ARRIBA par...

Страница 51: ...r la pantalla LCD de vista previa ImageView tomará por defecto una resolución alta y unos ajustes de gran calidad así como todo en automático cuando se enciende por primera vez de modo que usted estará listo para tomar fotos en condiciones normales sin necesidad de cambiar nada Si quiere analizar las opciones disponibles vea la sección del manual titulada Uso del menú Capturar Modo Fotografía está...

Страница 52: ...ara ver otras fotos anteriores pulse la tecla de flecha IZQUIERDA Cada presión le lleva una foto atrás y pulsando la tecla de flecha DERECHA se mueve hacia adelante hacia las fotos más recientes Pulse el botón MODE MODO para salir del modo Review Visualizar y volver a la vista previa en vivo Consulte la sección Menú Reproducir Visualizar para obtener detalles sobre cómo utilizar las funciones del ...

Страница 53: ...rchivo pueden ajustarse pulsando MENU MENÚ seleccionando Size Tamaño si no aparece ya resaltado y pulsando OK SNAP ACEPTAR DISPARO Puede seleccionar la resolución de vídeo que prefiera desde HD calidad máxima archivos más grandes hasta QVGA calidad mínima archivos más pequeños Nota Independientemente de la resolución seleccionada todos los vídeos se graban a una velocidad de 30 fotogramas en forma...

Страница 54: ...JO para seleccionar el ajuste que desee y a continuación pulse OK SNAP ACEPTAR DISPARO para confirmar y activar la nueva configuración Estos son todos los parámetros y ajustes que tiene a su disposición en el menú CAPTURE CAPTURAR modo Still Photo Fotografía Estática junto con una descripción de sus funciones Parámetro Configuración negrita predeterminada Función Descripción Tamaño Size 12 M 8 M 5...

Страница 55: ...2 0 2 0 en pasos de 0 5 EV predeterminado 0 Permite realizar un ajuste manual de la infraexposición sobreexposición Los valores negativos permiten obtener fotos más oscuras mientras que los valores positivos permiten obtenerlas más claras Cuando el fondo sea muy brillante por ejemplo nieve en escenas invernales puede que necesite añadir EV para evitar la infraexposición White Balance Balance de bl...

Страница 56: ...s instantes en la pantalla inmediatamente después de realizar la foto Time Stamp Impresión de fecha Off Desactivado Date Only Solo fecha Date Time Fecha y hora Seleccione Date Only Solo fecha para sobreimprimir la fecha en sus fotos vídeos Seleccione Date Time Fecha y hora para sobreimprimir tanto la fecha como la hora Asegúrese de haber definido la fecha hora correcta mediante la opción Date Inpu...

Страница 57: ...ón negrita predeterminada Función Descripción Tamaño Size HD D1 QVGA VGA Selecciona la resolución de vídeo HD 1280 x 720 píxeles por fotograma D1 720 x 480 QVGA 320 x 240 VGA 640 x 480 Valor de exposición EV 2 0 2 0 en pasos de 0 5 EV predeterminado 0 Permite realizar un ajuste manual de la infraexposición sobreexposición Los valores negativos permiten obtener fotos más oscuras mientras que los va...

Страница 58: ...cla de flecha IZQUIERDA para salir del menú MENÚ PLAY Parámetro Configuración negrita predeterminada Función Descripción Delete Suprimir Single Uno All Todo Select Seleccionar Seleccione Single Uno y a continuación pulse OK ACEPTAR para suprimir la foto o vídeo que se muestra actualmente en pantalla los últimos Seleccione All Todo y a continuación pulse OK ACEPTAR para suprimir todas las fotos y v...

Страница 59: ... fotos y vídeos almacenados en la tarjeta use las teclas de flecha para resaltar la imagen que desee y a continuación pulse MENU MENÚ y después pulse OK ACEPTAR para proteger únicamente la imagen seleccionada Use esta función una segunda vez para desproteger una imagen protegida previamente si decide que desea eliminarla Thumbnail Miniatura Execute Ejecutar Seleccione Execute Ejecutar y a continua...

Страница 60: ...Capturar Play Reproducir oVideo Output Producción de vídeo Después de acceder por primera vez a cualquier otra pantalla de menú pulse la tecla de flecha DERECHA para pasar al menú Setup Configuración El menú Setup Configuración ofrece una serie de funciones operativas básicas relacionadas con la captura o la visualización de fotos y vídeos La pestaña SETUP CONFIGURACIÓN ubicada en la parte superio...

Страница 61: ...tivado para cancelar la cámara permanecerá encendida a menos que se apague manualmente manteniendo pulsado el botón Mode Power Modo Encendido Sys Reset Reinicio del sistema Cancel Cancelar Execute Ejecutar Pulse OK ACEPTAR Seleccione Execute Ejecutar y pulse OK ACEPTAR para restaurar todos los ajustes para todas las opciones en todos los menús a sus ajustes originales de fábrica Light Freq Frec Lu...

Страница 62: ...c la tarjeta SD aparecerá en su escritorio como un nuevo icono de unidad de disco Haga doble clic en este nuevo icono de disco abra la carpeta de DCIM y después la s carpeta s que haya dentro de ella 100DSCIM etc Sus fotos vídeos son los archivos que hay dentro llevan el prefijo PICT__ seguido de un número igual que el que usted veía antes en la pantalla de la cámara cuando visualizaba sus fotos L...

Страница 63: ...i va a imprimirla o guardar una versión más pequeña de resolución baja o media para utilizar las fotos en el correo electrónico o insertarlas en documentos Cuando esté listo para guardar su archivo editado tal vez desee utilizar Guardar como y darle un nombre más descriptivo que el de PICT0001 etc Al hacerlo también conservará el archivo original como copia de seguridad para poder volver a abrirlo...

Страница 64: ...de los prismáticos a su vista ajuste de dioptrías Asegúrese de que el ocular derecho esté colocado en cero en ese momento es decir que la flecha de la parte inferior del ocular señale al 0 Mantenga los dos ojos abiertos todo el tiempo 2 Cubra con la mano la lente frontal del objetivo del lado derecho de los prismáticos mientras mira por los oculares 3 Gire el mando de enfoque de los prismáticos F ...

Страница 65: ... polvo o la suciedad de las lentes o use un cepillo suave para lentes Para eliminar la suciedad y las marcas de dedos utilice el paño de microfibra incluido y frote con movimientos circulares Usar un paño áspero o frotar innecesariamente las lentes puede rayar la superficie y causar daños permanentes Un paño de microfibra lavable es ideal para la limpieza rutinaria de las lentes Eche un poco de al...

Страница 66: ...irección para la devolución del producto 3 Una explicación del defecto 4 Prueba de Fecha de Compra 5 El producto debe estar bien empaquetado en una caja de cartón resistente para evitar que se dañe en el tránsito con gastos prepagados de envío a la dirección siguiente EN U S A Envíelo a EN CANADÁ Envíelo a Bushnell Outdoor Products Bushnell Outdoor Products Attn Repairs Attn Repairs 9200 Cody 25A ...

Страница 67: ...richtung 70 71 Aufnahme von Standbildern 72 73 Aufnahme von Videos 74 Das Menü Capture Aufnahme Standbildmodus 75 78 Das Menü Video Output Videoausgabe 79 Das Menü PLAY Wiedergabe Ansichtsmodus 80 81 Das Menü Setup Einrichtung 82 83 Übertragung von Fotos Videos auf den PC 84 85 Verwendung des Fernglases 86 Allgemeine Pflege und Reinigung 87 ...

Страница 68: ...NU Taste Menü F Fokussierrad des Fernglases C POWER MODE Taste Ein Modus E OK SNAP Taste OK Auslöser K Kameraobjektiv I USB Anschluss H Fernbedienungsbuchse B SD Kartensteckplatz A Batterie fach G Stativöffnung J Dioptrieneinstellung rechte Augenmuschel ZumÖffnennachunten schieben Batteriepolarität ...

Страница 69: ...6 SD Karte eingelegt 7 Anz der verbleibenden Bilder freier Kartenspeicher 8 Videomodus 9 Videoauflösung HD 10 Bisherige Videoaufnahmedauer 11 Wiedergabe Ansichtsmodus 12 Videoclip 13 Dateinummer Bild oder Videonummer 14 Zum Wiedergeben Anhalten des Videoclips die Aufwärtspfeiltaste drücken Echtzeitanzeige Standbildmodus 4 3 7 2 1 6 5 8 9 10 Echtzeitanzeige Videomodus 11 Wiedergabe Ansichtsbildschi...

Страница 70: ...arte mit einer Kapazität von maximal 32 GB Karten mit 64 GB oder mehr können nicht verwendet werden auf der die aufgenommenen Fotos und oder Videos gespeichert werden Da die Kamera keinen internen Speicher hat wird nach dem Einschalten die Meldung INSERT CARD Karte einlegen am Display angezeigt Sie können die ImageView erst verwenden nachdem Sie eine Karte eingelegt haben Stecken Sie eine kompatib...

Страница 71: ...m die Menüs Setup Einrichtung und Capture Aufnahme zu schließen Einstellen von Datum und Uhrzeit optional nur zum Drucken von Datum Uhrzeit auf Fotos erforderlich Die Funktion Date Time Stamp Datums Zeitstempel ist standardmäßig deaktiviert Wenn Sie diese nutzen möchten müssen Sie zunächst das Datum und die Uhrzeit einstellen Drücken Sie hierzu die Taste MENU Menü Wählen Sie mit der RECHTEN PFEILT...

Страница 72: ...hau über das LCD Display jedoch empfohlen Die ImageView verwendet beim ersten Einschalten standardmäßig eine hohe Auflösung und Qualitätseinstellung sowie den Automatikmodus Sie können also unter den meisten Bedingungen ohne weitere Änderungen mit den Fotoaufnahmen beginnen Weitere Informationen zu den verfügbaren Optionen finden Sie im Abschnitt Verwendung des Menüs Capture Aufnahme Standbildmodu...

Страница 73: ... indem Sie die ABWÄRTSPFEILTASTE gedrückt halten bis die Zoomanzeige ganz unten ist es wird ein Digitalzoom von 1 0 angezeigt Eine Vorschau des aufgenommenen Fotos zeigen Sie an indem Sie die RECHTE PFEILTASTE drücken Drücken Sie zum Anzeigen älterer Fotos die LINKE PFEILTASTE Mit jedem Drücken erscheint das jeweils vorherige Foto Drücken Sie die RECHTE PFEILTASTE um neuere Fotos anzuzeigen Drücke...

Страница 74: ...AP OK Auslöser um die Aufnahme zu beenden Drücken Sie POWER MODE Ein Modus um wieder zum Standbildmodus zurückzukehren Die Videoqualität Dateigröße stellen Sie ein indem Sie MENU Menü drücken das Menüelement Size Größe auswählen sofern es noch nicht hervorgehoben ist und dann OK SNAP OK Auslöser drücken Wählen Sie dann die gewünschte Videoauflösung aus von HD höchste Qualität größte Dateien bis QV...

Страница 75: ...nerhalb des Menüs und drücken Sie die Taste OK SNAP OK Auslöser wenn Sie die Einstellungen für die jeweilige Option ändern möchten Wählen Sie mit Hilfe der AUFWÄRTS ABWÄRTSPFEILTASTE die gewünschte Einstellung aus und drücken Sie dann zum Bestätigen und Aktivieren der neuen Einstellung die Taste OK SNAP OK Auslöser Nachfolgend werden alle Parameter und Einstellungen im Menü CAPTURE Aufnahme Standb...

Страница 76: ...ort wird eine kürzereVerschlusszeit verwendet um Bewegungsunschärfen zu vermeiden Bei der Einstellung Night Nacht wird eine längere Verschlusszeit verwendet um mehr Licht einzufangen Stativ empfohlen Bei der Einstellung Portrait Portrait wird die Blendenöffnung vergrößert um den Hintergrund unscharf dar zustellen Bei der Einstellung Landscape Landschaft wird die Blendenöffnung verkleinert um den H...

Страница 77: ...wird automatisch ein niedrigerer ISO Wert in hellem Licht und ein höherer ISO Wert in dunklerem Licht ausgewählt Je niedriger der ISO Wert ist umso höher ist die Bildqualität Color Standard Vivid Sepia Monochrome Standard normale Farben Vivid besonders satte Farben Sepia Fotos mit Antikeffekt Monochrome Schwarzweißfotos Saturation High Normal Low Dient zur Auswahl der Farbsättigung High tiefe Farb...

Страница 78: ...e Datum und Uhrzeit korrekt eingestellt wurden Wählen Sie Off Aus Standardeinstellung aus wenn weder Datum noch Uhrzeit auf die Bilder gedruckt werden soll Burst On Off Bei der Einstellung On Ein wird mit jedem Drücken derTaste SNAP Auslöser eine schnelle Serie von drei Fotos aufgenommen Noise Reduce Rauschunter drückung On Off On um das Auftreten von Bildrauschen Grobkörnung bei Aufnahmen mit sch...

Страница 79: ...E um das Menü zu schließen Parameter Einstellungen Fett Standardeinstellung Funktion Beschreibung Size HD D1 QVGA VGA Dient zur Auswahl derVideoauflösung HD 1280 x 720 Pixel pro Bild D1 720 x 480 QVGA 320 x 240 VGA 640 x 480 EV 2 0 bis 2 0 in Schritten zu je 0 5 EV Standardein stellung 0 Ermöglicht eine manuelle Justierung von Unter Überbelichtung Minuswerte führen zu dunkleren Fotos Pluswerte hel...

Страница 80: ... Capture Aufnahme beschrieben Drücken Sie die LINKE PFEILTASTE um das Menü zu schließen MENÜ PLAY Parameter Einstellungen Fett Standardeinstellung Funktion Beschreibung Delete Single All Select Wählen Sie Single Einzeln aus und drücken Sie OK um das aktuell angezeigte letzte Foto bzw Video zu löschen Wählen Sie All Alles aus und drücken Sie OK um alle Fotos Videos auf der SD Karte zu löschen Wähle...

Страница 81: ...der SD Karte auszuwählen verwenden Sie zum Hervorheben des gewünschten Bildes die Pfeiltasten und drücken Sie MENU Menü und schützen Sie das ausgewählte Bild dann durch Drücken von OK Durch erneute Auswahl dieser Funktion heben Sie den Schutz eines zuvor geschützten Bildes wieder auf wenn Sie dieses löschen möchten Thumbnail Execute Wählen Sie Execute Ausführen aus und drücken Sie dann OK um alle ...

Страница 82: ...ideo Output Videoausgabe Drücken Sie nach dem Aufruf eines der Menüs die RECHTE PFEILTASTE um zum Menü Setup Einrichtung zu wechseln Das Menü Setup Einrichtung bietet eine Vielzahl grundlegender Funktionen die mit dem Aufnehmen und Anzeigen von Fotos und Videos nichts zu tun haben Nach der Auswahl des Menüs wird die Registerkarte SETUP Einrichtung oben rechts am Display hervorgehoben Verwenden Sie...

Страница 83: ...chaltet wenn sie nicht manuell mit Hilfe derTaste POWER MODE Ein Modus ausgeschaltet wird Sys Reset Cancel Execute Drücken Sie OK Wählen Sie Execute Ausführen aus und drücken Sie OK um die Einstellungen für alle Optionen in allen Menüs auf die ursprünglichenWerkseinstellungen zurückzusetzen Light Freq 60 Hz 50 Hz Stellen Sie die Netzfrequenz für Ihr Land ein Dies wirkt sich vor allem auf Bilder au...

Страница 84: ... DieSD KartewirdalsneuesDiskettensymbolaufdemDesktopangezeigt Doppelklicken Sie auf dieses neue Diskettensymbol und öffnen Sie dann den darin enthaltenen Ordner DCIM sowie die anderen Unterordner 100DSCIM usw Ihre Fotos und Videos sind als Dateien in diesen Ordnern gespeichert Sie haben das Präfix PICT__ gefolgt von der gleichen Zahl die auch schon beim Anzeigen der Fotos auf dem Kameradisplay ang...

Страница 85: ...nnen Sie die Bilder für den Versand per Mail oder das Einfügen in Dokumente mit einer geringen oder mittleren Auflösung speichern Wenn Sie mit der Bearbeitung der Datei fertig sind können Sie diese mit Hilfe von Speichern unter unter einem aussagekräftigeren Namen als PICT0001 usw speichern Das hat auch den Vorteil dass die Originaldatei als Sicherung erhalten bleibt und später erneut geöffnet und...

Страница 86: ...rieneinstellung Stellen Sie sicher dass die rechte Augenmuschel anfangs auf Null eingestellt ist der Pfeil auf der Unterseite der Augenmuschel zeigt auf 0 Halten Sie stets beide Augen geöffnet 2 Decken Sie das Objektiv auf der rechten Seite des Fernglases mit der Hand ab während Sie durch das Okular schauen 3 Drehen Sie das Fokussierrad des Fernglases F bis ein fernes Objekt mit kleinen Details z ...

Страница 87: ... Staub oder Schmutz vom Objektiv oder verwenden Sie einen weichen Objektivpinsel Um Schmutz oder Fingerabdrücke zu entfernen reinigen Sie die Objektive mit dem mitgelieferten Mikrofasertuch in kreisförmigen Bewegungen Die Verwendung eines rauen Tuches oder ein unnötiges Rubbeln kann die Objektivoberfläche zerkratzen und zu dauerhaften Schäden führen Das waschbare Mikrofaser Reinigungstuch ist idea...

Страница 88: ...Erläuterung des Defekts 4 Beleg des Erwerbsdatums 5 Das Produkt sollte in einem robustenVersandpaket verpackt sein um Beschädigungen während desTransports zu vermeiden und sollte mit Rückporto versehen sein vorausbezahlt an die folgende Adresse Versandadresse in den USA Versandadresse in KANADA Bushnell Outdoor Products Bushnell Outdoor Products Attn Repairs Attn Repairs 9200 Cody 25A East Pearce ...

Страница 89: ...ase 92 93 Scatto foto istantanee 93 95 Registrazione dei video 95 96 Utilizzo del menu Cattura Capture foto istantanee 97 100 Menu Output video Video Output 101 Menu RIPRODUZIONE RIVEDERE 102 103 Menu Impostazione Setup 104 105 Trasferimento delle foto e dei video al PC 106 107 Utilizzo del binocolo 108 Cura generale e pulizia 109 ...

Страница 90: ...la messa a fuoco del binocolo C TastoPOWER MODE alimentazione modalità E Tasto OK SNAP K Obiettivo del la fotocamera I Porta USB H Presa remota B Slot per scheda SD A Vano batterie G Attacco per il treppiede J Regolazione diottrica conchiglia oculare destra Scorrereversoilbasso peraprire Polaritàdellebatterie ...

Страница 91: ... è ancora possibile memorizzare stima basata sulla memoria di una scheda inutilizzata 8 Modalità video 9 Risoluzione video HD 10 Tempo di registrazione video trascorso 11 Modalità Riproduzione Rivedere 12 Filmato video 13 Numero del file numero della foto o del video 14 Premere il tasto Su per riprodurre mettere in pausa il filmato video Schermata anteprima dal vivo modalità foto istantanee 4 3 7 ...

Страница 92: ...4GB o più non funzionano per memorizzare le foto e o i video catturati Poiché non è presente una memoria interna se non viene inserita una scheda ImageView non potrà funzionare e all accensione verrà visualizzato il messaggio INSERT CARD inserisci scheda sul the display Inserire una scheda compatibile non inclusa nella confezione nello slot della scheda B rivolgendo i contatti di metallo della sch...

Страница 93: ...tto Per impostazione predefinita la funzione Stampa data ora Date Time Stamp è disattivata Se si desidera utilizzarla impostare prima la data e l orario premendo il tasto MENU Premere il tasto Destra per selezionare il menu Impostazioni Setup quindi premere il tasto freccia SU per selezionare Immissione data Date Input e premere OK SNAP Selezionare Imposta Set premere OK e utilizzare i tasti frecc...

Страница 94: ...iguardanti come selezionare e modificare le impostazioni come la risoluzione la qualità dell immagine e l esposizione Per scattare una foto tenere la fotocamera con entrambe le mani e quanto più ferma possibile e premere il tasto OK SNAP E La manopola di messa a fuoco del binocolo F non influisce sull obiettivo della fotocamera il quale è preimpostato per ottenere foto nitide a tutte le distanze d...

Страница 95: ...otocamera con cura evitando di toccare l obiettivo K situato al centro fra gli obiettivi del binocolo per non degradare la qualità dell immagine Pulire l obiettivo della fotocamera solo con un tessuto asciutto per obiettivi o con un panno di microfibre NON usare alcun tipo di liquido REGISTRAZIONE DEI VIDEO UTILIZZANDO LA MODALITÀ VIDEO Per entrare nella modalitàVideo dalla modalità Foto premere p...

Страница 96: ...ono registrati alla velocità di 30 fotogrammi al secondo in formato AVI ImageView non registra l audio Premere il tasto freccia DESTRA per rivedere un video dopo averlo ripreso Premere il tasto freccia SU per iniziare la riproduzione premerlo nuovamente per mettere in pausa la riproduzione Durante la riproduzione il contatore a destra visualizza il tempo trascorso Quando si è pronti a ritornare al...

Страница 97: ...reccia SU GIÙ per selezionare un opzione del menu quindi premere OK SNAP laddove si desideri modificare le impostazioni per l opzione selezionata Utilizzare i tasti SU GIÙ per selezionare l impostazione desiderata quindi premere OK SNAP per confermare e attivare la nuova impostazione Di seguito sono elencati tutti i parametri e le impostazioni disponibili nel menu Cattura Capture modalità foto ist...

Страница 98: ...e la memoria della scheda Modalità scena Scene Mode Auto Sport Notte Ritratto Paesaggio Controluce Lasciare l impostazione predefinita Auto esposizione eseguita automaticamente per scattare foto generiche La preimpostazione Sport seleziona le velocità più rapide dell otturatore per evitare la sfocatura dell effetto mosso La preimpostazione Notte seleziona le velocità più basse dell otturatore che ...

Страница 99: ...tti corret tamente Se l impostazione Auto non fornisce buoni risultati i colori appaiono troppo arancione o blu provare l impostazione che corrisponde alla condizione di illuminazione corrente ISO Auto 100 200 400 800 Imposta la sensibilità del sensore alla luce La modalità Auto seleziona automaticamente le ISO inferiori in condizioni di illuminazione chiara e le ISO maggiori in condizioni di lumi...

Страница 100: ...a Selezionare Solo data Date Only per stampare la data su foto video Selezionare Data e ora Date Time per stampare sia data che ora Verificare che sia stata impostata la data e l ora corrette mediante l opzione Immissione data Date Input nel menu Impostazioni Setup Selezionare Off predefinito per non stampare sulle immagini la data e l orario Raffica Burst On Off Quando è impostata On ogni volta c...

Страница 101: ... Parameter Impostazioni Grassetto impostazione predefinita Funzione Descrizione Dimensione Size HD D1 QVGA VGA Seleziona la risoluzione video HD 1280x720 pixel per fotogramma D1 720x480 QVGA 320x240 VGA 640x480 EV 2 0 2 0 in passi da 0 5 EV impostazione predefinita 0 Consente la regolazione manuale della sovraesposizione sottoesposizione I valori negativi producono video più scuri mentre i valori ...

Страница 102: ... freccia SINISTRA per chiudere il menu Parametro Parameter Impostazioni Grassetto impostazione predefinita Funzione Descrizione Elimina Delete Singola Tutte Selezione Selezionare Singola e premere OK per eliminare la foto o il video correntemente visualizzato l ultimo Selezionare Tutte e premere OK per eliminare tutte le foto i video memorizzati sulla scheda SD Scegliere Selezione per specificare ...

Страница 103: ... video memorizzati sulla scheda utilizzare i tasti freccia per selezionare l immagine desiderata e premere MENU quindi premere OK per proteggere solo l immagine selezionata Utilizzare questa funzione una seconda volta per annullare la protezione di un immagine precedentemente protetta nel caso si decida di eliminarla Miniature Thumbnail Esegui Execute Selezionare Esegui Execute e premere OK per vi...

Страница 104: ...apture Riproduzione Play E OutputVideo Video Output Dopo aver aperto qualsiasi altra schermata di menu premere il tasto freccia DESTRA per passare al menu Impostazione Setup Il menu Impostazione Setup offre una varietà di funzioni operative di base che non sono correlate alla cattura o alla visione di foto e video La scheda Impostazione SETUP in alto a destra nel menu viene evidenziata quando sele...

Страница 105: ...nnullare la fotocamera resta sempre accesa finché non viene spenta manualmente tenendo premuto il tasto Mode Power Reimposta sistema Sys Reset Annulla Esegui Premere OK Selezionare Esegui e premere OK per ripristinare tutte le impostazioni di tutte le opzioni in tutti i menu a quelle originali predefinite dalla fabbrica Frequenza luce Light Freq 60 Hz 50 Hz Impostare la frequenza della rete elettr...

Страница 106: ...compare come icona di nuovo disco sul desktop Fare doppio clic sull icona di questo nuovo Disco aprire la cartella DCIM all interno e poi le cartelle all interno della cartella 100DSCIM ecc Le foto video sono i file all interno hanno il prefisso PICT_ seguito da un numero come visto in precedenza sul display della fotocamera durante la revisione delle foto I file delle fotografie hanno estensione ...

Страница 107: ...pando o salvare una versione più piccola o di media risoluzione per una email o per l inserimento nei documenti Quando si è pronti per salvare il file modificato è possibile utilizzare il comando Salva con nome e fornire un nome più descrittivo di PICT0001 o simile In questo modo è possibile conservare il file originale che può essere sottoposto ad altre modifiche in un momento successivo Verifica...

Страница 108: ...a sia impostata su zero in un primo momento la freccia inferiore della conchiglia oculare punta sullo 0 Tenere sempre gli occhi aperti 2 Utilizzando la mano coprire la lente dell obiettivo anteriore destra del binocolo mentre si guarda negli oculari 3 Ruotare la manopola della messa a fuoco del binocolo F finché l oggetto distante con dettagli piccoli ad esempio una parete con mattoni i rami di un...

Страница 109: ... di frammenti oppure usare una spazzola morbida per lenti Per rimuovere polvere o impronte pulire con il panno in microfibra in dotazione strofinando con un movimento circolare L impiego di un panno ruvido o una eccessiva strofinatura comportano il rischio di graffiatura delle lenti nonché danni irreversibili Il panno lavabile di pulizia in microfibra è ideale per la pulizia ordinaria delle ottich...

Страница 110: ...larestituzionedelprodotto 3 Unaspiegazionedeldifetto 4 Scontrinoriportanteladatadiacquisto 5 Ilprodottodeveessereimballatoinunascatolarobusta perpreveniredanniduranteiltrasporto evaspeditofrancodestinatarioaunodeiseguentiindirizzi RecapitonegliSTATIUNITI RecapitoinCANADA BushnellOutdoorProducts BushnellOutdoorProducts Attn Repairs Attn Repairs 9200Cody 25AEastPearceStreet Unit1 OverlandPark Kansas...

Страница 111: ...uipement contient des composants électriques et ou électroniques et par conséquent ne doit pas être éliminé en fin de vie avec les autres déchets ménagers Vous devez au contraire vous débarasser de ce produit afin qu il soit recyclé aux points de collecte respectifs fournis par les communautés locales Pour vous ceci est sans frais Sil équipementcontientdespilesamovibles rechargeables celles cidoiv...

Страница 112: ...gt werden siehe auch die jeweiligen Anmerkungen in der Anleitung dieses Instruments Weitere Informationen zu diesem Thema sind in Ihrer Gemeinde Stadtverwaltung Ihrem regionalen Abfallentsorgungsunternehmen oder in dem Geschäft in dem Sie Ihr Equipment gekauft haben erhältlich Smaltimento di apparecchiature elettriche ed elettroniche Vigente presso i Paesi UE e altri Paesi europei con sistemi di r...

Страница 113: ......
Страница 114: ... 2012 Bushnell Outdoor Products For further questions or additional information please contact Bushnell Outdoor Products 9200 Cody Overland Park Kansas 66214 800 423 3537 www bushnell com ...

Отзывы: