3
BASIC SETUP & SETTINGS
• Fully charge the BackTrack Mini before use. Plug the provided charging cable and charge the unit from any USB port.
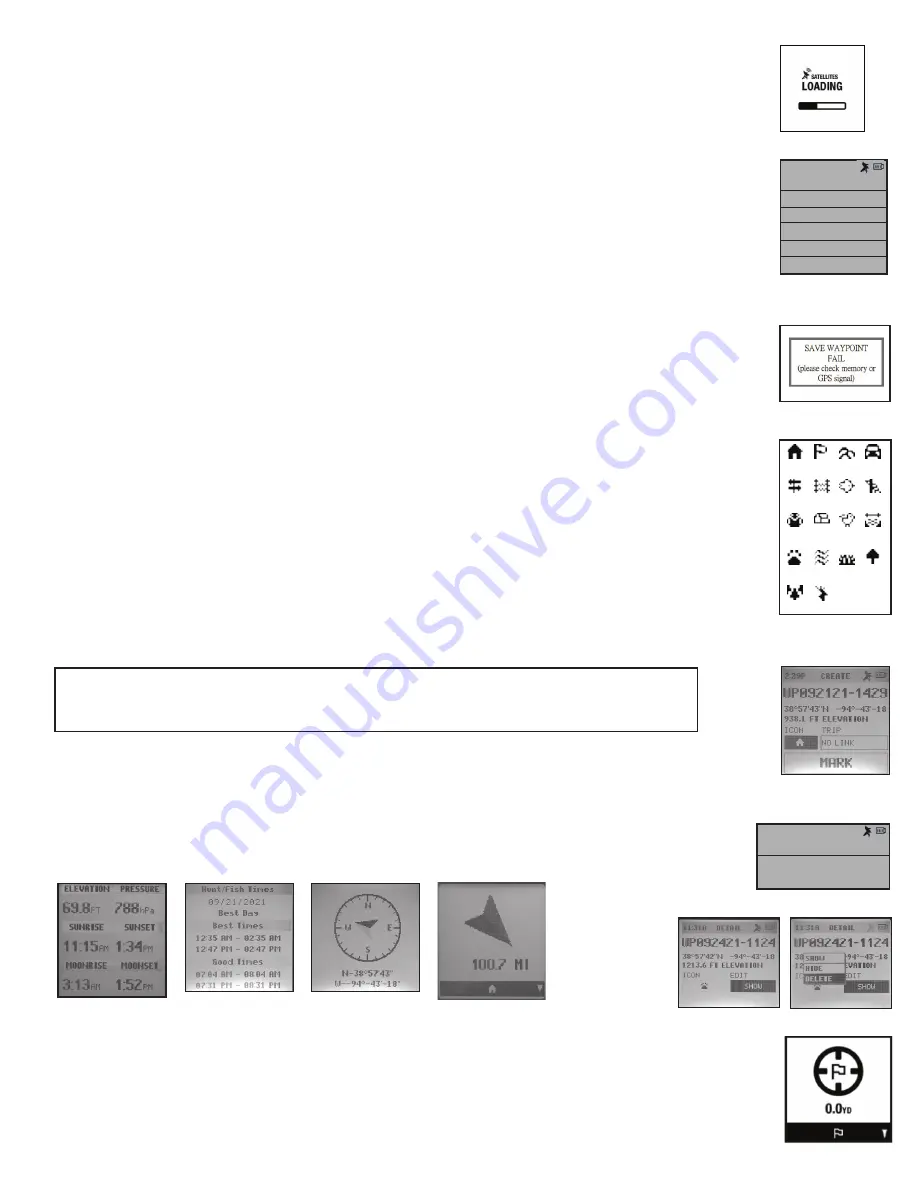
• Go outdoors. Press and hold POWER (1) until the display comes on. Wait for the GPS satellite to connect (10)
(Fig. 1). The percentage indicates the strength of the satellite signal. After the first power-up in a new area, it may take
a few minutes to find the satellite signal. *It is recommended to turn off the unit when going indoors. The unit will
continue searching for a satellite and consume the battery faster than normal.
• Press and hold the SELECT (2) button for 3 seconds to access the menu. (Fig. 2)
• Select SETTINGS to adjust the Time, Units, Backlight, Reset, FW Upgrade, and About. Press SELECT (1) to choose
which option you wish to make changes.
Time: 1) Format: 12 HOUR or 24 HOUR
2) Daylight Saving: OFF or ON
3) Time Zone: Press the Toggle Up/Down buttons to choose your time zone preference and time
display format. Press Select to confirm.
Unit:
1) Unit: English (Ft., MPH) or Metric (M., KPH)
2) Temperature: °F or °C
3) Coordinates: DMS (Degrees, Minutes, Seconds), DMM (Degrees, Decimal Minutes), or DD (Degrees)
Timer: 1) Frequency - Off, Daily, Weekday, Weekend
2) Time - Set timer by selecting Hour, Minutes and AM/PM
* Note: timer does not vibrate or audio sound.
Backlight: 1) Period - 15 sec., 30 sec., 60 sec., 90 sec.
2) Brightness - Low, Medium, High
* Note: the longer the backlight stays on, the more battery the backlight will consume.
Reset: Do Factory Reset? Yes or No
FW Upgrade: See full instructions on Page 7.
About: Firmware version, FCC ID, and IC ID
WAYPOINTS - Waypoints are locations you record and store or upload to the device. Waypoints can
mark where you are, where you are going, or where you have been.
• While in the Settings menu, select WAYPOINTS. Before creating a new Waypoint, check that the GPS signal is fixed
and not flashing. If the satellite icon is flashing, the GPS signal is not active.
• The BackTrack Mini will not save a new Waypoint if there is insufficient internal memory. The user will need to release
enough memory space to create a Waypoint. (Fig. 3) We suggest synchronizing with the Bushnell Connect app and
saving the trips and waypoints, then removing trips and waypoints off of the BackTrack Mini.
• On the Create screen, select one of 18 Location icons (Fig. 4. While standing at the location you want to mark, press
the Toggle Down button (4) to highlight and select MARK (Fig. 5) to save the position in the BackTrack Mini’s memory.
• Waypoint name: Waypoint - Date - Time “WP092121-1429” Waypoint September 21, 2021 - 12:29pm
• To return to the location you marked, press the Power button (1) to return to the home screen. Press the Select key (2)
to see your current location’s Elevation, Pressure, Sunrise, Sunset, Moonrise, and Moonset from the home screen. (Fig. 6)
• From the Elevation screen, press the Toggle Up or Down buttons to see the Hunt/Fish Times. (Fig. 7)
• Press Select (2) to view the Compass screen (Fig. 8), displaying the Latitude and Longitude of your current location,
and a Digital Compass Display (Fig. 9) including your heading (direction of travel) in degrees.
• Once the Waypoint is created, go back to Waypoints in the Settings menu and choose
View All (Fig. 10). Waypoint order is by the time waypoint is created (i.e., its default filename).
The latest Waypoint is on top, and the oldest is on the bottom. Choose a Waypoint to edit the
usage of that specific Waypoint. (Fig. 11)
- Show: Waypoint is visible and available to be added to a Trip.
- Hide: Waypoint is saved but not visible and cannot be added.
- Delete: Permanently delete the Waypoint from the unit.
Fig. 1
Fig. 10
2:22P WAYPOINT
CREATE
VIEW ALL
2:22P MENU
SETTINGS
WAYPOINTS
TRIPS
CONNECTION
COMP CALIBR
ALT CALIBR
Fig. 2
Fig. 3
Fig. 4 Icons
Waypoint Saving Shortcut:
Standing at the location you want to mark, press the Select (2) and Toggle Down (4) at the same time.
Press Select (2) to confirm the save.
Fig. 5
Fig. 6
Fig. 7
Fig. 8
Fig. 9
(1)
* When the device is
close to the Waypoint,
within 10 meters, the
system will show a
figure (Fig.12) to let
the user know they
have arrived at the
Waypoint.
Fig. 11
Fig. 12
(1)
Home Flag Hills Car
Trail
head
Fence Fish Tree
Stand
Back
Pack
Camp Bird Crossing
Tracks River Meadow Tree
Forest Deer


