background image

20

SafeTrack™ Battery Conservation Mode

SafeTrack is a Bushnell exclusive feature that extends and conserves battery 
power, without the wait to re-establish GPS satellite contact after a full power 
down. When you are in SafeTrack mode, the display screen will shut off, and 
the status LED will blink green. Intermittent satellite contact is maintained, so 
you will quickly be able to check your current location or progress. To enter 
SafeTrack mode, press and hold the 

H

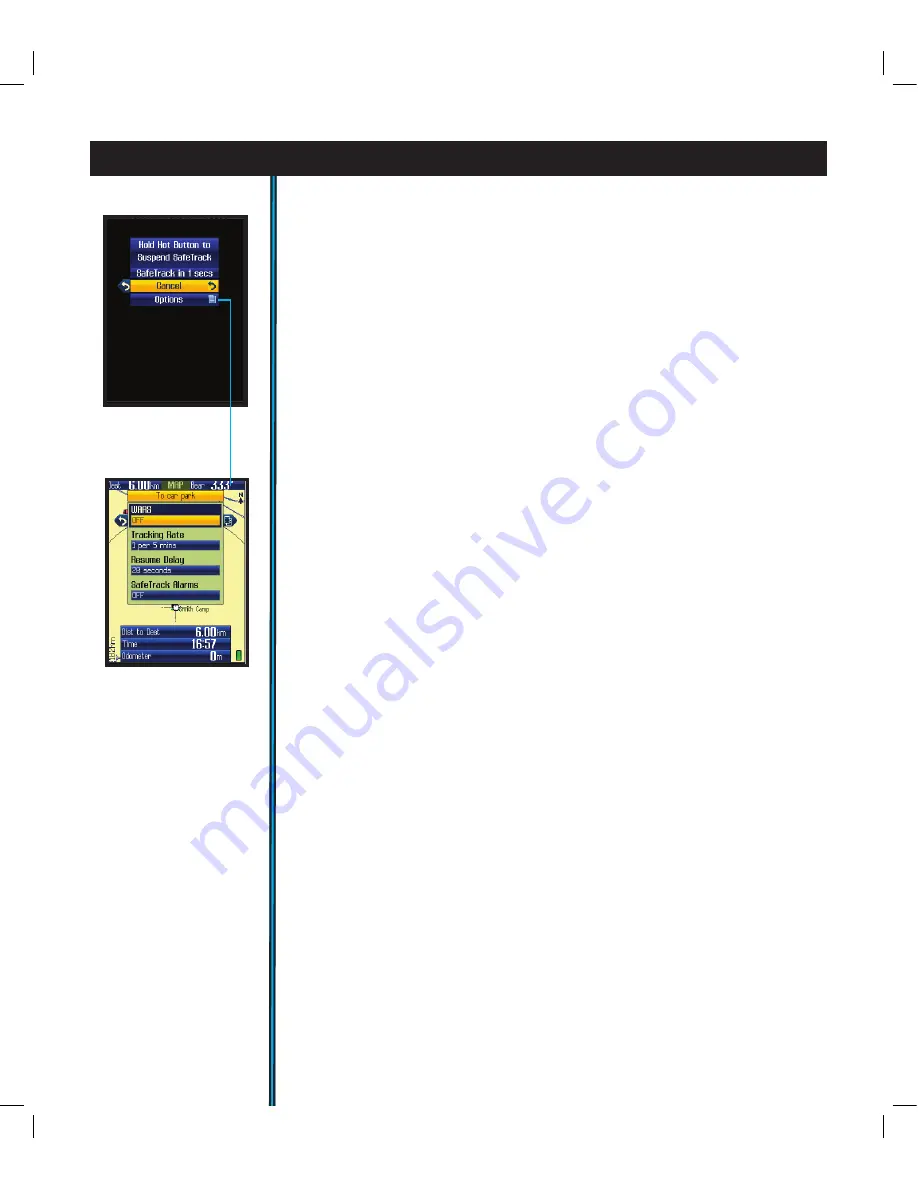
ot button. You will see the SafeTrack 

screen (

Fig. 

27

), with a count down delay (time can be adjusted in the Set Page 

Menu) before the unit enters SafeTrack mode. If you accidently hold the 

H

ot 

button down, select “Cancel” and press OK. If you do not cancel, at the end of 
the countdown, the unit will be in SafeTrack mode. The display will black out, 
and you will no longer be able to receive streaming XM radio, sports updates, 
or other continuous signals. The ONIX will automatically make GPS satellite 
contact every 5 minutes (default, can be changed in SafeTrack Options menu), 

which extends battery life significantly while still allowing you to instantly get 
a fix on your location and resume navigation when you exit SafeTrack mode. 


Note: XM Satellite “Auto Update” mode can be used at the same time as 
SafeTrack,  to  limit  XM  reception  to  intermittent  weather  info  updates, 
resulting in even greater battery life extension.


The GPS and XM satellite 

receivers in the ONIX400 are independent of each other.

As long as you are actively using the GPS and pressing buttons (within time 
limit set in SafeTrack options (

Fig. 

28

)), the screen display will stay active-but 

the unit is still in SafeTrack mode.
After  a  period  of  inactivity  (length  of  time  selectable  in  SafeTrack  options 
menu), the Start SafeTrack screen (

Fig. 

27

) will appear. 

If you do not want to return to SafeTrack, press OK or Left with “Cancel” 
selected.

using your onix400 gPs receiver : safetrack

Fig 28.


SafeTrack 

Options

(select “Options” 

from SafeTrack 

Screen)

Fig 27. 

SafeTrack 

Screen

ONIX400 1LIM QS Guide-Feb08 Revi20   20

2/20/08   8:56:04 PM

Содержание 364000

Страница 1: ...ONIX 400 GPS XM RADIO RECEIVER Quick Start Guide Model 364000 Lit 98 0973 02 08 English ONIX400 1LIM QS Guide Feb08 Revi1 1 2 20 08 8 55 53 PM ...

Страница 2: ...notes ONIX400 1LIM QS Guide Feb08 Revi2 2 2 20 08 8 55 53 PM ...

Страница 3: ... while driving An accident can result in property damage injury or death if the operator fails to practice prudent driving practices It is the sole responsibility of the driver of any vehicle to operate the motor vehicle in a safe manner Information from the GPS unit can distract the operator of a motor vehicle It is unsafe to operate the controls of the GPS unit while operating a motor vehicle If...

Страница 4: ...u may want to start near your home by turning on the ONIX then pressing the MENU button to run through the six basic screens MAP NAV XM Weather XM Radio SAT SET while reading the manual section for each After that practice using the Hot button and 5 way button to see and select from a menu of options perhaps on the SET screen by setting a few personal preferences for information displays Once you ...

Страница 5: ...artment following any submersion or prolonged exposure to rain snow etc Any moisture observed inside the battery compartment or on the exterior of the battery pack or MicroSD card should be dried off immediately and completely Prolonged submersion over 30 minutes and or to water depths greater than 1 meter can cause damage to the unit If the ONIX exterior becomes dirty clean it with a soft cloth d...

Страница 6: ... Button located on right side of ONIX Push to turn on Once the unit is on press briefly to see the Power Menu Hold button for 2 sec to turn power off USB Port connect to PC with supplied cable Accessory Port used for AC charging cord and optional XM accessories Battery Pack Module houses Lith Ion battery pack Also covers MicroSD card slot Audio Out Jack connect supplied earbuds to hear XM Satellit...

Страница 7: ...orts and entertainment XM reception must be activated Listen to your favorites while you navigate or just listen at the end of the day when you reach your campsite boat or home Note XM reception must be set to ON in the SET Page 5 SAT Satellite this page allows you to monitor the signal strength of multiple GPS satellites confirming when you have a lock adequate number and quality of satellites to...

Страница 8: ...ors where GPS signals are not accessible 2 SafeTrack Battery Conservation Mode a SafeTrack Mode creates a low power state while maintaining satellite connection b Utilize SafeTrack to extend battery life during navigation c XM Satellite Radio audio does not function when Safetrack is activated d XM Weather and XM Sports information can be updated while utilizing SafeTrack See Auto Update e Access ...

Страница 9: ... satellite lock process will take longer up to 3 or 4 minutes the first time you use your GPS in a new geographical area but will be much faster on future usage in the same area see Reset Data in the SET Page GPS options if you later relocate more than 300 miles away from your initial area You can check reception with the SAT page at any time but will likely find that you use it less than any othe...

Страница 10: ... e g 10 2km span from top to bottom of screen Use the and buttons to change the zoom level MAP Page Layering Options You may choose to add other items to your view of the MAP page To select these items hold down the MENU button for 2 seconds then press the UP button you will see a map page layer options screen Fig 3 Use the 5 way button to move up and down the options press the center button to se...

Страница 11: ...nloaded files are geo referenced enabling your ONIX to choose the correct photo automatically based on your current location and zoom level Note that while both types of images can be stored at the same time on your ONIX only one of them photo or topo map can be displayed over the base map at a time Topo the topographic map you choose from files you download and store in the ONIX will be layered o...

Страница 12: ...e local time your selection has replaced the previous type of info 6 Press DOWN to select the second Info Box and repeat steps 4 5 to change what is displayed in this box Repeat the process again if you like for the third box Note that if you choose Location your latitude longitude for one of your info boxes it will automatically fill 2 Info Boxes latitude is the top box 7 You may have noticed tha...

Страница 13: ...eather related info When finished press the LEFT button then EXIT and the Info Boxes will now show the various weather information you selected Fig 10b Note that you can also select Weather at Destination or Current Weather as one or two of your Info Boxes from the Nav tab but the full list of weather related info is only available by selecting the Weather tab 12 Try the other tabs selecting the S...

Страница 14: ... to be displayed in this box Then press the Right button and repeat to change the other data box Next press the Down button if you want to change the items displayed in the Info Boxes at the bottom of the screen Follow the same procedure to see and select from the lists of options and repeat for the other Info Boxes 3 The XM Weather Page After selecting the XM Weather Page you will see a display s...

Страница 15: ...ted in set up the channel monitor box at the bottom of the screen to easily swap listening channels and even turn the box into your personal Scoreboard to monitor your favorite sports teams and scores Please see pages 22 23 for details on using the XM Radio HOT button menu 5 The SAT Page Fig 17 As seen earlier in Getting Started The SAT page view is used to identify the quality or strength of the ...

Страница 16: ...cation where you first powered up the ONIX Compass options to select your preferred navigation units Degrees Cardinal Letter or Mils and North Reference True or Magnetic Display allows adjustment of display Brightness and Contrast Sounds options to mute all sounds set volume and mute or select different tones for key beep destination arrival and warning sound Note the volume and main sound mute se...

Страница 17: ...it has locked into the satellites ideally 4 or more the satellite position icons will stop blinking and turn green you are ready to begin using the ONIX The next step is your choice you may go to the NAV or SET page to select options or make personal settings first or begin navigating by going directly to the MAP page The simplest GPS function is to mark your present location Any location that you...

Страница 18: ...eate a new one when using the Find GoTo feature After selecting your destination and pressing OK you The title of the destination will show in a yellow box at the top of the screen and the bearing arrow will point in the correct direction to take you to it To stop this navigation activity press the Hot button again you will see the option to stop Press OK to confirm you want to stop navigating and...

Страница 19: ...ater recall You will have the option of naming the trail so it is easy to find in your My Trails list Note this option will only be seen if you are already actively navigating a trail you started a Navigate navigate a saved trail This starts navigation through a previously completed trail b Reverse press OK to navigate the selected trail from its endpoint to its start very useful to go back to a p...

Страница 20: ...ill automatically make GPS satellite contact every 5 minutes default can be changed in SafeTrack Options menu which extends battery life significantly while still allowing you to instantly get a fix on your location and resume navigation when you exit SafeTrack mode Note XM Satellite Auto Update mode can be used at the same time as SafeTrack to limit XM reception to intermittent weather info updat...

Страница 21: ...ymbols press and hold the left arrow Hold the up arrow to access the Shift for upper case letters etc and Done when you are finished and ready to exit the text entry procedure functions Selecting Waypoint Icons After the waypoint icon is selected move the cursor over the waypoint and press OK in the Edit Waypoint menu of the MAP page see pg 15 the display will show a menu of icons Fig 30 or common...

Страница 22: ...Select this to see the list of 22 categories currently each containing related channels different musical genres comedy news sports talk etc Use Up Down to select a Category then press the OK button to check or uncheck which categories you want Fig 34 to be available Press the right button to see a 2nd screen of XM categories This will make channel browsing see below faster you will only see chann...

Страница 23: ...rlier and nothing that is not checked Fig 38 The current sports info on display is indicated in bold white on the red banner You can press the Down button red banner turns yellow and then press the Right button to highlight a sport in the banner this will pushpin or lock that sport so the Scoreboard stops auto scrolling to the next sports category but remains on the one you select If you have sele...

Страница 24: ... server so that you can access them at any time After you complete an outdoor excursion BushnellGPS com also enables you to upload all of your trip s navigation information into your account folders to review and analyze and save for the next return trip BushnellGPS com also provides detailed GPS product features and specifications Software Update Downloads Troubleshooting and Frequently Asked Que...

Страница 25: ...age Downloaded photos or maps are not found or cannot be used 1 USB cable was disconnected or power was shut off before download was completed 2 Unit was used immediately after download without restarting power off then on again 1 When downloading information from the PC program or Web please wait until the download has been completed Disconnecting the unit prior to completion of download will res...

Страница 26: ...etermined by turning the equipment off and on the user is encouraged to try to correct the interference by one or more of the following measures Reorient or relocate the receiving antenna Increase the separation between the equipment and receiver Connect the equipment into an outlet on a circuit different from that to which the receiver is connected Consult the dealer or an experienced radio TV te...

Страница 27: ...elow IN U S A Send To IN CANADA Send To Bushnell Outdoor Products Bushnell Outdoor Products Attn Repairs Attn Repairs 8500 Marshall Drive 25A East Pearce Street Unit 1 Lenexa Kansas 66214 Richmond Hill Ontario L4B 2M9 For products purchased outside the United States or Canada please contact your local dealer for applicable warranty information In Europe you may also contact Bushnell at Bushnell Ge...

Страница 28: ...s For further questions or additional information please contact Bushnell Outdoor Products 9200 Cody Overland Park Kansas 66214 Customer Service 800 423 3537 www bushnell com ONIX400 1LIM QS Guide Feb08 Revi28 28 2 20 08 8 56 07 PM ...

Отзывы: