background image

Product support

Help is always at hand

Product support

42

If you require any technical guidance or find that your product is not operating as intended, a simple solution can often be found in the 

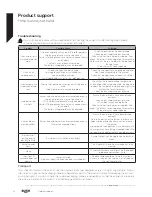
Troubleshooting

 section of these instructions, 

Troubleshooting

If you still have a problem with your appliance after checking these basic troubleshooting steps, please 
contact an authorised service person or qualified technician.

Problem

Possible Cause

Solution 

Oven and/or grill 

(if available) do not 

work.

The oven and/or grill may be in the ´

off

` position.

Supply gas pressure may not be correct.

Power (if the appliance has an electric connection) is 

switched off.

The feet have not been assembled.

The battery (if applicable) may be depleted.

Check the position of the control knob.
Check the gas supply and gas pressure.

Check whether there is power supplied. Also 

check that other kitchen appliances are working.

Make sure that there is no block at the bottom of 

the appliance.

The battery may need replacing.

Oven is not 

cooking evenly.

Wrong shelf position being used.

Your appliance has been installed by an 

unauthorised technician.

Fan (if applicable) may be in the ´

off

` position.

Check the shelf positions, cooking period and 

heat values according to the manual.

Check that the appliance is correctly installed.

Ensure that the fan is working.

Oven temperature 

is too high or too 

low.

Wrong shelf position or wrong heat setting being 

used.

Supply gas pressure may be improper.

Check that the recommended temperatures 

and shelf positions are being used. Be prepared 

to adjust the temperature up or down slightly to 

achieve the results you want.

Check the gas supply and gas pressure.

Hob burners do 

not light.

Burner cap and crown are not assembled correctly.

Supply gas pressure may not be correct.

LPG cylinder (if applicable) may be depleted.

Power (if the appliance has an electric connection) is 

switched off. 

The battery (if applicable) may be depleted.

Ensure the burner parts have been placed 

correctly.

Check the gas supply and gas pressure.

LPG cylinder may need replacing.

Check whether there is power supplied. Also 

check that other kitchen appliances are working.

The battery may need replacing.

Flame colour is 

orange/yellow.

Burner cap and crown are not assembled correctly.

Different gas compositions.

Ensure the burner parts have been placed 

correctly.

Due to the design of the burner, the flame can 

appear to be orange/yellow in certain areas of 

the burner.

If you operate the appliance with natural gas, city 

natural gas may have different compositions. Do 

not operate the appliance for a couple of hours.

Burner is not 

igniting or only 

partially lighting.

Burner parts may not be clean or dry.

Ensure that parts of the appliance are dry and 

clean.

Burner sounds 

noisy.

-

This is normal. The noise may reduce as they 

heat up.

Noise

-

It is normal for some metal parts on the cooker 

to produce noise when in use.

Oven light (if 

available) does not 

operate.

Lamp has failed.

Electrical supply is disconnected or switched off.

Replace lamp according to the instructions.

Make sure the electrical supply is switched on at 

the wall socket outlet.

Transport

If you need to transport the product, use the original product packaging and carry it using its original case. Follow 
the transport signs on the packaging. Tape all independent parts to the product to prevent damaging the product 
during transport. If you do not have the original packaging, prepare a carriage box so that the appliance, especially 
the external surfaces of the product, is protected against external threats.

Содержание BGC60SB

Страница 1: ...Instruction manual Gas Cooker BGC60SW BGC60SB Max 8 9 9 7 5 2 3 4 1 ...

Страница 2: ...re with your instructions Don t worry there s nothing too technical coming up Just simple step by step guidance to get you up and running quickly Sound good Then let s get started Help and Guidance We re here to help you get the most from your Combined Gas Cooker Should you require any guidance a simple solution can often be found online at www argos support co uk If you still require further assi...

Страница 3: ...ds 44 Disposal 44 Guarantee 45 6 7 Safety information Safety information 6 Getting to know your Gas Cooker Ready Let s begin 12 Product features Control panel 13 Installing your Gas Cooker Installatıon and preparatıon for use 16 Gas connection 17 Gas conversion If available 19 Electrical connection and safety 20 Anti tilting kit 21 Adjusting the feet 22 Functions Use of gas burners 26 Hob controls...

Страница 4: ......

Страница 5: ...1 Safety information ...

Страница 6: ...ore use and allow the cooker to cool before closing the lid Do not operate the appliance with an external timer or separate remote control system WARNING To prevent the appliance tipping the stabilising brackets must be installed For detailed information refer to the anti tilting kit set guide During use the appliance will get hot Care should be taken to avoid touching heating elements inside the ...

Страница 7: ...uthorised technician The manufacturer is not responsible for any damage that might be caused by incorrect placement and installation by unauthorised people When the appliance is unpacked make sure that it is has not been damaged during transportation In the case of a defect do not use the appliance and contact a qualified service agent immediately The materials used for packaging nylon staplers st...

Страница 8: ...y shatter when heated Turn off all the burners and allow the hob surface to cool before closing the lid Do not place anything on the oven door when it is open This could unbalance the oven or damage the door Do not place heavy or flammable items e g nylon plastic bags paper cloth etc into the drawer This includes cookware with plastic accessories e g handles CAUTION The inside surface of the stora...

Страница 9: ...n Important Please read these instructions fully before installing or operating Safety information 9 or online at www argos support co uk If you still require further assistance call one of our experts on 0345 257 7271 ...

Страница 10: ......

Страница 11: ...Getting to know your gas cooker 2 ...

Страница 12: ... found in the Troubleshooting section of these instructions Ready Let s begin Please read these instructions carefully They contain important information which will help you get the best from your Electrical Cooker and ensure safe and correct installation and operation If you require any further assistance our technical experts are happy to help For full details refer to the product support sectio...

Страница 13: ...s on 0345 257 7271 Product features Important Specifications for the product vary and the appearance of your appliance may differ from that shown in the figures below Accessorries The grill pan and handle set The wire grid Control panel Max 8 9 9 7 5 2 3 4 1 6 7 7 7 7 List of Components 1 Cooktop 2 Control panel 3 Oven door handle 4 Oven door 5 Adjustable feet 6 Oven Control Knob 7 Hob Control Kno...

Страница 14: ......

Страница 15: ...Installing your gas cooker 3 ...

Страница 16: ...ume of less than 5 m3 permanent ventilation of 100 cm2 free area is required For rooms with a volume of between 5 m3 and 10 m 3 permanent ventilation of 50 cm2 free area will be required unless the room has a door which opens directly to outside air in which case no permanent ventilation is required For rooms with a volume greater than 10 m 3 no permanent ventilation is required Important Regardle...

Страница 17: ...cupboard is to be installed above the appliance the safety distance between cooktop and any cupboard cooker hood should be as shown below A mm 420 B mm Cooker Hood Cupboard 650 700 C mm 20 D mm Product Width E mm 100 A B C C D E Gas connection Assembly of gas supply and leakage check Connect the appliance in accordance with applicable local and international standards and regulations First check w...

Страница 18: ...nnection Points that must be checked during fixed gas connection assembly The method used to assemble a fixed gas connection gas connection made by threads e g a nut varies according to the country you are in The most common parts for your country will be supplied with your appliance Any other parts required can be supplied as spare parts During connection always keep the nut on the gas manifold f...

Страница 19: ... assembly screw below the burner Remove the screw move the burner diagonally and the injector will be revealed on the rear side of the burner box For grill burners the screw is already visible Remove the screw pull the grill burner towards you and the injector will be visible on the rear surface of the oven cavity Screw Injector Oven burner Remove the injectors using a 7mm spanner and replace the ...

Страница 20: ...ingly In all conditions all components used in gas connections should be approved by local and or international authorities In all gas connections refer to the Assembly of gas supply and leakage check clause explained above Electrical connection and safety if available WARNING The electrical connection of this appliance should be carried out by an authorised service person or qualified electrician...

Страница 21: ...n Yellow Green Blue Green Yellow Earth wire to the terminal marked PE Brown Live wire to the terminal marked L Blue Neutral wire to the terminal marked N For this connection a Twin and Earth 6242Y type cable should be used Anti tilting kit Anti tilting Bracket x1 will be attached to the wall Dowel x1 Screw x1 1 2 3 The document bag contains an anti tilting kit Loosely attach the anti tilting brack...

Страница 22: ...09 5 112 60x60x85 309 5 64 50x60x90 247 5 112 50x60x85 247 5 64 50x50x90 247 5 112 50x50x85 247 5 64 Adjusting the feet Your product stands on four adjustable feet For safe operation it is important that your appliance is correctly balanced Make sure the appliance is level prior to cooking To increase the height of the appliance turn the feet anti clockwise To decrease the height of the appliance ...

Страница 23: ...Installing your gas cooker Bringing it all together Installing your gas cooker 23 or online at www argos support co uk If you still require further assistance call one of our experts on 0345 257 7271 ...

Страница 24: ......

Страница 25: ...Functions 4 ...

Страница 26: ... wish to ignite and keep it pressed while turning it anti clockwise until the knob is in the 90 degrees position The microswitch under the knob will create sparks through the spark plug for as long as the control knob is pressed Press the knob until you see a stable flame on the burner Flame safety device Hob burners Hobs equipped with a flame failure device provide security in case of an accident...

Страница 27: ...e of the pan as this may harm plastic accessories such as handles Switch the main gas control valve off when the burners are not in use for prolonged periods of time WARNING Only use flat bottomed pans with thick bases Make sure the bottom of the pan is dry before placing it on the burner The temperature of accessible parts may become high while the appliance is operating It is imperative that chi...

Страница 28: ...e the amount of cleaning required The material and finish of the baking tray and dishes used will affect base browning Enamel dark heavy or nonstick utensils increase base browning Shiny aluminium or polished steel trays reflect the heat away and reduce base browning When cooking more than one dish in the oven place dishes centrally on different shelves rather than cluster several dishes on one sh...

Страница 29: ...ckwise direction until to the 0 position Place a tray on the shelf below the grid to collect any dripping oil or fat during grilling Place the wire grid on the topmost shelf making sure that the food does not touch the grill burner Preheat the grill on the full setting for a few minutes before sealing steaks or toasting Food should be turned during cooking as required Food should be thoroughly dri...

Страница 30: ......

Страница 31: ...Using your gas cooker 5 ...

Страница 32: ...obs from overheating Take care to avoid touching the heat shield when closing the oven door Allow the heat shield to cool before removing WARNING The grill pan has a detachable handle Make sure when using the grill pan handle that it is centralised and secure as shown in the figure Do not leave the handle in position while grilling is in operation The grill pan and handle set The grill pan set is ...

Страница 33: ...AL RATING KW 2 75 3 CONSUMPTION 261 9 l h 218 1 g h MEDIUM BURNER DIA of INJECTOR 1 100mm 97 65 NOMINAL RATING KW 1 75 1 75 CONSUMPTION 166 7 l h 127 2 g h MEDIUM BURNER DIA of INJECTOR 1 100mm 97 65 NOMINAL RATING KW 1 75 1 75 CONSUMPTION 166 7 l h 127 2 g h SMALL BURNER DIA of INJECTOR 1 100mm 72 50 NOMINAL RATING KW 1 1 CONSUMPTION 95 2 l h 72 7 g h OVEN BURNER DIA of INJECTOR 1 100mm 120 76 NO...

Страница 34: ...Energy Efficiency Index conventional 103 6 Energy Efficiency Index fan forced Energy Class A Energy consumption gas conventional MJ cycle kWh cycle 6 30 1 75 Energy consumption gas fan forced MJ cycle kWh cycle Number of cavities 1 Heat Source GAS Volume l 58 This oven complies with EN 15181 Energy Saving Tips Oven Cook the meals together if possible Keep the pre heating time short Do not elongate...

Страница 35: ... cm Auxiliary Energy Efficiency 1 NA Heating Technology 2 Gas Size 2 Semi Rapid Energy Efficiency 2 59 0 Heating Technology 3 Gas Size 3 cm Semi Rapid Energy Efficiency 3 59 0 Heating Technology 4 Gas Size 4 Rapid Energy Efficiency 4 57 0 Energy Efficiency of Hob 58 3 This hob complies with EN 30 2 1 Energy Saving Tips Hob Use cookwares having flat base Use cookwares with proper size Use cookwares...

Страница 36: ......

Страница 37: ...Care and maintenance 6 ...

Страница 38: ...the gas hob Clean the gas hob on a regular basis Take off the pan supports caps and crowns of the hob burners Wipe the hob surface with a soft cloth soaked in soapy water Then wipe the hob surface over again with a wet cloth and dry it Wash and rinse the hob burner caps Do not leave them wet Dry them immediately with a dry cloth Make sure you re assemble all parts correctly after cleaning The surf...

Страница 39: ... WARNING The maintenance of this appliance should be carried out by an authorised service person or qualified technician only Changing the oven lamp WARNING Switch off the appliance and allow it to cool before cleaning your appliance Remove the glass lens then remove the bulb Insert the new bulb resistant to 300 C to replace the bulb that you removed 230 V 15 25 Watt Type E14 Replace the glass len...

Страница 40: ......

Страница 41: ...Product support 7 ...

Страница 42: ... burners do not light Burner cap and crown are not assembled correctly Supply gas pressure may not be correct LPG cylinder if applicable may be depleted Power if the appliance has an electric connection is switched off The battery if applicable may be depleted Ensure the burner parts have been placed correctly Check the gas supply and gas pressure LPG cylinder may need replacing Check whether ther...

Страница 43: ... and efficient service please have the following information ready Model Ref Serial number Date of purchase Local call rates applies Lines open 8am 7pm Monday to Saturday and 10am 4pm Sunday Calls to Argos enquiry lines may attract a charge and set up fee from residential lines depending on your call plan tariff Mobile and other providers costs may vary see www bt com pricing for details For Secur...

Страница 44: ...tructions which may occur as a result of product improvemenst and development Disposal The symbol on the product or on its packaging indicates that this product may not be treated as household waste Instead it shall be handed over to the applicable collection point for the recycling of electrical and electronic equipment By ensuring this product is disposed of correctly you will help prevent poten...

Страница 45: ...u provide us with information about another person you confirm that they have appointed you to act for them to consent to the processing of their personal data including sensitive personal data and that you have informed them of our identity and the purposes as set out in the Important Data Privacy notice displayed overleaf for which their personal data will be processed You are entitled to ask fo...

Страница 46: ...Contact www argos support co uk Helpline 0345 257 7271 ...

Отзывы: