Installing your gas cooker
Bringing it all together
Installing your gas cooker
19
or online at
www.argos-support.co.uk
If you still require further assistance, call one of our experts on
0345 257 7271.
WARNING:
Do not use a naked flame to check for
gas leaks.
Gas conversion (if available)
Your appliance is designed to be operated with LPG/
NG gas. The gas burners can be adapted to different
types of gas, by replacing the corresponding injectors
and adjusting the minimum flame length suitable to the
gas in use. For this purpose, the following steps should
be performed.
Changing injectors
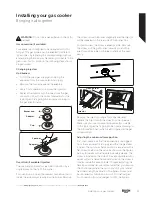
Hob burners
•
Cut off the main gas supply and unplug the
appliance from the mains electrical supply.
•
Remove the burner caps and the adapters.
•
Use a 7 mm spanner to unscrew the injectors.
•
Replace the injector with the ones from the gas
conversion kit, with the correct diameters for the
type of gas that is going to be used, according to
the gas injector table.
Adapter
Spanner
Adapter
Cup
Burner cap
Oven/Grill (if available) Injectors
The oven and grill injectors are held in position by a
single screw on the tip of the burner.
For oven burners, open the drawer compartment and
locate the assembly screw below the burner. Remove
the screw, move the burner diagonally and the injector
will be revealed on the rear side of the burner box.
For grill burners, the screw is already visible. Remove
the screw, pull the grill burner towards you and the
injector will be visible on the rear surface of the oven
cavity.
Scr
ew
Injector
Oven burner
Remove the injectors using a 7mm spanner and
replace the injector with the ones from the spare set.
Make sure you use corresponding diameters suitable
to the type of gas that is going to be used, according to
the information chart (which is also supplied in the gas
conversion kit).
Adjusting the minimum flame position
First of all, make sure that the appliance is unplugged
from the mains electrical supply and that the gas feed
is open. The minimum flame position is adjusted with a
flat screw located on the valve. As shown in the figures
below; for valves with a flame failure safety device, the
screw is located on the side of the valve spindle and for
valves without a flame failure safety device, the screw is
located inside the valve spindle. To make adjusting the
flame position easier, we recommend that you remove
the control panel (and the micro switch if your model
has one) during the alteration. The bypass screw must
be loosened for conversion from LPG to natural gas.
For conversion from natural gas to LPG, the bypass
Содержание BGC60SB
Страница 1: ...Instruction manual Gas Cooker BGC60SW BGC60SB Max 8 9 9 7 5 2 3 4 1 ...
Страница 4: ......
Страница 5: ...1 Safety information ...
Страница 10: ......
Страница 11: ...Getting to know your gas cooker 2 ...
Страница 14: ......
Страница 15: ...Installing your gas cooker 3 ...
Страница 24: ......
Страница 25: ...Functions 4 ...
Страница 30: ......
Страница 31: ...Using your gas cooker 5 ...
Страница 36: ......
Страница 37: ...Care and maintenance 6 ...
Страница 40: ......
Страница 41: ...Product support 7 ...
Страница 46: ...Contact www argos support co uk Helpline 0345 257 7271 ...


