18
Repair and Maintenance
WARNING:
To avoid a pinch or injury keep
fingers away from moving
sprockets and chain.
WARNING:
Make sure power switch
is in OFF position before
performing any maintenance.
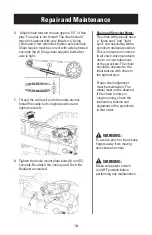
6. Adjust chain tension to have approx. 1/2” of free
play. Free play is not forced! The chain should
move this amount with very little force. Using
12mm and 17mm wrenches tighten axle securely.
Chain tension must be correct with axle tightened
securely (fig A). Snug chain adjuster bolts after
axle is tight.
7. Thread the cable wire into the cable anchor.
Install the cable to its original position and
tighten securely
8. Tighten the brake mount plate bolts (A) and (C)
securely. Re-attach the chain guard. Test ride.
Readjust as needed.
Chain and Sprocket Notes:
The chain will typically have
a “loose spot” and “tight
spot” corresponding with a
sprocket rotational position.
This is normal and common
to all chain-driven products
due to run-out tolerances
of the sprockets. The chain
should be adjusted to the
ideal tension with chain in
the tightest spot.
Proper chain alignment
must be maintained. The
wheel must not be skewed.
If the chain is noisy or
rough running, check the
lubrication, tension and
alignment of the sprockets,
in that order.


