background image

Dual SH BrewWISE

®

 Training Manual

20

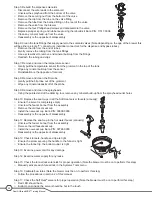
Step 5: Rebuild the dispense solenoids

Disconnect the wire leads to the solenoid 


Unscrew the sprayhead from the bottom of the valve


Remove the securing nut from the bottom of the valve


Remove the clip from the tube on the valve 

fi

tting


Remove the tube from the barbed 

fi

tting on the rear of the valve


Remove the valve from the brewer 


Remove the four Phillips head screws and disassemble the valve 


Replace plunger, spring, and rubber seat using the rebuild kit Bunn P/N: 11517.0008


Clean any mineral build-up from the valve


Reassembly is the opposite of disassembly


Step 6: Clean the tank 

fi

ttings that supply water to the solenoid valves (Note depending on the age of the brewer this 

will be either a single “T” connector or individual connectors for the dispense and bypass tubes.)

Remove the clip from the end of tubes


Gently remove the tubing from the tank 

fi

ttings


Use a screwdriver to remove and mineral build-up from the 

fi

ttings


Reattach the tubing and clips


Step 7: Remove and clean the temperature sensor

Gently pull the temperature sensor from the grommet in the top of the tank


Wipe any mineral build-up from the sensor


Reinstallation is the opposite of removal


Step 8: Remove and clean the 

fi

ll probe

Gently pull the 

fi

ll probe out of the grommet 


Wipe any mineral deposits off of the probe


Step 9: Remove and clean the sprayheads

Using the pointed end of the deliming tool, remove any mineral build-up from the sprayhead outlet holes


Step 10: Replace the seat cups in all the Soft Heat server faucets (annually)

Ensure the server is completely empty


Unscrew the faucet bonnet from the assembly


Remove the old faucet seat cup


Install the new seat cup Bunn P/N: 00600.0000


Reassembly is the opposite of disassembly


Step 11: Replace the seat cup in the hot water faucet (annually)

Unscrew the faucet bonnet from the assembly


Remove the old faucet seat cup


Install the new seat cup Bunn P/N: 02766.0000


Reassembly is the opposite of disassembly


Step 12: Check funnels, handle and tip are tight

Ensure the screw securing the handle to the funnel is tight


Ensure the funnel tip, the bottom outlet, is tight


Step 13: Examine power cord for any damage

Step 14: Examine water supply for any leaks

Step 15: Check the funnel lock solenoids for proper operation (Note the brewer must be on to perform this step)

Manually activate each funnel lock in the Systems Tools menu


Step 16: Calibrate 

fl

ow rates (Note the brewer must be on to perform this step)

Follow the procedures in section 2 of this manual


Step 17: Check the Soft Heat

®

 servers for proper operation (Note the brewer must be on to perform this step)

Red LED should be on


Bottom panel inside the server should be hot to the touch


S

MA R T

F

U NNE L

Содержание Dual SH BrewWISE

Страница 1: ...BUNN TECHNICAL TRAINING Dual SH BrewWISE DBC ...

Страница 2: ...ult Values 11 Unit 3 Machine Composition Exterior Overview 13 Product Outlets and Removable Parts 13 User Interface 13 Accessing the Inside of the Brewer 13 Machine Function and Operations 14 Main Control Board 14 Filling System 14 Heating System 15 Dispensing System 15 Coffee Holding System 16 The Soft Heat Server 17 Unit 4 Preventive Maintenance Preventive Maintenance 19 PM Steps 19 Unit 5 Troub...

Страница 3: ...ror Given a new machine all the necessary tools and safety equipment the learner will be able to install the brewer without error The learner will be able to verify that the site requirements have been met The learner will be able to locate and document the serial number The learner will be able to hook up the water supply The learner will be able to hook up the electrical supply ...

Страница 4: ...he machine s serial number is located on the data plate which is attached to the bottom of the front panel The se rial number begins with the word DUAL The complete serial number will need to be documented on all work orders and warranty tags Water Supply Install Step 1 Check water pressure install a regulator if above 90psi Step 2 Flush water lines Step 3 Install shut off valve Step 4 Attach the ...

Страница 5: ...ine does not have an On Off switch and will turn on when the unit is plugged in Step 1 Flip the On Off switch to the On position When the machine is turned on it will begin to fill the tank After the tank fills the machine will automatically begin the heating cycle This will take approximately 20 minutes Once the water temperature has reached the programmed Brew Lockout temperature it will display...

Страница 6: ... to install and setup the brewer for customer turnover without error Given an installed machine all the necessary tools and safety equipment the learner will be able to set the machine up for initial operation The learner will be able to power on the machine The learner will be able to perform the calibrations ...

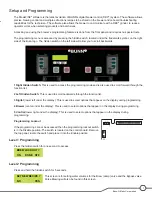
Страница 7: ... forward through the function list 2 Left Hidden Switch This is used to scroll backwards through the function list 3 Digital lower left under the display This is used to select options that appear on the display during programming 4 Brewer center under the display This is used to select options that appear on the display during programming 5 Control lower right under the display This is used to se...

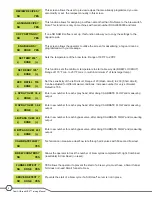
Страница 8: ...mber for very soft water Default is 155 Enter new number for each spray head after doing CALIBRATE FLOW and measuring output Enter new number for each spray head after doing CALIBRATE FLOW and measuring output Enter new number for each bypass valve after doing CALIBRATE FLOW and measuring output Enter new number for each bypass valve after doing CALIBRATE FLOW and measuring output Technician can m...

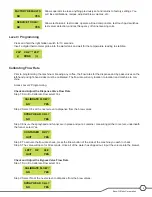
Страница 9: ...cation and machine to ma chine Access Level 2 Programming Check and Adjust the Dispense Valve Flow Rate Step 1 Scroll to Calibrate Flow select Yes Step 2 Select Yes at the next screen to dispense from the brew valves Step 3 Ensure the sprayhead and funnel are in place and put a container measuring pitcher or server underneath the funnel select Yes Step 4 To activate the flow rate check press the B...

Страница 10: ...d will contain all of the coffee parameters for the customers cof fee flavor profile including Coffee Name Brew Volumes Bypass Percentages Pulse Brew Times PreInfusion Times and Drip Out Times To upload the recipe onto the brewer remove the funnels and place the card under the left hand funnel sensing coil The machine will recognize the recipe card and prompt to upload the recipe on the display TA...

Страница 11: ...ge batch 20 Pulse Brew Times Small batch 40 10 5 Medium batch Off Large batch Off Pre Infusion Times Small batch Off Medium batch Off Large batch Off Drip Out Times Small batch 1 00 Medium batch 1 30 Large batch 2 00 Enable Ads Yes Brew Temperature 200º F 93º C Ready Temperature 195º F 91º C Refill 155 Spray Oz Minute 39 2 Bypass Oz Minute 24 1 Funnel Detect Yes Server Detect Yes ...

Страница 12: ... will remove the front panel and top cover Given an operating machine the learner will be able to give a general explanation of how the unit operates The learner will be able to identify the functions of the main control board and identify the components that correspond to each triac The learner will be able to identify the components and functions of the filling system The learner will be able to...

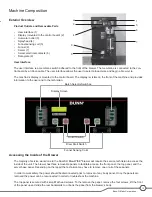
Страница 13: ...n Accessing the Inside of the Brewer The majority of service work done to the Dual SH BrewWISE brewer will require the service technician to access the inside of the unit The brewer has three removable panels to facilitate access the front panel the top panel and the server base panel Depending on the repair the technician may have to remove one or all of these panels In order to work safely the p...

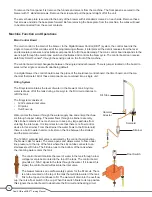
Страница 14: ...wer s tank Anytime water is drawn off of the tank during a brew cycle the fill circuit activates to refill the tank The fill system consists of 120V solenoid inlet valve Fill probe Overflow cup Water enters the brewer through the water supply line and enters the chas sis through copper tubing The water flows through a strainer assembly this strainer contains a fine mesh screen to keep any large pa...

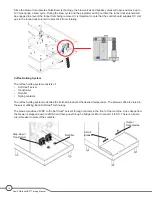
Страница 15: ...tor the control board reads the temperature as value of resistance The temperature sensor allows the control board to trigger the two heating element triacs when the temperature drops below its programmed value and shut down the trigger voltage when the water temperature reaches the programmed holding value Dispensing System The dispensing system consists of Brew valve Bypass valve Sprayhead Funne...

Страница 16: ...from vibrating Coffee Holding System The coffee holding system consists of Soft Heat server Transformer Rectifier Spring contacts The coffee holding system maintains the finished product at the desired temperature The brewed coffee is stored in the server utilizing Bunn Soft Heat technology The brewer provides 24VDC to the Soft Heat servers through contacts in the front of the machine Line voltage...

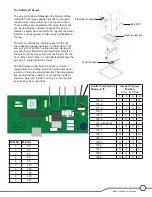
Страница 17: ...power from the brewer On the front of the server there is a red LED that indicates the server is in contact with the brewer The Soft Heat control board contains controls for temperature and holding time The holding time is ad justed by turning the small white dial The temperature can be adjusted by cutting or reconnecting leads to resistors Note the resistor can only be reconnected by soldering th...

Страница 18: ...hine requiring a preventive maintenance the learner will be able to identify which elements of a component need to be serviced without error Given a machine all the necessary tools and safety equipment the learner will be able to identify the components that need to be serviced for the PM ...

Страница 19: ... do not remove the valve from the machine Using the basin wrench remove the nut from the front of the valve Disconnect the electrical leads from the valve coil Remove the coil from the valve stem Using the basin wrench unscrew the valve stem from the base Replace the valve plunger and spring using the rebuild kit Bunn P N 01111 0000 Reassembly is the opposite of disassembly Step 3 Remove and clean...

Страница 20: ...e fill probe out of the grommet Wipe any mineral deposits off of the probe Step 9 Remove and clean the sprayheads Using the pointed end of the deliming tool remove any mineral build up from the sprayhead outlet holes Step 10 Replace the seat cups in all the Soft Heat server faucets annually Ensure the server is completely empty Unscrew the faucet bonnet from the assembly Remove the old faucet seat...

Страница 21: ...the learner will be able to access the software and diagnosis the problem The leaner will be able to access the programming menu The learner will be able to navigate to the Service Tools menu The learner will be able use the Service Tools menu to test inputs or outputs Given a list of error messages and issues the learner will be to identify the probable cause of the message or issue Given a brewe...

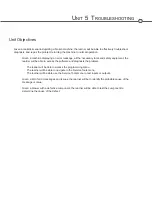
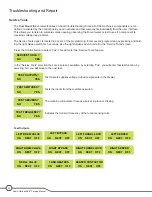
Страница 22: ...he Control button to select Yes This will enter the Service Tools feature In the Service Tools selection their are 4 screens available by selecting Yes you will enter that test function by selecting No you will move to the next test Test Outputs supplies voltage to load components in the brewer Tests the inputs from the membrane switch The machine will indicate if it sees a server in place or miss...

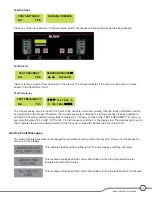
Страница 23: ...TEST FREQUENCY screen you see something like 124 7 KHZ 5 The 124 7 is the frequency and the 5 is the tuning step The decimal point next to the 5 indicates the funnel is being detected if the funnel is removed the decimal point should turn off Service Fault Messages The brewer features several error messages for problems occurring within the machine These error messages be show up on the display Th...

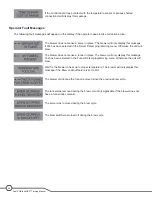
Страница 24: ... menu Otherwise the unit will brew The brewer does not sense a funnel in place The brewer will only display this message if Yes has been selected in the Funnel Detect programming menu Otherwise the unit will brew Wait for the brewer to heat up to proper temperature The brewer will only display this message if the Brew Lockout feature is set to NO The brewer did not see the funnel removed since the...

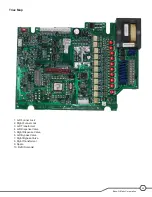
Страница 25: ... 25 Triac Map 1 Left Funnel Lock 2 Right Funnel Lock 3 Left Transformer 4 Left Dispense Valve 5 Right Dispense Valve 6 Left Bypass Valve 7 Right Bypass Valve 8 Right Transformer 9 Spare 10 Refill Solenoid 1 2 3 4 5 6 7 8 9 10 ...

Страница 26: ......
Отзывы: