background image

SKU 

68332


For technical questions, please call 

1-800-444-3353 

Page: 

33

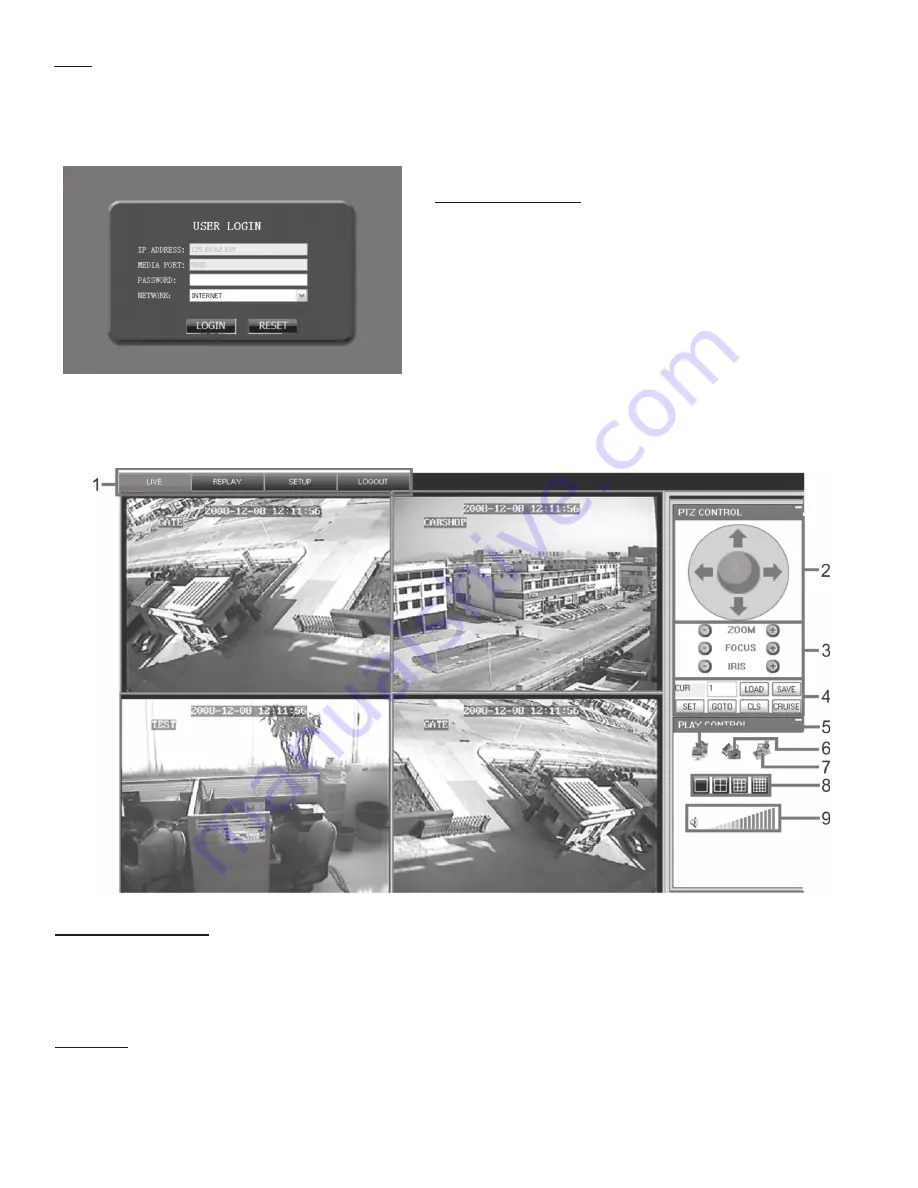
log-in to Net-Viewer

After the webcam installs the plug-ins, select the log-in 

language (English), enter the password and click LOGIN. 

You can view DVR remotely through Net-Viewer.
Note: The default password is empty. The system allows 

the Administrator to set a new password as per instructions 

the Password Set menu. If you want to delete an old 

Internet Browser webcam at DVR system update, run 

the command characters: “regsvr32/u dvrocx.ocx”

Note:

 If you cannot use HTTP port 80 or 9000 because it is being used by another program, or it is being 

blocked by your service provider, you can use another port in the same range. If you do so you will need to 

forward the IP address of the router to the other port, change the port in the DVR NETWORK settings, and add 

the port number after the IP address. For example, if you set the HTTP port as 82, you need to enter the IP 

address as 192.168.0.25:82. (User name and password here are the same as what you use on the DVR.)

Main Screen Controls

1: Drop Down Menu Bar
2 - 4: PTZ Control (Pan/Tilt/Zoom)
6 - 9: Live Play Control 

live Mode

After successful Log-in to Net-viewer, the system will  enter into live display interface 

and connect to audio/video feed automatically (as shown above).

Main log-in Screen

Содержание 68332

Страница 1: ...herein may be reproduced in any shape or form without the express written consent of Harbor Freight Tools Diagrams within this manual may not be drawn proportionally Due to continuing improvements actual product may differ slightly from the product described herein Tools required for assembly and service may not be included Manual Revised 11f Record Product s Serial Number Here Note If product has...

Страница 2: ...ation Infrared Illumination Range 12 feet Camera Operating Temperature 50ºF 104ºF Cable 60 ft Audio Video Cable Hard drive 500GB hard drive Audio ADPCM2 CODEC Video H 264 Motion Detection Selectable Area and Sensitivity Detection Microprocessor 32 bit RISC Processor Network Interface RJ 45 10m 100m Ethernet Interface HDD Interface SATA up to 1024GB USB Port USB 2 0 Audio Port 1 Input Channel 1 Out...

Страница 3: ...cation 16 PTZ Setup Pan Tilt Zoom 16 Mobile 17 Motion Detect 18 System Function 18 Time Setup 18 Password 19 Video Setup 19 Language 19 Information 20 System Maintenance 20 Menu Lock 21 Basic Operation 21 Navigating the Menu List 22 Recorded Video Search and Playback 22 Video Search 23 Recording File Backup 24 Mobile Device Access Set up 24 Windows Mobile 25 Symbian System Mobile 26 iPhone 27 Blac...

Страница 4: ... that may occur It must be understood by the operator that common sense and caution are factors which cannot be built into this product but must be supplied by the operator SAVE THESE INSTRUCTIONS 1 Work area safety Keep cameras cables and DVR our of reach of children 2 Electrical safety a Power plugs must match the outlet Never modify the plug in any way Do not use any adapter plugs with grounded...

Страница 5: ...Devices Devices with Two Prong Plugs Outlets for 2 Prong Plug 1 Devices marked Double Insulated do not require grounding They have a special double insulation system which satisfies OSHA requirements and complies with the applicable standards of Underwriters Laboratories Inc the Canadian Standard Association and the National Electrical Code See Outlets for 2 Prong Plug 2 Double insulated devices m...

Страница 6: ...5 50 75 100 150 0 2 0 18 18 18 18 16 2 1 3 4 18 18 18 16 14 3 5 5 0 18 18 16 14 12 5 1 7 0 18 16 14 12 12 7 1 12 0 18 14 12 10 12 1 16 0 14 12 10 16 1 20 0 12 10 TABLE A Based on limiting the line voltage drop to five volts at 150 of the rated amperes Symbology Double Insulated Canadian Standards Association Underwriters Laboratories Inc V Volts Alternating Current A Amperes n0 xxxx min No Load Re...

Страница 7: ...splay Supports auto maintenance Setup Overview This unit can be set up in several different configurations The simplest is with a TV monitor For set up through the internet there are specific software requirements and you will need to have an understanding of your router your computer and your internet connection settings as well as port forwarding knowledge Following are the possible set up optio...

Страница 8: ... 800 444 3353 Page 5 Components Components and Controls Camera Cables Mouse Cable Splitter Remote Control Software CD DVR Adapter Adapter Power Cord Video Cable Not shown 2 AA Batteries for the Remote Control Hardware to install Cameras Four Cameras ...

Страница 9: ...g or move to the right when navigating in the Setup menu or select when navigating in the Menu List 10 STOP Used to stop playback or to stop recording 11 REC Used to start manual recording 12 MENU ESC Used to enter and exit the menus 13 UP Used to move up a selection in the menu list 14 SEL EDIT Used to select an item in the menus 15 DOWN Used to move down a selection in the menu list 16 PTZ Used ...

Страница 10: ... the TV Plug the TV into a wall outlet The unit will power up IMPORTANT Before mounting any of the cameras test the unit by hooking up all the connections as shown below and testing all the features to insure the unit is working properly There are two 6mm cameras for longer range and two 3 6mm cameras for wider angle shorter range viewing Test the cameras for the best location before installing Ea...

Страница 11: ...lowing for Mouse operation In the Main Interface to maximize the image to full screen Double click the live image of any channel To return to display all cameras Double click again To enter a Menu Right click any area of the screen To select menu items in the Menu Left click any area of the screen To exit the Menu List Left click any area outside the menu To exit all other menus Right click any ar...

Страница 12: ...Setting Email Setting Motion Area Setting Main Menu Camera Record Schedule Network Search Devices System Main Menu The Main Menu is for setting up the DVR and cameras for recording playback network and other access You can also set system function settings such as the time user password Audio Video settings language system information and system maintenance Note When setting up or making changes t...

Страница 13: ...cel the modification click EXIT to exit the menu 4 Click DEFAULT to return to default values Autoseq Image Auto Cycle Function In the Display Setup submenu select AUTOSEQ to enter the auto cycle submenu shown left In the auto cycle function the system will automatically rotate the video images from a full screen image of each channel CH1 CH2 CH3 and CH4 then Quad all channels then repeat Default r...

Страница 14: ...ect Time Schedule Record and select the SCHEDULE option The Schedule submenu will display shown at left Recording options include CH 1 CH 2 CH 3 CH 4 or All channels Click the desired option To set up weekly schedules select the box of the recording status you want ALARM motion detected GENERAL or NO RECORD and then click on each box in the schedule time line that you want this method to apply to ...

Страница 15: ...rt 9000 and web port 80 by default Note When selecting DHCP the router will allocate DVR IP address automatically after you exit the menu Write down the addresses assigned for your reference Leave unit in DHCP mode or change to static to enter the addresses manually so the router does not change them later PPPoE When selecting PPPoE input the user name and password provided by your internet servic...

Страница 16: ...r s gateway and select a fourth set of numbers that is different than any other device attached to the same router If the IP address of your computer in the ipconfig was a single or two digit number enter any three digit number If the computer IP address ends with a number in the 100s enter a number in the 200 s After you enter the addresses click APPLY At the bottom of the NETWORK SETUP window th...

Страница 17: ...ailable on the Hard Drive USABLE REC TIME Based on current image detail quality and frame rate system will show you how much recording time you have left on the Hard Drive OVERWRITE If you select on the system will automatically overwrite the oldest recordings once the hard drive is full if you select off recording will stop once the hard drive is full HDD FORMAT You use this option to format the ...

Страница 18: ...OFF there are no alarm sounds VIDEO LOSS Options are ON and OFF When the function is ON system will issue alarm sound and display video loss on the preview interface when the function is OFF system will have no alarm sound but the preview interface will display video loss Email Alarm Notification This option sends a notice to an email account when the motion alarm is triggered Click the Email setu...

Страница 19: ...ick F F keys to control camera focus and click I I to adjust iris CRUISE SETUP Click CRUISE SET to open the auto cruise function window if you want to adjust the cruise function The system default is ON CH Select the channel number with the PTZ camera TOTAL Enter presetting bit quantity CUR POINT System has default starting current cruise point as 01 You can use this option to set additional cruis...

Страница 20: ...vity level of motion detection from 1 to 4 with 4 being the most sensitive MD AREA This option allows you select the area you want to be sensitive to motion A new window displays with a grid separated into a 13 by 10 block area Select areas in red where motion detection is desired When any object moves into the motion detection area the red areas of the grid recording will be triggered In the shad...

Страница 21: ...menu Use this menu to modify the system date time date time format and time zone and also setup DST daylight savings time status and mode Password Click Main Menu System User Password to enter the Password Setup menu This option allows you set the device ID for the DVR and set the system password if you want to use one The new passwords will be available after clicking APPLY When you set Password ...

Страница 22: ...item does not have a VGA video out port Language Click Main Menu System Language Select to enter the Language Select menu Select the language then click APPLY The selection will be available after system Auto restarts Note This option is available only when the DVR comes with Multiple language OSD Information Click Main Menu System System Information to enter the System Information menu View syste...

Страница 23: ...mware and set system auto maintenance When opening auto maintain function you can setup system to restart regularly Menu Lock As a system safety feature you can click Menu Lock menu to lock menu when leaving the DVR If you want to login to the DVR you would input the device code and password Note The user only has the authority to search recordings but the Administrator has full authority over Mai...

Страница 24: ...gin recording Note if you have recording already scheduled you can override the motion detect setting or the no record setting by choosing this function STOP RECORD Select to stop recording START CRUISE Select to begin the PTZ cruise function set up in the setup menu cameras with this function are not included START AUTOSEQ Select to begin an automatic cycling of the camera displays PIP MODE Selec...

Страница 25: ...or that day ALL Select All Click ALL to select all the events on the current page REVERSE Invert selection Click REVERSE to select all the events on the current page except those you have currently selected BACKUP Click BACKUP to save your selected files to backup See following for backup procedure Video Search In the Main Menu select SEARCH to enter the Video Search menu shown at left or from the...

Страница 26: ... recording s and click BACKUP When the backup is completed you will be notified Click OK to confirm and complete the backup process Note The Backup file will be in H264 format You can convert it to AVI format using the Multimedia Player program that comes with the DVR Playback 2 3 0 4 or through the net viewer program allowing you to use any player which supports AVI format ...

Страница 27: ...DVR settings Note Captured images will be saved to the default path Explorer Program Files ASee Photofile If using this program for the first time or when changing the settings select Setting to enter the following window Following are the entries in the window User Name Same as user name set on DVR Password Same as password set on DVR Server Same as IP address connected to DVR or dynamic domain n...

Страница 28: ...controls are described below 1 Channel select 2 PTZ direction 3 Lens control left to right focus zoom iris 4 Play control bar l to r play pause full screen snapshot setup next channel group quit Note the snapshot images will be saved to the default path file manager Images 8 If using this program for the first time or when changing the settings select Setup to enter the following window or select ...

Страница 29: ...program 5 After installation the ASee icon will appear 6 Select the icon to enter the program Following are the control functions 1 Channel Select 2 PTZ direction left right up down 3 Area selection zoom in zoom out 4 Focus 5 Iris 6 Play control bar l to r play pause snapshot setup next channel group help 7 Enter the settings window to enter the settings Following are the window entries 1 Enter de...

Страница 30: ...ADER from the Main Menu 5 Press START on APPLICATION LOADER menu 6 Press BROWSER then select ASee alx 7 Press FINISH Setup and Operation on Blackberry phone viewer 1 The Blackberry viewer will be displayed in the Downloads directory 2 Enter the Downloads directory and select the ASee icon 3 You will enter the menu with control icons along the bottom of the screen Following are the icon functions 1...

Страница 31: ...settings and the system will return to Live display d Select HISTORY to enter the history list Highlight one record and press ENTER The pop up menu has the following options Open Connects to the DVR and displays the default CH1 Edit Allows you to edit the history record Delete Deletes the history record 5 Help Enters help function 6 Channel Select Select the CHANNEL SELECT icon to search channels ...

Страница 32: ...ket icon 2 The E Market window will open 3 Select the SEARCH icon in the upper right corner and input Apkinstaller 4 Highlight and install the program 5 Follow the installation steps 6 Enter the program aps window and select the Apkinstaller icon 7 Select the ASee apk and install 8 Enter the program aps window and select the ASee icon 9 The program will open Follow the steps 6 and 7 for the Iphone...

Страница 33: ... at left Note The file type you have selected should be 264 format 2 Highlight the file and Click OPEN shown lower left 3 Open the Play window on the top of the multimedia player interface and select PLAY 4 Click the pop up menu button on the bottom of the Playback program window then the play 1 triangle to play the backup file Playback Program Playback included on the disk is an alternate program...

Страница 34: ...Settings The default setting for video playback is a display of all four channels To change the setting to view only one channel click Setting Video Play Setting Normal Video Bar Choose the desired channel in the Channel window then check Play The Video Click APPLY then OK To set the Audio Click Setting Audio Channel Setting Normal Video Bar Choose the desired channel in the Channel window then ch...

Страница 35: ...and will be different from the numbers shown in the above example 12 If Require server verification https for all sites is selected you will need to uncheck the selection box 13 Click ADD 14 Close window To change the default setting for the TRUSTED SITES zone to low on the Main Settings 1 Click on DEFAULT LEVEL 2 Change security level of the zone to Low by sliding the slider to the bottom 3 This ...

Страница 36: ...0 because it is being used by another program or it is being blocked by your service provider you can use another port in the same range If you do so you will need to forward the IP address of the router to the other port change the port in the DVR NETWORK settings and add the port number after the IP address For example if you set the HTTP port as 82 you need to enter the IP address as 192 168 0 ...

Страница 37: ...e format of the backup files is H 264 you can convert H 264 format into more familiar AVI format by pressing the button to switch from 264 to AVI Setup Mode Click SETUP to enter into the sub menu including Recording Mode menu Alarm Mode menu PTZ Control Menu Network Setting menu System Setting menu and Host Info menu Note You can only modify and save the parameters remotely when the DVR is set to ...

Страница 38: ...rm HDD not enough space alarm HDD not found alarm and alarm output time etc Click Setup for each camera to enter and adjust the motion detection settings for each channel of DVR PTZ Control Click PTZ CONTROL menu to setup the Pan Tilt Zoom camera settings Remote setup methods are the same as local DVR setup Network Click NETWORK to enter the Network menu Remote setup methods are the same as local ...

Страница 39: ...saving path and screen capture saving path The menu also allows you to set a lower bandwidth for Internet video transmission set user password turn daylight saving time on off etc Host Information Click HOST INFO to enter the Host Information submenu This screen displays the Usage Rate of the HDD the available recording time the software version and MAC address ...

Страница 40: ...h the Main Menu under Network Setup Check that the IP Allocation is set to DHCP Note the IP Address Enter the IP Address in the address bar in Internet Explorer and press enter You will access the HD Note If your modem does not support DHCP you will need to get the address information form your internet provider Error codes when trying to install DxClient software Incompatibility with web browser ...

Страница 41: ...ation charges prepaid Proof of purchase date and an explanation of the complaint must accompany the merchandise If our inspection verifies the defect we will either repair or replace the product at our election or we may elect to refund the purchase price if we cannot readily and quickly provide you with a replacement We will return repaired products at our expense but if we determine there is no ...

Страница 42: ...SKU 68332 For technical questions please call 1 800 444 3353 Page 39 Notes ...

Страница 43: ... may cause undesired operation To the extent that you use this unit with software other than what is provided we will not be responsible for any loss or damage to your computer or contents Trademark Acknowledgements Ethernet Internet Explorer IE ActiveX DivX Apkinstaller Windows XP and Windows Vista are registered trademarks of the respective holders Windows Mobile is a registered trademark of Mic...

Отзывы: