background image

5

Engl

ish

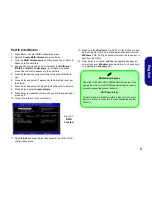
Part II: Intel Matrix

1.

Press 

Ctrl + i

 to enter RAID configuration menu.

2.

Select 

1.Create RAID Volume

 and press Enter.

3.

Type the 

RAID volume name

 and then press Tab or Enter to 

advance to the next field.

4.

Specify (use the up and down arrow keys) the 

RAID level


(

RAID 0 or RAID 1 or Recovery

 - see 

Table 1

) and then 

press Tab or Enter to advance to the next field.

5.

Press


Enter and the system will select the physical disks to 

use.

6.

Press Enter and select (if applicable) the Strip Size (best set 
to default).

7.

Press Enter and select the Capacity size (best set to default).

8.

Press Enter to select 

Create Volume

.

9.

Press Enter to create the volume, and confirm the selection by 
pressing 

Y

.

10. This will now return to the main menu.

11. Select 

6.Exit

 and press Enter, then press

 Y

 to exit the RAID 

configuration menu.

12. Make sure the 

Windows 7

 OS DVD is in the DVD drive and 

as the computer starts up it will automatically boot from the 

Windows 7

 OS DVD (you will be prompted to press a key to 

boot from the DVD).

13. Press Enter to continue installing the operating system as 

normal (see your 

Windows

 documentation if you need help 

on installing the 

Windows

 OS). 

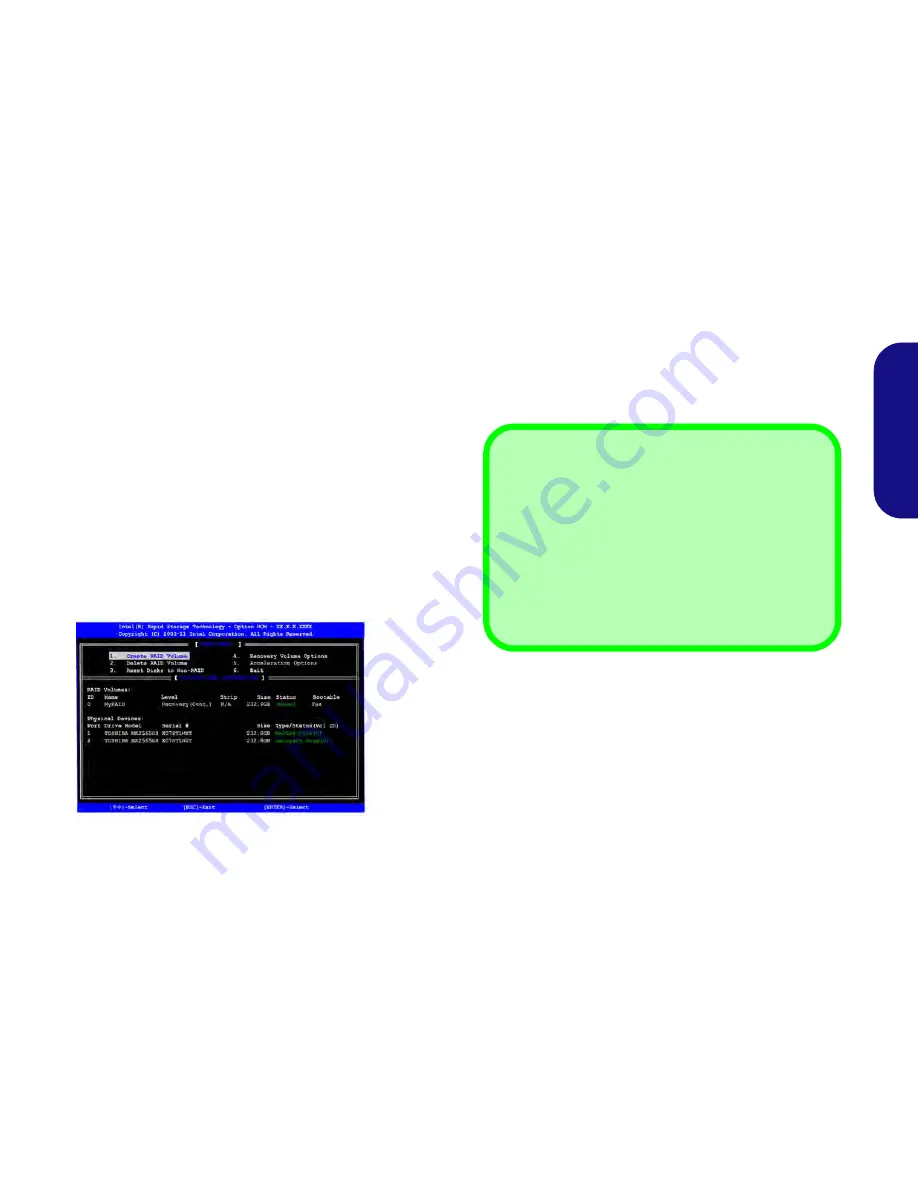
Figure 2

RAID 

Created

RAM Module Speeds 

Use either 1333MHz OR 1600MHz DDR3 modules of the
same brand. Do not mix DRAM speeds/brands in order to
prevent unexpected system behavior.

RAID Hard Disks

All hard disks in a RAID should be identical (the same
size and brand) in order to prevent unexpected system
behavior.

Содержание 15CL48

Страница 1: ......

Страница 2: ......

Страница 3: ... version française de ce guide commence à la page 49 Le Manuel de l Utilisa teur étendu se trouve sur le disque de Pilotes Utili taires Manuel de l Utilisateur disque Device Drivers Utilities User s Manual Introducción Español Esta Guía del Usuario Concisa le presenta las caracterís ticas principales de su ordenador La versión española de esta guía comienza en la página 73 El Manual del usua rio c...

Страница 4: ...1 Hot Key Tasten Tastatur 32 Control Center Steuerzentrum 34 Systemübersicht Ansicht von vorne links rechts und hinten 38 Systemübersicht Ansicht von unten 39 Grafikfunktionen 40 Audiofunktionen 42 Installation der Treiber 43 Fehlerbehebung 44 Technische Daten 45 Sommaire A propos de ce Guide Utilisateur Concis 49 Guide de démarrage rapide 51 Configuration RAID 52 Carte du système Vue de face avec...

Страница 5: ...ros de vídeo 89 Instalación de controladores 91 Solución de problemas 92 Especificaciones 93 Sommario Informazioni su questa guida rapida 97 Guida di avvio rapido 99 Configurazione RAID 100 Descrizione del sistema Vista anteriore con pannello LCD aperto 102 Indicatori LED 103 Pulsanti Hot Key Tastiera 104 Control Center Centro di controllo 106 Descrizione del sistema Vista anteriore sinistra destr...

Страница 6: ...IV ...

Страница 7: ...aren t or you are planning to re configure or re install portions of the system refer to the expanded User s Manual The Device Drivers Utilities User s Manual disc does not contain an operating system Regulatory and Safety Information Please pay careful attention to the full regulatory notices and safety information contained in the expanded User s Man ual on the Device Drivers Utilities User s Ma...

Страница 8: ... a battery that has been dropped or that appears damaged e g bent or twisted in any way Even if the computer continues to work with a damaged battery in place it may cause circuit damage which may possibly result in fire Make sure that your computer is completely powered off before putting it into a travel bag or any such container Before cleaning the computer make sure it is disconnected from any...

Страница 9: ... hand as illustrated in Figure 1 to support the base of the computer Note Never lift the computer by the lid LCD 7 Press the power button to turn the computer on System Software Your computer may already come with system software pre installed Where this is not the case or where you are re configuring your computer for a different system you will find this manual refers to Microsoft Windows 7 Mode...

Страница 10: ...iption RAID 0 at lease two hard disks needed Identical drives reading and writing data in paral lel to increase performance RAID 0 imple ments a striped disk array and the data is broken into blocks and each block is written to a sepa rate disk drive RAID 0 a striped array is not fault tolerant The failure of one drive will result in the loss of all data in the array RAID 1 at lease two hard disks...

Страница 11: ...ate the volume and confirm the selection by pressing Y 10 This will now return to the main menu 11 Select 6 Exit and press Enter then press Y to exit the RAID configuration menu 12 Make sure the Windows 7 OS DVD is in the DVD drive and as the computer starts up it will automatically boot from the Windows 7 OS DVD you will be prompted to press a key to boot from the DVD 13 Press Enter to continue i...

Страница 12: ...n 6 Hot Key Buttons 7 Speakers 8 Keyboard 9 Built In Microphone 10 Touchpad Buttons Wireless Device Operation Aboard Aircraft The use of any portable electronic transmission devices aboard aircraft is usually prohibited Make sure the wire less modules are OFF if you are using the computer aboard air craft Use the key combina tions to toggle power to the WLAN Bluetooth modules and check the LED ind...

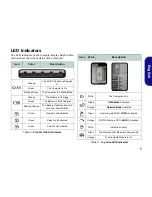
Страница 13: ... Sleep Mode Orange The Battery is Charging Green The Battery is Fully Charged Blinking Orange The Battery Has Reached Criti cally Low Power Status Green Number Lock Activated Green Caps Lock Activated Green Scroll Lock Activated Icon Color Description White The Computer is On Green UMA Mode Activated Orange Optimus Mode Activated Green Intel Integrated GPU iGPU Activated Orange NVIDIA Discrete GPU...

Страница 14: ...w you to change oper ational features instantly Figure 4 Keyboard Icon Description PC Camera Power Toggle Mute Toggle WLAN Module Power Toggle Function Keys NumLk ScrLk Numeric Keypad Fn Key Special Characters Some software applications allow the number keys to be used with Alt to produce special characters These special characters can only be produced by using the numeric key pad Regular number k...

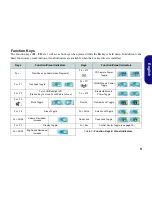
Страница 15: ...ause in Audio Video Programs Fn F10 PC Camera Power Toggle Fn F1 Touchpad Toggle Fn F11 WLAN Module Power Toggle Fn F2 Turn LCD Backlight Off Press a key to or use TouchPad to turn on Fn F12 Bluetooth Module Power Toggle Fn F3 Mute Toggle NumLk Number Lock Toggle Fn F4 Sleep Toggle Fn ScrLk Scroll Lock Toggle Fn F5 F6 Volume Decrease Increase Caps Lock Caps Lock Toggle Fn F7 Display Toggle Fn Esc ...

Страница 16: ...TouchPad Camera on off Click on Power Conservation Modes to switch between Performance Balanced or Energy Star modes To remove the Power Conservation Modes screen just click in a blank area of the icon or press a key on the keyboard Click on the buttons or just click and hold the mouse button to adjust the slider for Brightness Volume Click on Display Switch Time Zone Desktop Background to bring u...

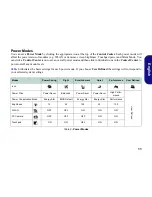
Страница 17: ...ter to power on off any modules etc Table 6 illustrates the basic settings for each power mode If you choose User Defined the settings will correspond to your selected system settings Table 6 Power Modes Modes Power Saving Flight Entertainment Quiet Performance User Defined Icon Power Plan Power Saver Balanced Power Saver Power Saver High Perfor mance User Defined Power Conservation Mode Energy St...

Страница 18: ... current volume level You can use the slider to adjust the Volume or the Fn F5 F6 key combinations or use the Fn F3 key combination to mute the volume Power Conservation This system supports Energy Star power management features that place computers CPU hard drive etc into a low power sleep modes after a designated period of inactivity Click either the Performance Balanced or Energy Star button Cl...

Страница 19: ...e Desktop Background button will allow you to change the desktop background picture Touchpad PC Camera Wireless LAN Module Bluetooth Module Click any of these buttons to toggle the Touchpad or module s power status A crossed out icon will appear over the top left of the icon when it is off Note that the power status of a module and Touchpad power is also effected by the Power Mode selected Caps Lo...

Страница 20: ...d is backwards compatible with USB 2 0 10 Figure 6 Front Left Right Rear Views 1 LED Indicators 2 Security Lock Slot 3 USB 2 0 Port 4 Headphone Out Jack 5 Microphone In Jack 6 S PDIF Out Jack 7 Optical Device Drive Bay 8 Emergency Eject Hole 9 Multi in 1 Card Reader 10 USB 3 0 Ports 11 Combined eSATA USB 3 0 Port 12 HDMI Out Port 13 RJ 45 LAN Jack 14 External Monitor Port 15 DC In Jack 16 Vent 10 ...

Страница 21: ...use 2 1 4 3 2 Battery Information Always completely discharge then fully charge a new battery before using it Completely discharge and charge the battery at least once every 30 days or after about 20 partial dis charges see the expanded User s Manual on the Device Drivers Utilities User s Manual disc HDMI Note that the HDMI Port supports video and audio signals to attached external displays Note T...

Страница 22: ...hics and Media Control Pan el 1 Click Start and click Control Panel or point to Settings and click Control Panel 2 Click Intel R Graphics and Media in the icon view OR 3 Right click the desktop and select Graphics Properties from the menu 4 Choose the application mode Basic Advanced or Wizard To access the NVIDIA Control Panel 1 Click Start and click Control Panel or point to Settings and click Co...

Страница 23: ...ory Architecture UMA Mode will use only the integrated GPU Optimus Mode will allow the system to automatically determine whether the dGPU or iGPU is used Thus the user can completely control how the graphics system operates Press the GPU button and the button color will indicate the current mode Table 7 GPU Button Modes The GPU LED indicators will display which GPU is currently in use Table 8 GPU ...

Страница 24: ...lick the Activate button 3 The program will connect to the internet to verify the activation key 4 Click Finish to complete the application activation 5 Restart the computer THX Tru Studio Pro HDMI 1 When you connect an HDMI display to the HDMI Out port the THX TruStudio Pro controls will be disabled 2 A warning box will pop up and will prompt Do you want to select another audio device now 3 Click...

Страница 25: ...d follow the installation procedure as directed Driver Installation General Guidelines As a general guide follow the default on screen in structions for each driver e g Next Next Fin ish unless you are an ad vanced user In many cases a restart is required to install the driver Make sure any modules e g PC Camera or WLAN are ON before in stalling the appropriate driver Windows Update After installi...

Страница 26: ... a substantial amount of disk space for each file Note that the Windows system requires a minimum of 15GB of free space on the C drive system partition It is recommended that you save the capture video file to a location other than the C drive limit the file size of the captured video or reduce video resolution Options Video Capture Pin Output Size The captured video files from the PC Camera are t...

Страница 27: ...00MHz TDP 35W Intel Core i3 Processor i3 3110M 2 40GHz 3MB L3 Cache 22nm DDR3 1600MHz TDP 35W Intel Core i7 Processor i7 2860QM 2 50GHz i7 2820QM 2 30GHz 8MB L3 Cache 32nm DDR3 1600MHz TDP 45W i7 2760QM 2 40GHz i7 2720QM 2 20GHz 6MB L3 Cache 32nm DDR3 1600MHz TDP 45W i7 2670QM 2 20GHz i7 2630QM 2 00GHz 6MB L3 Cache 32nm DDR3 1333MHz TDP 45W i7 2640M 2 80GHz i7 2620M 2 70GHz 4MB L3 Cache 32nm DDR3 ...

Страница 28: ... by Quad Core CPUs Dual Core CPUs sup port two SO DIMMs maximum Storage Factory Option One Changeable 12 7mm h Optical Device Type Drive Super Multi Drive Module or Blu Ray Combo Drive Module Factory Option Two Changeable 2 5 6cm 9 5mm h SATA Serial Hard Disk Drives supporting RAID level 0 1 Interface One USB 2 0 Port Three USB 3 0 Ports One eSATA Port USB 3 0 Port Combined One HDMI Out Port One H...

Страница 29: ...or WLAN Module or WLAN and Bluetooth Combo Module Environmental Spec Temperature Operating 5 C 35 C Non Operating 20 C 60 C Relative Humidity Operating 20 80 Non Operating 10 90 Power Full Range AC DC Adapter AC Input 100 240V 50 60Hz DC Output 19V 6 3A 120W 8 Cell Smart Lithium Ion Battery Pack 76 96WH Dimensions Weight 413mm w 277 5mm d 17 5 44mm h 3 2kg with ODD 76 96WH Battery ...

Страница 30: ...24 English ...

Страница 31: ...tion ohne Vorankündigung zu überarbeiten und den Inhalt zu verändern Einige oder alle Funktionen des Computers sind bereits eingerichtet worden Falls das nicht der Fall ist oder wenn Sie ein zelne Teile des Systems neu konfigurieren oder neu installieren möchten finden Sie eine Anleitung im erweiterten Benut zerhandbuch Die Disc Device Drivers Utilities User s Manual enthält nicht das Betriebssyst...

Страница 32: ...ch spezifiziert sind Entsorgen Sie die Akkus nicht in Feuer Sie können explodieren Richten Sie sich nach den regional gültigen Entsorgungsvorschriften Verwenden Sie den Akku nicht mehr wenn er heruntergefallen ist oder in ande rer Weise beschädigt z B verzogen ist Auch wenn der Computer mit dem beschädigten Akku zu funktionieren schein können dadurch Stromkreise beschädigt werden die schließlich e...

Страница 33: ... Hand halten Sie das Unterteil des Computers fest siehe Abb 1 Hinweis Heben Sie den Computer niemals am Deckel LCD hoch 7 Drücken Sie auf den Netzschalter um den Computer einzuschalten Systemsoftware Möglicherweise wurde das Notebook bereits mit vorin stallierter Software ausgeliefert Ist das nicht der Fall oder wenn Sie das Notebook für ein anderes System neu konfigu rieren möchten finden Sie daz...

Страница 34: ...aufwerke lesen und schreiben Daten parallel um die Leistung zu verbessern Bei RAID 0 wird ein Striped Disk Array verwendet die Daten wer den in Blöcke aufgeteilt und jeder Block wird auf ein anderes Laufwerk geschrieben Ein Striped Array RAID 0 ist NICHT fehlertolerant sodass der Ausfall eines Laufwerks zum Verlust aller Daten im Array führen kann Ein Striped Array ist NICHT fehlertolerant sodass ...

Страница 35: ... erstellen und bestätigen Sie die Auswahl mit Y 10 Sie gelangen in das Hauptmenü zurück 11 Wählen Sie 6 Exit und drücken Sie auf Enter danach auf Y um das RAID Konfigurationsmenü zu beenden 12 Stellen Sie sicher dass sich die Windows 7 DVD im DVD Laufwerk befindet Während der Computer hochfährt startet dieser automatisch von der Windows 7 DVD Sie werden aufgefordert eine Taste zu drücken um den Sy...

Страница 36: ...tatur 9 Mikrofon 10 Touchpad mit Tasten Die Benutzung drahtlos angeschlossener Geräte in Flugzeugen In der Regel ist die Benut zung jeglicher tragbarer elektronischer Funkgerä te in Flugzeugen ver boten Achten Sie darauf daß die Wireless Module AUS GESCHALTET sind wenn Sie den Computer im Flugzeug benutzen Drücken Sie die ent sprechenden Tastenkombinationen um jeweils das WLAN oder das Bluetooth M...

Страница 37: ...kku wird geladen Grün Der Akku ist voll geladen Lampe blinkt orange Der Akku hat einen kritisch nied rigen Stromstatus erreicht Grün Die Funktion NumLk Nummerntastatur ist aktiviert Grün Caps Lock ist aktiviert Grün Scroll Lock ist aktiviert Symbol Farbe Beschreibung Weiß Der Computer ist angeschaltet Grün UMA Modus aktiviert Orange Optimus Modus aktiviert Grün Integrierte GPU iGPU von Intel aktiv...

Страница 38: ...en umschalten können Abb 4 Tastatur Symbol Beschreibung PC Kamera aktivieren deaktivieren Stummschaltung Stummschaltung aufheben Wireless LAN Modul aktivieren deaktivieren Numeric Fn Taste Nummemtastatur Funktionstasten Num Rollen Sonderzeichen Bei einigen Programmen können die Nummern Tasten zur Er zeugung von Sonderzeichen zusammen mit der Taste Alt gedrückt werden Diese Sonderzeichen können nur...

Страница 39: ...ivieren Fn F11 Wireless LAN Modul aktivieren deaktivieren Fn F2 LCD Hintergrundlicht ausschalten zum Einschalten beliebige Taste drücken oder Touchpad berühren Fn F12 Bluetooth Modul aktivieren deaktivieren Fn F3 Stummschaltung Stummschaltung aufhe ben Num Ein Ausschalten der Nummerntastatur Fn F4 Wechsel Schlaf Wiederaufnahme Fn Rollen Ein Ausschalten des Scroll Modus Fn F5 F6 Audio Lautstärke ve...

Страница 40: ...einen der Modi Performance Leistung Balanced Ausgeglichen oder Ener gy Star auszuwählen Um das Fenster Power Conservation Modes Stromsparmodi zu entfernen klicken auf einen leeren Bereich des Symbols oder drücken Sie auf eine Taste der Tastatur Klicken Sie auf die Tasten oder drücken Sie nur auf die Maustaste und halten Sie diese gedrückt um die Helligkeit Lautstärke Brightness Volume einzustellen...

Страница 41: ...nden Sie die Grundeinstellungen für jeden Energiemodus Wenn Sie die Option User Defined Benut zerdefiniert wählen werden die von Ihnen konfigurierten Einstellungen angezeigt Tabelle 6 Energiemodus Modi Power Saving Stromsparmodus Flight Flugmodus Entertainment Unterhaltungsmodus Quiet Lautlosmodus Performance Leistungsmodus User Defined Benutzerdefiniert Symbol Energiesparplan Energiesparmodus Aus...

Страница 42: ...r mit dem Schieberegler oder mit der Tastenkombination Fn F5 F6 einstellen Mit der Tastenkombination Fn F3 wird der Ton ausgeschaltet Power Conservation Strom sparen Dieses System unterstützt die Energy Star Stromsparfunktionen die Computer CPU Festplatte usw nach einer längeren Zeit der Inaktivität in einen Ruhemodus versetzen bei dem weniger Strom verbraucht wird Klicken Sie entweder auf die Tas...

Страница 43: ... Background Desktop Hintergrund Wenn Sie auf die Schaltfläche Desktop Hintergrund klicken können Sie das Bild für den Desktophintergrund einstellen TouchPad PC Kamera Wireless LAN Modul Bluetooth Modul Klicken Sie auf eine dieser Tasten um das TouchPad ein oder auszuschalten Ist es ausgeschaltet erscheint links oben am Symbol ein Kreuz Beachten Sie dass sowohl der Energiemodus eines Moduls und des...

Страница 44: ...terseite Rechte Seite Vorderseite Abb 6 Ansicht von vorne links rechts und hinten 1 LED Anzeigen 2 Sicherheitsschloß Buchse 3 USB 2 0 Anschluss 4 Kopfhörer Ausgangs buchse 5 Mikrofon Eingangsbuchse 6 S PDIF Ausgangsbuchse 7 Schacht für optisches Laufwerk 8 Notauswurfloch 9 Multi in 1 Kartenleser 10 USB 3 0 Anschlüsse 11 Kombinierter eSATA USB 3 0 Anschluss 12 HDMI Ausgangsanschluss 13 RJ 45 LAN Bu...

Страница 45: ...n 2 1 4 3 2 Hinweis zum Akku Ein neuer Akku sollte bei seiner ersten Verwendung zuerst einmal vollständig entladen und dann komplett wieder geladen werden Entladen und laden Sie den Akku mindestens einmal im Monat oder nach etwa 20 Teilentladungen einmal vollständig siehe das erweiterte Benutzerhandbuch auf der Disc Device Drivers Utilities User s Manual HDMI Der HDMI Ausgangsanschluss unterstützt...

Страница 46: ... Systemsteuerung oder zeigen auf Einstellungen und klicken Systemsteuerung 2 Klicken Sie auf Intel Grafik und Medien Symbol in der Klassischen Ansicht Oder 3 Klicken Sie mit der rechten Maustaste auf den Desktop und dann aus dem Menü die Option Grafikeigenschaften wählen 4 Wählen Sie den Anwendungsmodus Standardmodus Erweiterter Modus oder Assistentenmodus und klicken Sie auf OK So öffnen Sie die ...

Страница 47: ...Beim UMA Modus wird nur die integrierte GPU verwendet beim Optimus Modus bestimmt das System automatisch ob die dGPU oder die iGPU verwendet wird Auf diese Weise kann der Benutzer selbst bestimmen wie das Grafiksystem arbei tet Wenn Sie auf die GPU Taste drücken zeigt die Tas tenfarbe den aktuellen Modus an Tabelle 7 GPU Tastenmodi Die GPU LED Anzeigen zeigen an welche GPU gerade verwendet wird Ta...

Страница 48: ... Sie auf Aktivieren Schaltfläche 3 Das Programm stellt eine Verbindung zum Internet her um den Aktivierungsschlüssel zu prüfen 4 Klicken Sie auf Finish Fertig stellen um die Aktivierung der Anwendung abzuschließen 5 Starten Sie den Computer neu THX Tru Studio Pro HDMI 1 Wenn Sie ein HDMI Anzeigegerät an den HDMI Ausgangsan schluss anschließen werden die Steuertasten von THX Tru Studio Pro deaktivi...

Страница 49: ...ie auf Abbrechen um das Fenster zu schließen Befolgen Sie dann die Installa tionsanweisungen Allgemeine Hinweise zur Treiberinstallation Wenn Sie keine fortge schrittenen Kenntnisse haben folgen Sie für jeden Treiber den Anweisungen auf dem Bildschirm z B Weiter Weiter Fertig stellen In vielen Fällen ist es erforderlich den Computer nach der Treiberinstallation neu zu starten Alle Module z B PC Ka...

Страница 50: ...der Tastenkombination Fn F12 Bluetooth können Sie das Modul ein oder ausschalten siehe Tabelle 5 auf Seite 33 Die mit der PC Kamera aufgenommenen Dateien benötigen zu viel Speicherplatz Videodateien die mit hoher Auflösung aufgenommen werden erfordern sehr viel Speicherplatz Beachten Sie dass das Betriebssystem Windows mindestens 15GB freien Speicher im Laufwerk C der Systempartition benötigt Es w...

Страница 51: ...2 50GHz 3MB L3 Cache 22nm DDR3 1600MHz TDP 35W Intel Core i3 Prozessor i3 3110M 2 40GHz 3MB L3 Cache 22nm DDR3 1600MHz TDP 35W Intel Core i7 Prozessor i7 2860QM 2 50GHz i7 2820QM 2 30GHz 8MB L3 Cache 32nm DDR3 1600MHz TDP 45W i7 2760QM 2 40GHz i7 2720QM 2 20GHz 6MB L3 Cache 32nm DDR3 1600MHz TDP 45W i7 2670QM 2 20GHz i7 2630QM 2 00GHz 6MB L3 Cache 32nm DDR3 1333MHz TDP 45W i7 2640M 2 80GHz i7 2620...

Страница 52: ...rei 204 Pin SODIMM Sockel Unterstützung von DDR3 1333 1600MHz Speicher Speicher auf bis zu 24GB erweiterbar Die tatsächliche Speicherarbeitsfrequenz hängt vom FSB des Prozessors ab Hinweis Drei SO DIMMs werden nur von Quad Core CPUs unterstützt Dual Core CPUs unterstützen maximal zwei SO DIMMs Speicher Werkseitige Option Ein austauschbares optisches Laufwerk 12 7 mm Höhe Super Multi Laufwekrsmodul...

Страница 53: ...g n und Bluetooth 4 0 andere Hersteller Kartenleser Festes Multi in 1 Push Push Kartenleser Modul MMC MultiMedia Card RS MMC SD Secure Digital Mini SD SDHC SDXC kompatibel MS Memory Stick MS Pro MS Duo Mini Card Steckplatz Ein Mini Card Steckplatz für WLAN Modul oder Kombinierte Bluetooth und WLAN Modul Umgebungsbedingungen Temperatur In Betrieb 5ºC 35ºC Bei Aufbewahrung 20ºC 60ºC Relative Luftfeu...

Страница 54: ...48 Deutsch ...

Страница 55: ...publication ou de modifier son conte nu sans préavis Certains ou tous les éléments de l ordinateur peuvent avoir été déjà installés Si ce n est pas le cas ou si vous avez l intention de reconfigurer ou réinstaller des portions du système reportez vous au Manuel de l Utilisateur complet Le disque Device Drivers Utilities User s Manual ne contient pas de système d exploitation Informations de réglem...

Страница 56: ...uez pas d utiliser une batterie qui est tombée ou qui paraît endom magée ex tordue ou vrillée d une manière quelconque Même si l ordinateur continue de fonctionner avec la batterie en place cela peut détériorer le circuit pouvant déclencher un incendie Assurez vous que votre ordinateur est complètement éteint avant de le mettre dans un sac de voyage ou tout autre bagage similaire Avant de nettoyer...

Страница 57: ... illustré dans la Figure 1 maintenez la base de l ordinateur Remarque Ne soulevez jamais l ordinateur par le couvercle LCD 7 Pressez le bouton de mise en marche pour allumer Logiciel système Votre ordinateur peut être livré avec un logiciel système pré installé Si ce n est pas le cas ou si vous re configurez votre ordinateur pour un système différent vous constaterez que ce manuel fait référence à...

Страница 58: ... et écrivant des données en parallèle pour améliorer les performances RAID 0 implémente une matrice de disques agrégés et les données sont décomposées en blocs et chaque bloc est écrit sur un disque séparé Une matrice agrégée RAID 0 NE tolère PAS de panne étant donné que la panne d un lecteur entraî nera la perte de toutes les données dans la matrice RAID 1 deux disques durs minimum sont néces sai...

Страница 59: ... le volume et confirmez la sélection en appuyant sur Y 10 Vous retournerez maintenant au menu principal 11 Sélectionnez 6 Exit Quitter et appuyez sur Entrée puis appuyez sur Y pour quitter le menu de configuration RAID 12 Vérifiez que le DVD du SE Windows 7 est dans le lecteur de DVD ainsi l ordinateur démarrera automatiquement à partir du DVD du SE Windows 7 vous serez invité à appuyer sur une to...

Страница 60: ...ut parleurs 8 Clavier 9 Microphone 10 Pavé tactile Touchpad et boutons Utilisation des appareils sans fil à bord d un avion L utilisation de tout appa reil électronique de transmission est généra lement interdite à bord d un avion Assurez vous que les modules sans fil sont éteints si vous utilisez l ordina teur à bord d un avion Utilisez les combinai sons de touches pour basculer l alimentation su...

Страница 61: ...le configuré Orange La batterie est en charge Vert La batterie est complètement chargée Orange clignotant La batterie a atteint le niveau bas critique Vert Verrouillage numérique pavé numérique activé Vert Verrouillage majuscule activé Vert Verrouillage défilement activé Icône Couleur Description Blanc L ordinateur est allumé Vert Mode UMA activé Orange Mode Optimus activé Vert GPU intégré Intel i...

Страница 62: ...antanément de mode opérationnel Figure 4 Clavier Icône Description Activer Désactiver le module caméra PC Allume Éteind le son Activer Désactiver le module LAN sans fil Caractères Spéciaux Certaines applications permettent que les touches du pavé numérique soient utilisées avec Alt pour produire des carac tères spéciaux Ces caractères spéciaux peuvent être pro duits uniquement en utilisant le pavé...

Страница 63: ...n F1 Activer Désactiver le Touchpad Fn F11 Activer Désactiver le module LAN sans fil Fn F2 Eteindre le rétroéclairage LCD Appuyez sur une touche ou utilisez le Touchpad pour allumer Fn F12 Activer Désactiver le module Bluetooth Fn F3 Allume Éteind le son Verr Num Activer Désactiver le pavé numérique Fn F4 Permutation veille Fn ArrêtDét Activer Désactiver l arrêt défilement Fn F5 F6 Diminution Augm...

Страница 64: ...Modes Modes d économie d énergie pour basculer entre les modes Performance Performances Balanced Equilibré ou Energy Star Pour supprimer l écran Power Conservation Modes Modes d économie d énergie il suffit de cliquer sur une zone vierge de l icône ou appuyez sur une touche du clavier Cliquez sur les boutons ou cliquez et maintenez simplement le bouton de la souris pour ajuster le curseur de Lumin...

Страница 65: ...s de base pour chaque mode d alimentation Si vous choisissez User Defined Personna lisé les paramètres correspondront aux paramètres sélectionnés de votre système Tableau 6 Modes d alimentation Modes Power Saving Economie d énergie Flight Avion Entertainment Divertissement Quiet Silencieux Performance Performances User Defined Personnalisé Icône Mode de gestion de l ali mentation Economie d énergi...

Страница 66: ...r régler le volume ou les combinai sons de touches Fn F5 F6 ou utiliser les combinaisons de touches Fn F3 pour couper le volume Power Conservation Economie d énergie Ce système prend en charge les fonctionnalités de gestion d alimentation Energy Star qui placent les ordinateurs CPU disque dur etc dans des modes veille à faible consommation d énergie après une période d inactivité donnée Cliquez su...

Страница 67: ...eau Cliquer sur le bouton Fond d écran du bureau vous permettra de changer l image du fond d écran du bureau TouchPad caméra PC module LAN sans fil module Bluetooth Cliquez sur l un de ces boutons pour activer l état d alimentation du TouchPad ou du module Une icône barrée apparaît au dessus du coin supérieur gauche de l icône quand elle est désactivée Notez que l état de l alimentation d un modul...

Страница 68: ...he Droit Arrière Figure 6 Vues de face gauche droite arrière 1 Indicateurs LED 2 Fente de verrouillage de sécurité 3 Port USB 2 0 4 Prise de sortie haut parleurs casque 5 Prise d entrée de microphone 6 Prise de sortie S PDIF 7 Baie de périphérique optique 8 Trou d ejection d urgence 9 Lecteur de carte multi en 1 10 Ports USB 3 0 11 Port combiné eSATA et USB 3 0 12 Prise de sortie HDMI 13 Prise rés...

Страница 69: ...entila tion s quand le systeme est allumé 2 1 4 3 2 Informations batterie Décharger puis rechargez toujours complètement une batterie neuve avant de l utiliser Dé chargez complètement puis rechargez la batterie au moins une fois tous les 30 jours ou après environ 20 décharges partielles consultez le Manuel de l Utilisateur complet sur le disque De vice Drivers Utilities User s Manual HDMI Remarque...

Страница 70: ...dia Intel 1 Cliquez sur le menu Démarrer et cliquez sur Panneau de configuration ou pointez sur Paramètres et cliquez sur Pan neau de configuration 2 Cliquez sur Graphiques et média Intel R en Affichage classique OU 3 Cliquez droit sur le bureau et sélectionnez Propriétés graphiques dans le menu 4 Sélectionnez le mode pour l application Mode de Base Mode Avancé ou Mode Assistant Pour accéder au Pa...

Страница 71: ...e Mode UMA Unified Memory Architecture Le Mode UMA uti lisera seulement le GPU intégré Le Mode Optimus permet tra au système de déterminer automatiquement si le dGPU ou le iGPU est utilisé L utilisateur peut ainsi contrôler tota lement la manière dont le système graphique fonctionne Ap puyez sur le bouton GPU et la couleur du bouton indiquera le mode en cours Tableau 7 Modes du bouton GPU Les indi...

Страница 72: ...cliquez sur le bouton Activer 3 Le programme va se connecter à Internet pour vérifier la clé d activation 4 Cliquez sur Terminer pour terminer l activation de l application 5 Redémarrez votre ordinateur THX Tru Studio Pro HDMI 1 Lorsque vous connectez un écran HDMI à la prise de sortie HDMI les commandes de THX TruStudio Pro sont désactivées 2 Une fenêtre d avertissement apparaîtra avec le message...

Страница 73: ...diqué Directives générales pour l installation du pilote D une manière générale suivez les instructions par défaut à l écran pour chaque pilote par exemple Suivant Suivant Terminer à moins que vous ne soyez un utilisateur avancé Dans la plupart des cas un redé marrage est nécessaire pour installer le pilote Assurez vous que les mo dules par exemple caméra PC ou WLAN sont allumés avant d installer ...

Страница 74: ...Hot Key WLAN ou la combinaison de touches Fn F12 Bluetooth pour basculer l alimentation sur le module voir le Tableau à la page 58 Les fichiers vidéo capturés depuis la caméra PC prennent trop de place sur le disque Notez que la capture de fichiers vidéo à haute résolution nécessite un espace substantiel sur le disque pour chaque fichier Notez que le système Windows nécessite un minimum de 15Go d ...

Страница 75: ...3 3Mo 22nm DDR3 1600MHz TDP 35W Processeur Intel Core i3 i3 3110M 2 40GHz Cache L3 3Mo 22nm DDR3 1600MHz TDP 35W Processeur Intel Core i7 i7 2860QM 2 50GHz i7 2820QM 2 30GHz Cache L3 8Mo 32nm DDR3 1600MHz TDP 45W i7 2760QM 2 40GHz i7 2720QM 2 20GHz Cache L3 6Mo 32nm DDR3 1600MHz TDP 45W i7 2670QM 2 20GHz i7 2630QM 2 00GHz Cache L3 6Mo 32nm DDR3 1333MHz TDP 45W i7 2640M 2 80GHz i7 2620M 2 70GHz Cac...

Страница 76: ...DIMM 204 broches supportant la mémoire DDR3 1333MHz 1600MHz Mémoire extensible jusqu à 24Go La fréquence réelle d opération de la mémoire dépend du FSB du processeur Remarque Seuls trois modules SO DIMM sont pris en charge par les processeurs Quad Core les processeurs Dual Core prennent en charge deux modules SO DIMM au maximum Stockage de données Option d usine Un module de lecteur optique échang...

Страница 77: ...et LAN sans fil 802 11b g n tiers Lecteur de carte Lecteur de carte Push Push multi en 1 MMC MultiMedia Card RS MMC SD Secure Digital Mini SD SDHC SDXC MS Memory Stick MS Pro MS Duo Logement Mini carte Un logement Mini carte pour module WLAN ou module combo Bluetooth et LAN sans fil Spécifications environnementales Température En fonction 5 C 35 C Eteint 20 C 60 C Humidité relative En fonction 20 ...

Страница 78: ...72 Français ...

Страница 79: ... revisar esta publicación o cambiar su contenido sin previo aviso Algunas o todas las características del ordenador pueden haberse configurado de antemano Si no lo están o si desea reconfigurar o reinstalar partes del sistema consulte el Manual del usuario completo El disco Device Drivers Utilities User s Manual no contiene un sistema operativo Información de regulación y seguridad Por favor prest...

Страница 80: ... para desechos especiales Nunca utilice una batería que se haya caído o que parezca dañada p ej doblada o retorcida Incluso si el ordenador sigue funcionando con una batería dañada puede provocar daños en el circuito que podrían causar fuego Compruebe que su ordenador esté completamente apagado antes de intro ducirlo en una bolsa de viaje o en cualquier funda Antes de limpiar el ordenador quite la...

Страница 81: ...dos mientras utiliza la otra mano como se muestra en la Figura 1 para sostener la base del ordenador Nota Nunca levante el ordenador por la tapa LCD 7 Presione el botón de encendido para encender Software de sistema Puede ser que su ordenador tenga instalado un software de sistema Si no es el caso o si desea reconfigurarlo con otro sistema este manual se refiere a Microsoft Windows 7 Diferencias d...

Страница 82: ...dénticas leyendo y escribiendo datos en paralelo para aumentar el rendimiento RAID 0 implementa una matriz de discos dividida los datos se dividen en dos bloques y cada uno se escribe en una unidad de disco diferente Una Matriz Repartida RAID 0 NO tolera fallos pues el fallo de una unidad dará como resultado la pérdida de todos los datos en la matriz RAID 1 se necesitan al menos dos discos duros S...

Страница 83: ...me Crear volumen 9 Pulse Entrar para crear el volumen y confirme la selección pulsando Y 10 Ahora volverá al menú principal 11 Seleccione 6 Exit Salir y pulse Entrar luego pulse Y para salir del menú de configuración RAID 12 Asegúrese de que el DVD del SO Windows 7 esté en la unidad de DVD Cuando el ordenador se inicie arrancará automáticamente desde el DVD del SO Windows 7 Se le pedirá que presio...

Страница 84: ...porados 8 Teclado 9 Micrófono incorporado 10 Touchpad almohadilla táctil y botones Uso de dispositivos inalámbricos a bordo El uso de dispositivos electrónicos portátiles a bordo de un avión suele estar prohibido Compruebe que los módulos inalámbricos estén DESCONECTADOS si va a utilizar el ordenador en el avión Utilice las combinacio nes de teclas para cam biar la alimentación entre los módulos W...

Страница 85: ...a se está cargando Verde La batería está completamente car gada Naranja parpadeante La batería ha alcanzado el estado crí tico de poca energía Verde El teclado numérico NumLk está activado Verde El bloqueo de mayúsculas está acti vado Verde El bloqueo de desplazamiento está activado Icono Color Descripción Blanco El ordenador está encendido Verde Modo UMA activado Naranja Modo Optimus activado Ver...

Страница 86: ...icas operacionales al instante Figura 4 Teclado Icono Descripción Activar desactivar el módulo cámara PC Conmutación mudo Activar desactivar el módulo LAN Wireless Teclado Tecla Fn Teclas de función numérico Bloq Num Bloq Despl Caracteres especiales Algunas aplicaciones de software le permiten usar las teclas numéricas con Alt para producir caracteres especiales Es tos caracteres especiales sólo p...

Страница 87: ...sactivar el módulo cámara PC Fn F1 Activar desactivar el Touchpad Fn F11 Activar desactivar el módulo LAN Wireless Fn F2 Apagar luz de fondo del LCD presione una tecla o utilice el Touchpad para encenderlo Fn F12 Activar desactivar el módulo Bluetooth Fn F3 Conmutación mudo Bloq Num Activar disactivar el teclado numérico Fn F4 Conmutación dormir Fn BloqDespl Cambiar el bloqueo de desplazamiento Fn...

Страница 88: ...ation Modes Modos de ahorro de energía para cambiar entre los modos Performance Rendimiento Balanced Equilibrado o Energy Star Para quitar la pantalla Power Conservation Modes Modos de ahorro de energía simplemente haga clic en un área vacía del icono o presione una tecla del teclado Haga clic en los botones o simplemente haga clic y mantenga presionado el botón del ratón para ajustar el control d...

Страница 89: ...e cada modo de energía Si elige User Defined Definido por el usuario la configuración corresponderá al ajuste del sistema que ha seleccionado Tabla 6 Modos de energía Modos Power Saving Ahorro de energía Flight Vuelo Entertainment Entretenimiento Quiet Silencioso Performance Rendimiento User Defined Definido por el usuario Icono Plan de energía Economizador Equilibrado Economizador Economizador Al...

Страница 90: ... puede usar el control deslizante para ajustar el Volumen o las combinaciones de teclas Fn F5 F6 o la combinación de teclas Fn F4 para silenciar el volumen Power Conservation Ahorro de energía Este sistema soporta las características de administración de energía Energy Star que hace que los equipos CPU disco duro etc entren en modos de ahorro de energía y suspensión tras el período de tiempo de in...

Страница 91: ...ndo de pantalla podrá cambiar la imagen del fondo del escritorio TouchPad cámara PC módulo LAN Wireless módulo Bluetooth Haga clic en cualquiera de estos botones para cambiar el estado de energía del TouchPad o módulo Aparecerá una cruz en la esquina superior izquierda del icono cuando esté apagado Tenga en cuenta que el estado de energía de un módulo y la energía del TouchPad también quedan afect...

Страница 92: ...arte posterior Figura 6 Vistas frontal izquierda derecha y posterior 1 Indicadores LED 2 Ranura del cierre de seguridad 3 Puerto USB 2 0 4 Conector de salida de auriculares 5 Conector de entrada para micrófono 6 Conector de salida S PDIF 7 Bahía de dispositivo óptico 8 Orificio de expulsion de emergencia 9 Lector de tarjetas multi en 1 10 Puertos USB 3 0 11 Puerto combinado eSATA USB 3 0 12 Puerto...

Страница 93: ...ormación de la batería Siempre complete la descarga de una batería nueva y luego cárguela por completo antes de usarla Descárguela por completo y vuelva a cargarla al menos una vez cada 30 días o tras unas 20 descargas parciales consulte el Manual del usuario completo en el disco Device Drivers Utilities User s Manual HDMI Tenga en cuenta que el puerto de salida de HDMI soporta las señales de víde...

Страница 94: ...r botón 3 El programa se conectará a Internet para verificar la clave de activación 4 Haga clic en Finalizar para completar la activación de la aplicación 5 Reinicie el sistema THX Tru Studio Pro HDMI 1 Cuando conecte una pantalla HDMI al puerto HDMI Out los controles de THX Tru Studio Pro serán desactivados 2 Aparecerá un cuadro de aviso preguntando Desea seleccionar otro dispositivo de audio aho...

Страница 95: ...clic en Inicio menú y haga clic en Panel de control o vaya a Configuración y haga clic en Panel de control 2 Haga clic en Gráficos y multimedia Intel R icono en Vista clásica O 3 Haga clic con el botón derecho en el escritorio y seleccione Propiedades de gráficos en el menú 4 Seleccione el modo de aplicación Modo básico Modo avanzado o Modo de asistente y haga clic en Aceptar Para acceder al Panel...

Страница 96: ...Arquitectura de Memoria Unificada El Modo UMA sólo utilizará la GPU integrada el Modo Optimus permite al sistema determinar automáticamente si utilizar la dGPU o la iGPU Por lo tanto el usuario puede controlar por completo el funcionamiento del sistema gráfico Presione el botón de la GPU y el color del botón indicará el modo actual Tabla 7 Modos del botón GPU Los indicadores LED de la GPU mostrará...

Страница 97: ...erales para la instalación del controlador Como guía general siga las instrucciones predeter minadas en pantalla para cada controlador p ej Si guiente Siguiente Fi nalizar a menos que sea usuario avanzado En mu chos casos necesitará rei niciar para instalar el controlador Asegúrese de que los mó dulos p ej cámara PC o WLAN estén ENCENDI DOS antes de instalar el controlador apropiado Windows Update...

Страница 98: ...WLAN o la combinación de teclas Fn F12 Bluetooth para cambiar la energía al módulo vea la Tabla 5 en la página 81 Los archivos de vídeo capturados de la cámara PC ocupan demasiado espacio en el disco Tenga en cuenta que capturar archivos de vídeo de alta resolución requiere una cantidad sustancial de espacio en el disco para cada archivo Tenga en cuenta que el sistema Windows requiere un mínimo de...

Страница 99: ... 35W Procesador Intel Core i3 i3 3110M 2 40GHz Caché de nivel 3 de 3MB 22nm DDR3 1600MHz TDP 35W Procesador Intel Core i7 i7 2860QM 2 50GHz i7 2820QM 2 30GHz Caché de nivel 3 de 8MB 32nm DDR3 1600MHz TDP 45W i7 2760QM 2 40GHz i7 2720QM 2 20GHz Caché de nivel 3 de 6MB 32nm DDR3 1600MHz TDP 45W i7 2670QM 2 20GHz i7 2630QM 2 00GHz Caché de nivel 3 de 6MB 32nm DDR3 1333MHz TDP 45W i7 2640M 2 80GHz i7 ...

Страница 100: ...para memoria DDR3 1333 1600MHz Memoria expansible hasta 24GB La frecuencia de operación de memoria real depende del FSB del procesador Nota Tres SO DIMMs sólo son soportados por CPUs Quad Core CPUs Dual Core soportan un máximo de dos SO DIMMs Dispositivos de almacenamiento Opción de fábrica Una unidad de dispositivo óptico de 12 7mm h intercambiable módulo unidad Super Multi módulo unidad combo Bl...

Страница 101: ...luetooth 4 0 y LAN Inalámbrica 802 11b g n tercera parte Lector de tarjetas Módulo lector de tarjetas Push Push multi en 1 MMC MultiMedia Card RS MMC SD Secure Digital Mini SD SDHC SDXC MS Memory Stick MS Pro MS Duo Ranura Mini Card Una ranura para módulo WLAN o módulo Combo Bluetooth y LAN inalámbrica Especificaciones del ambiente Temperatura En funcionamiento 5 C 35 C Apagado 20 C 60 C Humedad r...

Страница 102: ...96 Español ...

Страница 103: ... la presente pubblicazione o di modificarne il contenuto senza preavviso È possibile che alcune o tutte le funzionalità del computer siano già state configurate In caso contrario o se si sta pianificando di riconfigurare o reinstallare componenti del sistema fare riferimento al Manuale per l utente completo Il disco Device Drivers Utilities User s Manual non contiene il sistema operativo Informazi...

Страница 104: ...Non continuare a usare in alcun modo una batteria che sia caduta in terra o che sembri danneggiata es piegata o torta Anche se il computer continua a funzionare con una batteria danneggiata questa può provocare danni ai circuiti risultanti in pericolo di incendio Assicurarsi che il computer sia completamente spento prima di inserirlo in una borsa da viaggio o in un contenitore simile Prima di puli...

Страница 105: ...ra mano come illustrato nella Figura 1 si mantiene la base del computer nota non sollevare mai il computer tenendolo dal coperchio LCD 7 Premere il pulsante di alimentazione per accendere Software del sistema È possibile che il software sia già pre installato sul computer In caso contrario oppure in casi di riconfigurazione del computer per un sistema diverso questo manuale si riferisce a Microsof...

Страница 106: ...gono e scrivono dati in parallelo per aumentare le prestazioni RAID 0 implementa un array di dischi in configurazione striped e i dati vengono spezzati in blocchi Ciascun blocco viene scritto su un unità disco separata Uno Striped Array RAID 0 NON è fault tolerant dato che un guasto a una delle unità causa la per dita di tutti i dati dell array RAID 1 sono neces sari almeno due dischi rigidi Unità...

Страница 107: ...fermare la selezione premendo Y 10 In questo modo si torna al menu principale 11 Selezionare 6 Exit e premere Invio quindi premere Y per uscire dal menu di configurazione RAID 12 Verificare che il DVD del sistema operativo Windows 7 si trovi nell unità DVD nonché che il computer si avvii automaticamente dal DVD del sistema Windows 7 viene richiesto di premere un tasto per avviare il computer dal D...

Страница 108: ... Key 7 Altoparlanti incorporati 8 Tastiera 9 Microfono incorporato 10 Touchpad e pulsanti Funzionamento del dispositivo senza fili a bordo di un aereo Solitamente l uso di qualsiasi dispositivo di trasmissione elettronica è proibito a bordo di un aereo Accertarsi che i moduli wireless siano spenti quando si utilizza il computer in aereo Utilizzare la combinazione di tasti appropriata per disattiva...

Страница 109: ...Arancione La batteria è in carica Verde Batteria completamente carica Arancione lam peggiante La batteria ha raggiunto lo stato critico di carica bassa Verde La funzione blocco numerico tastierino numerico è attivata Verde Bloc Maiusc è attivato Verde Bloc Scorr è attivato Icona Colore Descrizione Bianco Il computer è acceso Verde Modalità UMA attivata Arancione Modalità Optimus Attivata Verde GPU...

Страница 110: ...iare istantaneamente le funzionalità operative Figura 4 Tastiera Icona Descrizione Attiva disattiva camera PC Commutazione Mute Attiva disattiva il modulo LAN Wireless Tastierino Tasti funzione Bloc Num Tasto Fn Bloc Scorr numerico Caratteri speciali Alcune applicazioni software consentono di utilizzare i tasti numerici insieme al tasto Alt per produrre caratteri speciali Tali caratteri speciali p...

Страница 111: ... F11 Attiva disattiva il modulo LAN Wireless Fn F2 Spegne la retroilluminazione dello schermo LCD premere un tasto o utilizzare il Touchpad per ripristi nare lo schermo Fn F12 Attiva disattiva il modulo Bluetooth Fn F3 Commutazione Mute Bloc Num Attiva disattiva il tastierino numerico Fn F4 Commutazione Sospendi Fn Bloc Scorr Attiva disattiva il blocco dello scorri mento Fn F5 F6 Riduzione Aumento...

Страница 112: ...onservation Modes Modalità di risparmio energetico per selezionare le modalità Performance Prestazioni Balanced Bilanciate o Energy Star Per chiudere la schermata Power Conservation Modes Modalità di risparmio energetico è suf ficiente fare clic in un area vuota dell icona o premere un tasto sulla tastiera Fare clic sui pulsanti oppure semplicemente fare clic e tenere premuto il tasto del mouse pe...

Страница 113: ... modalità di risparmio energetico Se si sceglie User Defined Definita dall utente le impostazioni corrisponderanno alle impostazioni di sistema selezionate Tabella 6 Modalità risparmio energia Modalità Power Saving Risparmio energetico Flight Volo Entertainment Svago Quiet Non interattivo Performance Prestazioni User Defined Definita dall utente Icona Combinazione per il risparmio di energia Rispa...

Страница 114: ...rente È possibile utilizzare la barra di scorrimento per regolare il Volume o le combinazioni di tasti Fn F5 F6 oppure utilizzare la combinazione di tasti Fn F3 per disattivare totalmente l audio Power Conservation Conservazione dell energia Il sistema supporta le funzionalità della gestione energetica Energy Star che pone i computer CPU disco rigido ecc in una modalità di sospensione a basso cons...

Страница 115: ...sktop consente di cambiare l immagine sullo sfondo del desktop TouchPad camera PC modulo LAN wireless modulo Bluetooth Fare clic su uno di questi pulsanti per cambiare lo stato di risparmio energetico del TouchPad o dei moduli Quando disattivata sull angolo superiore sinistro dell icona compare un segno di spunta Si noti che lo stato di risparmio energetico di un modulo e la potenza del TouchPad v...

Страница 116: ...urezza 3 Porta USB 2 0 4 Jack uscita delle cuffie 5 Jack ingresso del microfono 6 Jack uscita S PDIF 7 Bay unità ottica 8 Foro di espulsione di emergenza 9 Lettore di schede multi in 1 10 Porte USB 3 0 11 Porta eSATA USB 3 0 combinata 12 Porta uscita HDMI 13 Jack RJ 45 per LAN 14 Porta per monitor esterno 15 Jack di ingresso DC 16 Ventola USB Le porte USB 3 0 sono di colore blu USB 3 0 trasferisce...

Страница 117: ... ventole durante l uso del computer 2 1 4 3 2 Informazioni sulla batteria Prima di utilizzare una batteria nuova scaricarla prima completamente quindi caricarla al massi mo Scaricare completamente e caricare la batteria almeno una volta ogni 30 giorni oppure dopo una ventina di cariche parziali consultare il Manuale per l utente esteso nel disco Device Drivers Utilities User s Manual HDMI Si noti ...

Страница 118: ...Start e fare clic su Pannello di controllo oppure scegliere Impostazioni e fare clic su Pannello di controllo 2 Fare clic sull icona Grafica e multimedia Intel R nella vista Classica O 3 Fare clic con il pulsante destro del mouse sul desktop e scegliere Proprietà grafiche dal menu 4 Scegliere la modalità dell applicazione Modalità di base Modalità avanzata o Modalità procedura guidata Per accedere...

Страница 119: ...rchitecture La modalità UMA utilizza solo la GPU integrata mentre la modalità Optimus consente al sistema di determinare automaticamente se utilizzare la dGPU o la iGPU L utente può controllare in modo completo il funzionamento del sistema grafico Premere il pulsante GPU il colore del pulsante indicherà la modalità corrente Tabella 7 Modalità pulsanti GPU Gli indicatori LED GPU visualizzano quale ...

Страница 120: ...l programma si connetterà a Internet per verificare la chiave di attivazione 4 Fare clic su Finish fine per completare l attivazione dell applicazione 5 Riavviare il computer THX Tru Studio Pro HDMI 1 Quando si collega uno schermo HDMI alla porta di uscita HDMI i controlli di THX Tru Studio Pro vengono disabilitati 2 Verrà visualizzata una finestra di avviso con la richiesta Selezionare un altro d...

Страница 121: ... per l installazione dei driver Come guida generale attener si alle istruzioni predefinite vi sualizzate sullo schermo per ogni driver ad esempio Avanti Avanti Fine finché le pro prie conoscenze non consenti ranno di operare come utente più avanzato Per installare il driver spesso sarà necessario riavviare il computer Verificare che tutti i moduli ad esempio camera PC o WLAN siano ACCESI prima di ...

Страница 122: ...la combinazione di tasti Fn F11 il pulsante Hot Key WLAN oppure la combinazione di tasti Fn F12 Bluetooth per accendere spegnere il modulo vedere la Tabella 5 a pagina 105 I file video catturati dalla camera PC prendono troppo spazio sul disco Nota catturare file di video ad altra risoluzione molto spazio disco disponibile per ogni file Nota Windows richiede un minimo di 15GB di spazio disco liber...

Страница 123: ...22nm DDR3 1600MHz TDP 35W Processore Intel Core i3 i3 3110M 2 40GHz Cache L3 da 3MB 22nm DDR3 1600MHz TDP 35W Processore Intel Core i7 i7 2860QM 2 50GHz i7 2820QM 2 30GHz Cache L3 da 8MB 32nm DDR3 1600MHz TDP 45W i7 2760QM 2 40GHz i7 2720QM 2 20GHz Cache L3 da 6MB 32nm DDR3 1600MHz TDP 45W i7 2670QM 2 20GHz i7 2630QM 2 00GHz Cache L3 da 6MB 32nm DDR3 1333MHz TDP 45W i7 2640M 2 80GHz i7 2620M 2 70G...

Страница 124: ...moduli SO DIMM Periferiche di memorizzazione Opzione di fabbrica Una unità di tipo ottico sostituibile da 12 7 mm altezza modulo unità Super Multi modulo unità Combo Blu Ray Due dischi rigidi sostituibili da 2 5 6cm 9 5mm altezz SATA Serial con supporto RAID livelli 0 1 Interfaccia Una porte USB 2 0 Tre porte USB 3 0 Una porta eSATA porta USB 3 0 combinata Una porta uscita HDMI Un jack uscita dell...

Страница 125: ...tooth e Wireless LAN Requisiti ambientali Temperatura In esercizio 5 C 35 C Non in esercizio 20 C 60 C Umidità relativa In esercizio 20 80 Non in esercizio 10 90 Alimentazione Adattatore AC DC a pieno campo Ingresso AC 100 240V 50 60Hz Uscita DC 19V 6 3A 120W Pacco batteria Smart agli ioni di Litio a 8 celle 76 96WH Dimensioni fisiche peso 413 larghezza x 277 5 profondità x 17 5 44 altezza mm min ...

Страница 126: ...120 Italiano ...

Отзывы: