background image

      Ph:  905.636.9865  Fax:  905.636.9879 

E-Mail    

[email protected]

       Web:    

www.bti-chargers.com


2

OPERATION 

  Put the main switch (1) in the “ OFF” position and connect the AC cord to the power supply. 

  Connect the battery, checking the polarity. 

  Move the main switch to “ON”, thus starting the automatic charging cycle. The display will show 

a sequence of details on the charger’s internal programming after first displaying “SPE”, it will 
show  the  software  release  installed  in  the  equipment,  then  the  following  parameters  in 
sequence: 

o


battery voltage 

o


charging current 

o


charging curve number  

o


the words 

“GEL” 

or “

Acd

”  depending on the set up charging curve being suitable   

for sealed (gel or agm) batteries or lead-acid wet batteries 


Make sure the type of batteries to be charged (vrla or lead-acid wet batteries) matches 
the displayed details (“GEL” or “Acd”, respectively).  If in doubt, contact your dealer.


  Next, a test is run on the battery voltage to decide if the charging process should be started or 

not. If the battery is not connected to the battery charger, the display will show the word 

“bat”

The  word  will  come  on  if  the  test  is  failed,  for  instance,  due  to  reversed  polarity  or  incorrect 
battery  connection.  If  the  test  is  passed,  the  display  will  show  the  battery  voltage  for 
approximately 5 seconds and the battery will begin to be charged. The charging cycle progress 
will be shown by red (4), yellow (5) and green (6) LED indicators.  

  At the end of the charge, when the green indicator is on, disconnect the AC power supply and 

disconnect the battery pack.  (Some charging profiles have a float stage at the end of charge: 
in this case the charger can be left connected to the battery pack.) 


Troubleshooting 


PROBLEMS 

SOLUTIONS AND CHECKS 

The battery charger does not switch on 

Check that the plug is connected to the mains supply. 
Check that the mains supply connection is powered. 
Check that the input fuse is not blown. 

The  charging  cycle  does  not  start  and  the  message 

bat

’ is displayed 

Check the connection to the battery and the polarity. 

The message 

E01 

is displayed 

This  means  that  the  maximum  voltage  admissible  by  the 
battery has been exceeded. The charging is interrupted. 

The message 

E02

 is displayed.  

This  means  that  the  maximum  internal  temperature  has  been 
exceeded. The charging is interrupted.  Call for service. 

The message 

E03 

is displayed 

This means that the maximum time for the charging phase has 
been exceeded. The charging is interrupted.  Check batteries. 

The message 

SCt 

is displayed 

This  means  that  the  total  safety  timer  has  interrupted  the 
charging. Check batteries. 

The message

 Srt 

is displayed 

This signals a possible internal short circuit.  Call for service. 


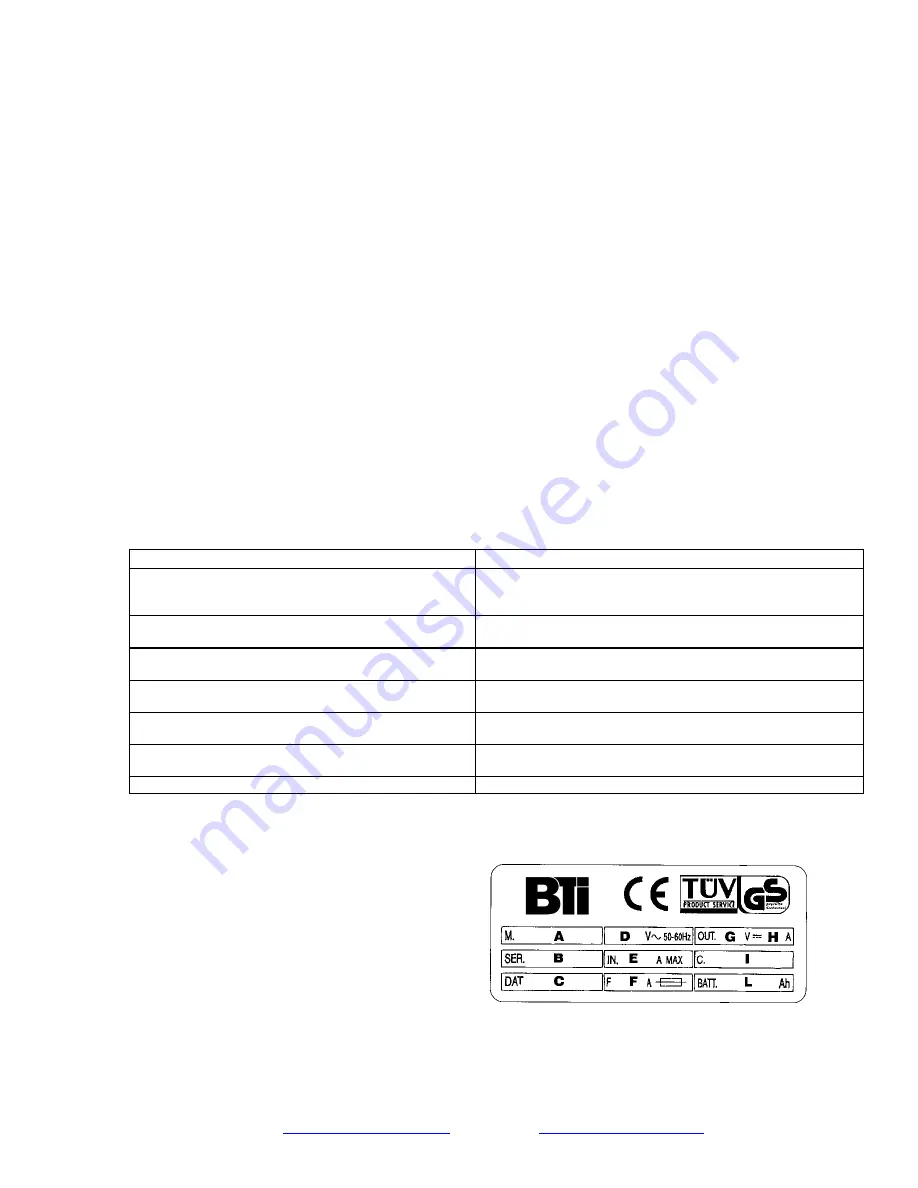
RATING PLATE 

 The rating plate on the rear of the unit provides the following details: 
 

  A – model 

  B – serial number 

  C – date of manufacture 

  D – mains voltage 

  E – input current 

  F – fuse rating 

  G – output voltage (max.) 

  H – output current (max.) 

  I – charging curve 

  L – range of battery sizes possible


Содержание CBSW1-S

Страница 1: ...tion make sure the rated input voltage of the charger suits the available supply voltage and the system is grounded If necessary replace the fuse with another of the same type and value as indicated on the rating plate Use battery chargers only in well ventilated areas Pay attention to any remarks of the battery manufacturer Attention Use protective glasses and gloves during battery maintenance Ba...

Страница 2: ...hown by red 4 yellow 5 and green 6 LED indicators At the end of the charge when the green indicator is on disconnect the AC power supply and disconnect the battery pack Some charging profiles have a float stage at the end of charge in this case the charger can be left connected to the battery pack Troubleshooting PROBLEMS SOLUTIONS AND CHECKS The battery charger does not switch on Check that the p...

Страница 3: ... insensitive to 10 system voltage variations 3 ISO isolation transformer class H 4 Efficiency 80 5 Output ripple at max load below 150mV 6 Accuracy of power and voltage measurements 1 ELECTROMAGNETIC COMPATIBILITY The tests of electromagnetic compatibility EMC on these devices were carried out in compliance with the CEI EN55014 1 A2 04 98 06 99 and CEI EN 55014 2 10 98 STANDARD norms with the test...

Страница 4: ...865 Fax 905 636 9879 E Mail info bti chargers com Web www bti chargers com 4 Esprit Series High Frequency Battery Charger FRONT PANEL CONTROLS PRESS FOR STATUS A Amps U Volts h hours C Ah E KWh 7 2 3 4 5 6 ON OFF 1 ...

Страница 5: ... de recharge sélectionnée batteries plomb acide à électrolyte liquide ou VRLA autre terme pour les batteries scellées qu elles soient de type AGM ou gel est appropriée au type de batterie à recharger De plus assurez vous que la tension d alimentation du chargeur respecte sa tension admissible et qu il est mis à la masse Au besoin remplacez le fusible par un nouveau fusible du même type et du même ...

Страница 6: ...t s affiche en cas d échec du test par exemple si la polarité est inversée au si la connexion est mauvaise En cas de réussite du test l afficheur affiche la tension de la batterie pendant environ 5 secondes et le cycle de recharge démarre La progression du cycle de recharge est illustrée par l allumage successif des indicateurs à DEL rouge 4 jaune 5 et vert 6 À la fin du cycle de recharge lorsque ...

Страница 7: ...ent être effectuées par du personnel qualifié Utilisez uniquement les pièces de rechange du fabricant CARACTÉRISTIQUES ÉLECTRIQUES 1 Alimentation 115 V 60 Hz autres options de tension d alimentation sur demande 2 Puissance de recherche inchangée lors de variations d alimentation CA pouvant atteindre 10 3 Transformateur d isolation ISO classe H 3 Efficacité 80 4 Ondulations parasites CA charge néce...

Страница 8: ... 905 636 9879 E Mail info bti chargers com Web www bti chargers com 8 Esprit Series Chargeur de batterie à haute fréquence PANNEAU DE CONTRÔLE AVANT APPUYER POUR ÉTAT A Amps U Volts h hours C Ah E KWh 7 2 3 4 5 6 ON OFF 1 ...

Страница 9: ...en ventiladas Prestar mucha atención a las indicaciones proporcionadas por el fabricante de las baterías Para baterías al plomo ácido con electrolito líquido Controlar el nivel del agua después de cada ciclo de carga Llenar nuevamente sólo con agua destilada Atención Los gases emanados durante la carga son explosivos No fumar en proximidad de las baterías Cuando se manejan cables o equipos eléctri...

Страница 10: ...tería por unos 5 segundos y luego comienza la carga de la batería El avance del ciclo de carga se señala por medio de tres indicadores luminosos de led rojo 4 amarillo 5 y verde 6 Al final de la carga con el indicador verde iluminado 6 colocar el interruptor general 1 en posición OFF y desconectar la batería INCONVENIENTES SOLUCION Y CONTROLES El cargador de baterías no se enciende Controlar que e...

Страница 11: ...en 240V 50Hz 100V 60Hz 115V 60Hz tensiones de entrada diferentes disponibles bajo pedido 2 Parámetros de carga insensibles a las variaciones de la tensión de red en el intervalo 10 3 Transformador de aislamiento ISO clase H 4 Rendimiento 80 5 Ripple de salida con carga máxima inferior a 150mVpp 6 Precisión de las medidas de corriente y tensión 1 ...

Страница 12: ...65 Fax 905 636 9879 E Mail info bti chargers com Web www bti chargers com 12 Esprit Series High Frequency Battery Charger FRONT PANEL CONTROLS PRESS FOR STATUS A Amps U Volts h hours C Ah E KWh 7 2 3 4 5 6 ON OFF 1 ...

Отзывы: