background image

2

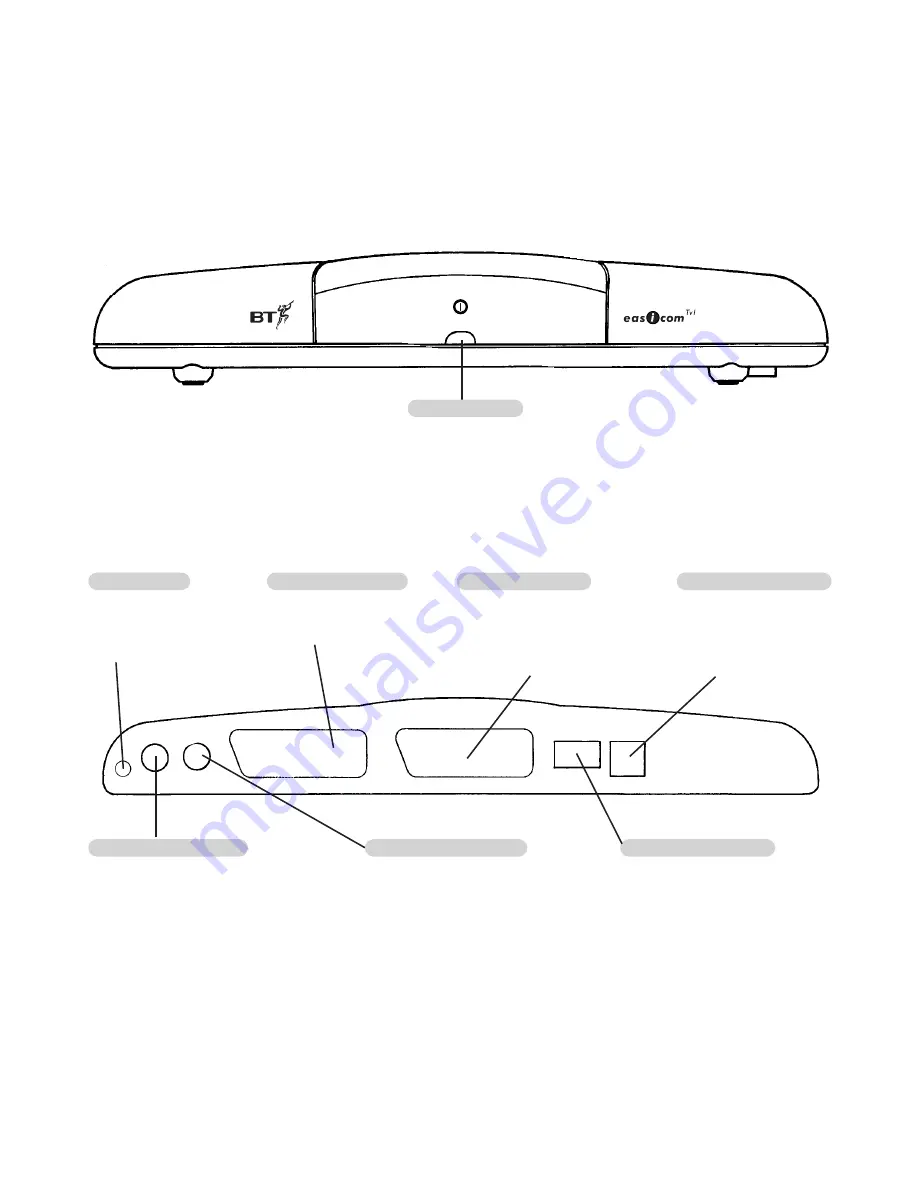
Set-top box

Front 

Back

Camera port 2 (AUDIO)

If you wish to connect a camera
monitoring system (See page 18) to
the Easicom

T V1

. This port is used to

connect the Audio input.

Camera port 1 (VIDEO)

If you wish to connect a camera
monitoring system (See page 18) to
the Easicom

T V1

. This port is used to

connect the Video input.

Power socket

To connect Easicom

T V1

to

the mains power via the
power supply cable (with
Transformer) provided.

Scart socket (AUX)

To connect Easicom

T V1

to any

other equipment (such as a
Video player, Satellite receiver,
games console etc) via a Scart
cable (not provided).

Scart socket (to TV)

To connect Easicom

T V1

to your television, via the
Scart cable (provided).

Telephone line socket

To connect Easicom

T V1

to

the telephone wall socket
via the telephone line
cord (provided).

Telephone socket

Enables you to plug in a telephone.

When the Easicom

T V1

is connected

to the telephone line you can if you
wish, plug in your telephone here,
so that it is conveniently situated
near the television for you to
answer calls.

Status Indicator

Red light is on when the power is

connected. The light flashes to let you

know when you have calls in your 

Calls List (page 10) and flashes fast when 

a priority caller has called you (page 17).

Camera

Video in

TV Scart

Aux Scart

Telephone

Line

12v

DC

Power

Camera

Audio in

Содержание EASICOM TV1

Страница 1: ...Digital Telephone Answering Machine with Caller Display For use with BT s Caller Display Caller Display service requires set up by BT or your service provider and connection to a digital exchange eas...

Страница 2: ...JANE 01768 234 72789 JOHN 01678 5645788 ROBERT 01446 678723466 012325 2 015847 5 015842 9 017612 8 016889 3 015842 9 Optional Camera Monitoring System If you wish you can attach a Camera Monitoring Sy...

Страница 3: ...nsole Press again to switch back UP and DOWN ARROWS Move you up and down the Calls List and Directory screens Directory Brings your Directory details onto the screen see page 13 You can now add to or...

Страница 4: ...a a Scart cable not provided Scart socket to TV To connect EasicomTV1 to your television via the Scart cable provided Telephone line socket To connect EasicomTV1 to the telephone wall socket via the t...

Страница 5: ...ontents At a Glance 1 Introduction 4 Setting up 5 Safety Instructions 8 Using Your EasicomTV1 9 Optional Camera Monitoring System 18 Maintenance 20 Help and advice 21 Technical specification 24 Index...

Страница 6: ...u pick up the phone and to find out who has been trying to contact you while you were away EasicomTV1 has been designed to enhance the way you use this service by showing this information on your tele...

Страница 7: ...et Plug the smaller end of the telephone line cord into the telephone socket on the back of your EasicomTV1 5 Setting up Follow the instructions in this section to set up your EasicomTV1 ready for use...

Страница 8: ...of your television The EasicomTV1 is best connected to a Television via a Scart connector Connect the plug at one end of the Scart lead it does not matter which to the socket marked TV on the back of...

Страница 9: ...refer to the Help and advice section page 21 7 Connect to the power supply Plug the power adaptor into the power socket on the wall and switch on 8 Connect a telephone optional If you wish you can co...

Страница 10: ...lation around the EasicomTV1 8 Safety instructions Warning For the remote control use only approved batteries 2 x AAA Alkaline batteries Do not try to use any power supply except the one provided othe...

Страница 11: ...ho is calling before you answer The number will appear discreetly but clearly at the top left of the Television or Satellite programme Video or Game you are watching It will stay on screen for 10 seco...

Страница 12: ...utton brings your Calls List onto the TV screen so that if you have been away from your phone you will be able to see at a glance who has been trying to contact you The Calls List will show 1 The numb...

Страница 13: ...t whilst recording a Video will not affect the recording or appear on the recording USING 2 The name allocated to that number if associated with a name stored in your Directory see page 12 3 Whether t...

Страница 14: ...e Directory every time you receive a call from that number the name of the person calling will be displayed and then stored in the Calls List This makes it much easier to identify your callers at a gl...

Страница 15: ...around the Directory Directory Page 1 of 5 DAVE DEREK JANE JOHN MARK MUM SUE Num 0123 045 67891 Flashing Cursor Press the DIRECTORY button To view the Directory Sample of Directory screen You can add...

Страница 16: ...18 digits You do not need to add any spaces for the telephone number to be recognised by the EasicomTV1 and displayed on screen but if you do wish to a space blank has been included as one of the char...

Страница 17: ...e page 17 Move the cursor using the LEFT and RIGHT ARROWS to select YES or NO To add a number from the Calls List to the Directory Using the DOWN ARROW move the cursor down to the next line which give...

Страница 18: ...d hold the DELETE button until the line disappears Continue adding characters until you have finished editing the entry Press the STORE button to save the changes The screen will show SAVE CHANGES Pre...

Страница 19: ...into the Directory you will be given the choice to allocate Priority status to that number page 15 You might typically wish to allocate Priority status to those callers most important to you When a Pr...

Страница 20: ...toring System in situ Follow the instructions provided with your camera monitoring system to set the camera where you wish it to be eg at your front door or a babies room Run the cables back to the Ea...

Страница 21: ...een Press and hold the CAMERA button until the camera image disappears from the screen The image and audio will return to the TV broadcast A callers telephone number will appear on your TV screen as n...

Страница 22: ...them immediately with new AAA Alkaline batteries as soon as they run out There are no customer replaceable parts on the EasicomTV1 except for the batteries in the Remote Control Clean the outside of t...

Страница 23: ...ed Your TV Scart connector does not support full Scart functionality Has the camera or AUX button been pressed Ensure the power supply lead is plugged in and switched on see page 7 Ensure Scart cable...

Страница 24: ...creen mode see page 12 Your TV Scart connector does not support full Scart functionality Some TVs auto switch from Standby mode to On when the Scart connector is activated Call BT or your telephone se...

Страница 25: ...te company that does not deliver Caller Display This is a function of the Scart switching and is quite normal The data from the telephone exchange has become corrupted the EasicomTV1 is not faulty BT...

Страница 26: ...X 10 Lines TV and AUX sockets Scart Camera video and audio sockets Phono Power Supply 12v DC 300mA Infra Red Controller batteries 2 X AAA alkaline Video Levels 1Volt p p 75 Ohms Weight 400 grams Tele...

Страница 27: ...up 18 using with your Easicom TV1 18 viewing camera image on screen 18 Cleaning 20 Connection to other equipment 6 Directory 12 add a number from the Calls List 15 adding an entry 14 edit an entry 16...

Страница 28: ...ified from time to time Services and equipment are provided subject to British Telecommunications plc s respective standard conditions of contract Nothing in this publication forms any part of any con...

Отзывы: