background image

SETTING 

UP

Diverse 4000 ~ 5th Edition ~ 17th July ’01 ~ 3664

10

Setting up

Situate your product close enough
to the mains power socket so that
the cable will reach.

Make sure it is at least 1 metre
away from other electrical products
to avoid interference.

Do not situate the product in the
bathroom or other humid areas.

Please note that your handset
is NOT registered. The Diverse
4000 handset will be easily
registered once you complete

the stops 1 to 3 below.

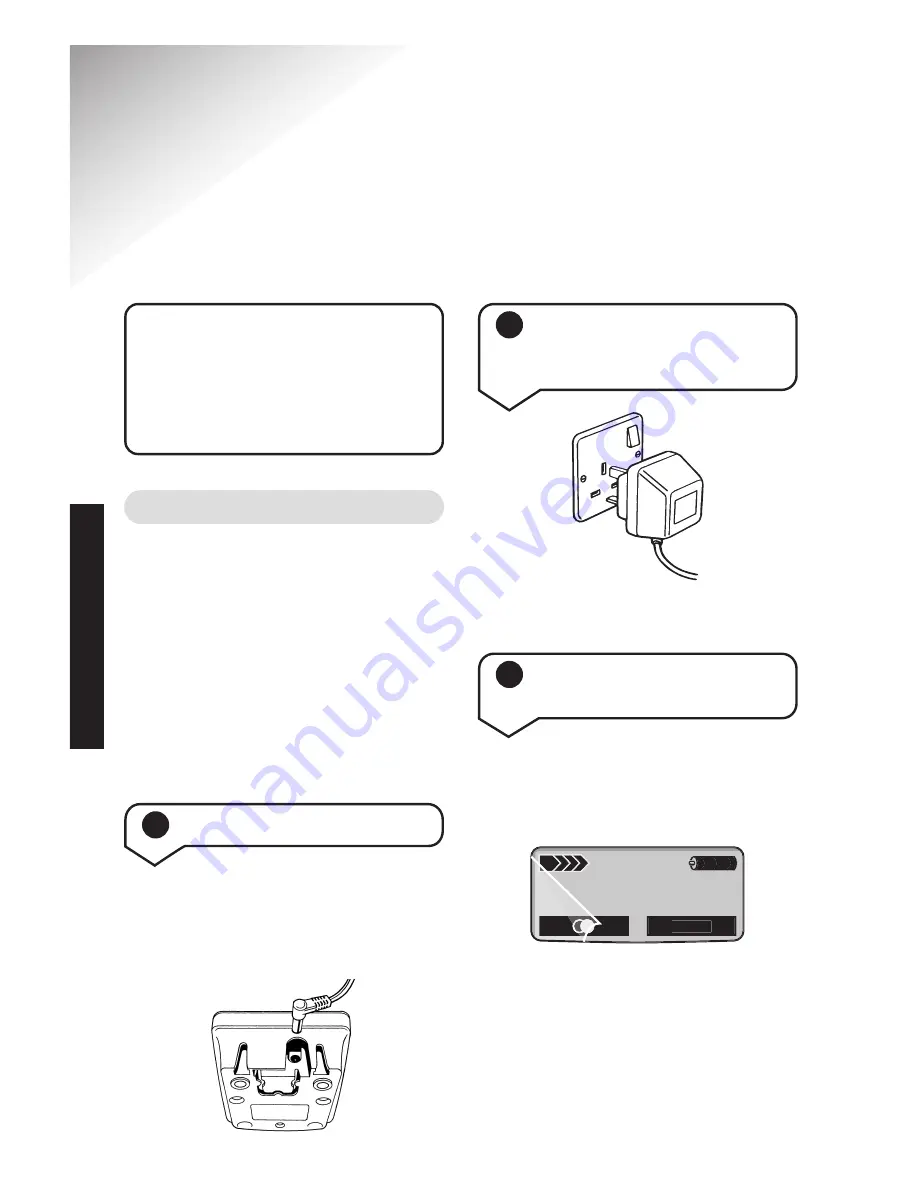
Plan the location

Plug the power supply cable into
the power socket on the
underside of your Diverse 4000
Executive charger.

2

Plug the power adaptor

into the wall socket and

switch on

1

Connect the charger

The display is protected by a
plastic film. Remove the protective
plastic film from the display.

3

Registering and charging

the handset

Menu

Содержание DIVERSE 4000 EXECUTIVE

Страница 1: ...0 range It may also be registered to other GAP compatible bases with possible limited availability of some functions Diverse 4000 Executive Handset Charger Digital Cordless Telephone Y O U M U S T S U...

Страница 2: ...Diverse 4000 5th Edition 17th July 01 3664 Please open this page for a further At a glance guide to your Diverse 4000 Executive...

Страница 3: ...achine In use light Lights up when the handset is in use and flashes to indicate calls message alarm calls or appointment reminders Star Bell Switches the handset ringer on and off Hash Keyguard Hold...

Страница 4: ...INT M Menu Diverse 4000 5th Edition 17th July 01 3664 2 Handset display Display option buttons Navigation button Idle Screen Charger Contact points...

Страница 5: ...7 Character map 18 Redial 23 Secrecy 24 Paging and internal calls 25 Caller Display and other Select Services 28 Calls list 28 Call Waiting 32 Other Select Services 33 In this guide Additional feature...

Страница 6: ...ntry 5 3 Advisory Tones entry 6 Handset Settings 6 1 Auto Answer 6 2 Language list 6 3 Register H Set list 6 4 Select Base list 6 5 Reset Handset 7 Base Settings 7 2 System PIN entry 7 3 Base Reset 7...

Страница 7: ...s The following functions are available Messages 1 Display Number 2 Delete Entry 3 Copy Entry 5 Delete List 6 Send List 7 Available Memory 1 Text Message 2 Answering Machine if available 3 Mailbox 4 C...

Страница 8: ...old to display Internal users to put caller on hold to display Internal users to display Calendar Clock to display Date Time enter settings to display Calendar Clock to display Alarm Clock enter setti...

Страница 9: ...to indicate new messages For calling other handsets Opens the menu Shows the status of the handset battery Shows the range status Displayed when the handset ringer is set to off Confirms the function...

Страница 10: ...lt clip Battery compartment cover 8 Introduction Your Diverse 4000 Executive handset and charger can be used with any product in the Diverse range apart from the Diverse 1000 Please refer to your main...

Страница 11: ...ld not be used near emergency intensive care medical equipment and should not be used by people with pacemakers Never dispose of batteries in a fire There is a serious risk of explosion and or the rel...

Страница 12: ...r humid areas Please note that your handset is NOT registered The Diverse 4000 handset will be easily registered once you complete the stops 1 to 3 below Plan the location Plug the power supply cable...

Страница 13: ...tered handset into the Executive Charger Unit and leave to charge for approximately 16 hours The charging status icon flashes on the handset to indicate that the batteries are being charged Menu INT 2...

Страница 14: ...days Fully discharging the batteries at least once a week will help them last as long as possible However the charge capacity of rechargeable batteries will reduce with time as they wear out so reduci...

Страница 15: ...4000 Executive is now ready for use However If you experience any difficulties please call the BT Diverse Helpline on 08457 908 070 Signal strength The range of your Diverse base station is 300 metres...

Страница 16: ...e Press the DOWN navigation button Enter the mode 12hr is the default If you want to keep as 12hr clock Press the Save options button if you want to change to 24hr clock Press the LEFT navigation butt...

Страница 17: ...NE button to switch the handset off Press and hold the RED PHONE button to switch the handset on again Making and ending calls To make an external call Ensure the handset is switched ON Press the GREE...

Страница 18: ...ternal call Handsfree Handsfree allows you to talk to your caller without holding the handset and allows other people in the room to listen to the conversation Your hands are left free for example to...

Страница 19: ...down the HANDSFREE button Using the directory You can store up to 200 numbers and names in the telephone directory You can enter up to 32 digits and up to 16 characters If you wish you can also add a...

Страница 20: ...OK Menu Character map These are the characters you can use when storing a directory entry 1x 2x 3x 4x 5x 6x 7x 8x 9x 10x 11x 12x 13x 14x 1 a b c 2 d e f 3 g h i 4 j k l 5 m n o 6 p q r s 7 t u v 8 w...

Страница 21: ...names which are listed in alphabetical order Press the GREEN PHONE button The number is dialled To dial a name and number in the directory 3DEF 3DEF Press the DOWN navigation button to open the direc...

Страница 22: ...button until you reach the idle display To edit a directory entry View Change You can copy individual entries to another Diverse 4000 Executive handset Press the DOWN navigation button to open the di...

Страница 23: ...ions button Press the DOWN navigation button until the display shows Send List Press the OK options button to confirm The numbers of all other registered handsets are displayed Press the DOWN navigati...

Страница 24: ...OWN navigation button to open the directory Press the DOWN navigation button to highlight the first entry in the directory Press the Menu options button Press the DOWN navigation button until the disp...

Страница 25: ...h the idle display To display the available memory Press the REDIAL options button The last number dialled will be displayed Press the DOWN navigation button to scroll through the redial list Press th...

Страница 26: ...PHONE button until the display returns to idle Press the Menu options button Press the DOWN navigation button until the display shows Delete Entry Press OK to confirm deletion Press the RED PHONE butt...

Страница 27: ...anted or locate a missing handset If you have multiple handsets registered to the base you can make internal calls between handsets Call All You can forward an external call to another handset registe...

Страница 28: ...ernal call on hold and speak to another handset End If you are making an internal call and hear the Call Waiting tone you can immediately take the incoming call Press the Accept options button to spea...

Страница 29: ...the RED PHONE button until you reach the idle display OK OK Providing the feature is switched on Your handset display shows the line is In Use Press the GREEN PHONE button the other two callers will h...

Страница 30: ...se ensure that you have stored the full telephone number including the area code otherwise the name will not match the number stored in the directory If the caller has withheld their number the displa...

Страница 31: ...n Calls list Text messages SM Messages in a mailbox voice mail Missed Calls New Call 02 04 08912345678 12 07 200011 33 Delete Menu To view the Calls list When you have new call the display flashes and...

Страница 32: ...ton Press the DOWN navigation button until the display shows Calls list Press the OK options button The most recently received call is displayed Press the UP DOWN navigation button if necessary to scr...

Страница 33: ...ETE options button Display shows Entry has been deleted Press the RED PHONE button until you reach the idle display OK To delete the complete Calls list Press the ENVELOPE button Press the DOWN naviga...

Страница 34: ...which is the current setting Press the RED PHONE button until you reach the idle display To accept a waiting call During a call when you hear the Call Waiting beeps The number or name if stored in the...

Страница 35: ...Press the DOWN navigation button until the display shows Select Services highlighted Press the OK options button Press the DOWN navigation button until the display shows Withhold No highlighted Press...

Страница 36: ...you have to go out before the call rings back Press the Menu options button Display shows Select Services Press the OK options button Press the DOWN navigation button until Ringback Off is highlighted...

Страница 37: ...ns button Press the LEFT RIGHT navigation button to display the option you want Automatic No Answer or If Busy Press the DOWN navigation button to scroll to the next line Press the Edit options button...

Страница 38: ...the OK options button Press the DOWN navigation button The display shows Mailbox Press the OK options button Menu OK OK OK OK Enter the telephone number of your messaging service For example 1571 to...

Страница 39: ...set will be able to retrieve your messages R R To retrieve messages from your Voice Mail service Press and hold down the 1 button When set up it will take you into your message service If during the s...

Страница 40: ...the RED PHONE button until you reach the idle display You can use your handset as an alarm clock The alarm rings every day at the time set When you have set a time for the alarm the display shows The...

Страница 41: ...s the RED PHONE button until you reach the idle display Menu OK OK Save To set an appointment call You can tell your handset to remind you of one appointment at a specific date and time If am or pm is...

Страница 42: ...andset at the time The call rings for about 30 seconds To display delete a missed appointment anniversary If you miss an appointment or an anniversary call details are saved and the display shows Appt...

Страница 43: ...two handsets is possible when Diverse 4000 Executive handsets are registered at the same base station and have currently selected that base station Or Diverse 4000 Executive handsets have set Best Ba...

Страница 44: ...utton to take the call Call Room monitor You can use a handset as a room monitor If a certain noise level is reached the handset will automatically dial an internal or external number which you have s...

Страница 45: ...f an external number has already been entered your can delete it by pressing the DELETE button If an internal number has been entered delete it by pressing the Yes options button Enter the internal nu...

Страница 46: ...ready been entered your can delete it by pressing the DELETE button If an internal number has been entered delete it by pressing the Yes options button Enter the external number you want the room moni...

Страница 47: ...ADDITIONAL FEATURES To switch off the room monitor from another phone When you are called by the room monitor you can switch off the room monitor from that phone Answer the call Press the 9 and 2 butt...

Страница 48: ...ear the current handsfree volume Press the LEFT or RIGHT navigation button to set the volume level you want Press the DOWN navigation button to select the handset earpiece volume Press the LEFT or RIG...

Страница 49: ...ent ringer volume Press the LEFT or RIGHT navigation button to set the ringer level you want Press the DOWN navigation button to select the ringer melody Press the LEFT or RIGHT navigation button to s...

Страница 50: ...the display shows Ringer Settings Press the OK options button You hear the current ringer volume Press the Time C options button Press the LEFT or RIGHT navigation button to switch the time control on...

Страница 51: ...the idle display To switch off your handset s beeps and tones You can switch off and on Key beeps when you press each button on your handset Confirmation beeps when you have finished making a setting...

Страница 52: ...ed on Press the OK options button again to switch auto talk off Press the RED PHONE button until you reach the idle display Diverse 4000 5th Edition 17th July 01 3664 50 Press the DOWN navigation butt...

Страница 53: ...Reset Handset Press the OK options button Press the Yes options button to confirm reset The settings after a reset will be Ringer volume 3 Ringer melody 1 Auto talk On Battery low beep On Room monitor...

Страница 54: ...name you want Press the Save options button to confirm Press the RED PHONE button until you reach the idle display Edit Save Your handsets are automatically assigned internal numbers between 1 6 You...

Страница 55: ...handset you want Press the Menu options button Press the DOWN navigation button until the display shows Call Barring To set call barring Press the LEFT navigation button to display the list of interna...

Страница 56: ...e PIN original setting 0000 Press the OK options button Press the DOWN navigation button to display the setting you want No barring Outgoing or Internal only Press the OK options button A will appear...

Страница 57: ...e forgotten your base You have changed the PIN Try entering the default PIN station PIN number 0000 If you have changed the PIN and cannot remember the number you will need to contact the BT Diverse H...

Страница 58: ...n You cannot dial external Call barring may be set Switch off call barring numbers see page 53 Your cannot hear your caller The LEFT navigation button Press to switch the has been pressed and the micr...

Страница 59: ...e handset display Diverse 4000 5th Edition 17th July 01 3664 57 4000 Classic handset 4010 4016 Executive 3010 Executive Caller Display Call Waiting Yes Yes Time displayed in idle mode Yes No Language...

Страница 60: ...eturned to point of purchase This guarantee does not cover any faults or defects caused by accidents misuse fair wear and tear neglect tampering with the equipment or any attempt at adjustment or repa...

Страница 61: ...lic telephone network and compatible switchboards This equipment complies with the essential requirements for the Radio Equipment and Telecommunications Terminal Equipment Directive 1999 5 EC Switchbo...

Страница 62: ...isplay shows Dial Mode Press the OK options button Press the DOWN navigation button to select tone with TBR pulse with Earth Recall DTMF Earth tone with Earth loop recall Press the OK options button t...

Страница 63: ...utton Tone dialling is now active Press the RED PHONE button until you reach the idle display OK Menu Note This setting is only for the duration of the call To set the pause length You can set the len...

Страница 64: ...until the display shows Add Features Press the OK options button Press the DOWN navigation button until the display shows TBR Press the OK options button Press the UP or DOWN navigation button to sel...

Страница 65: ...tically before telephone numbers in the caller list and the emergency numbers Press the DOWN navigation button until the display shows Access code Press the OK options button Enter the access code e g...

Страница 66: ...t 31 dial a number from 30 display status of call 29 display time of call 29 settings 32 view 29 Calls end 15 external 15 handsfree 16 holding 26 internal 25 making 15 on hold 26 receiving 16 redial 2...

Страница 67: ...s 25 Internal number change 52 Keyguard 51 Language change 49 Main menu 4 Making calls 15 Melody 47 On off alarm clock 39 auto talk 50 beeps and tones 49 handset power 15 keyguard 51 room monitor 45 s...

Страница 68: ...33 Voice mail 36 Setting up 10 Switchboard compatibility 59 Technical information 59 Telephone line cord 13 Three way conversation 26 Time control for ringer volume 48 Time set 13 14 Tone dialling 59...

Страница 69: ...ve standard conditions of contract Nothing in this publication forms any part of any contract TouchtoneTM is a registered trade mark of British Telecommunications plc in the UK British Telecommunicati...

Отзывы: