12
8. Make sure the cleaner thoroughly penetrates deep into
the finned areas.
9. Interior and exterior finned areas must be thoroughly
cleaned.
10. Finned surfaces should remain wet with cleaning so-
lution for 10 minutes.
11. Make sure surfaces are not allowed to dry before rins-
ing. Reapply cleaner as needed to ensure 10
−
minute
saturation is achieved.
12. Thoroughly rinse all surfaces with low
−
velocity clean
water using a downward rinsing motion of the spray
nozzle. Protect fins from damage from the spray noz-
zle.
Evaporator Coil Metering Devices
The metering devices are multiple fixed
−
bore devices
(Acutrol
) swedged into the horizontal outlet tubes from
the liquid header, located at the entrance to each
evaporator coil circuit path. These are non
−
adjustable.
Service requires replacing the entire liquid header
assembly.
To check for possible blockage of one or more of these
metering devices, disconnect the supply fan contactor
(IFC) coil, then start the compressor and observe the
frosting pattern on the face of the evaporator coil. A frost
pattern should develop uniformly across the face of the
coil starting at each horizontal header tube. Failure to
develop frost at an outlet tube can indicate a plugged or a
missing orifice.
Refrigerant System Pressure Access Ports
There are two access ports in the system
−
on the suction
tube near the compressor and on the discharge tube near
the compressor. These are brass fittings with black plastic
caps. The hose connection fittings are standard 1/4 SAE
male flare couplings.
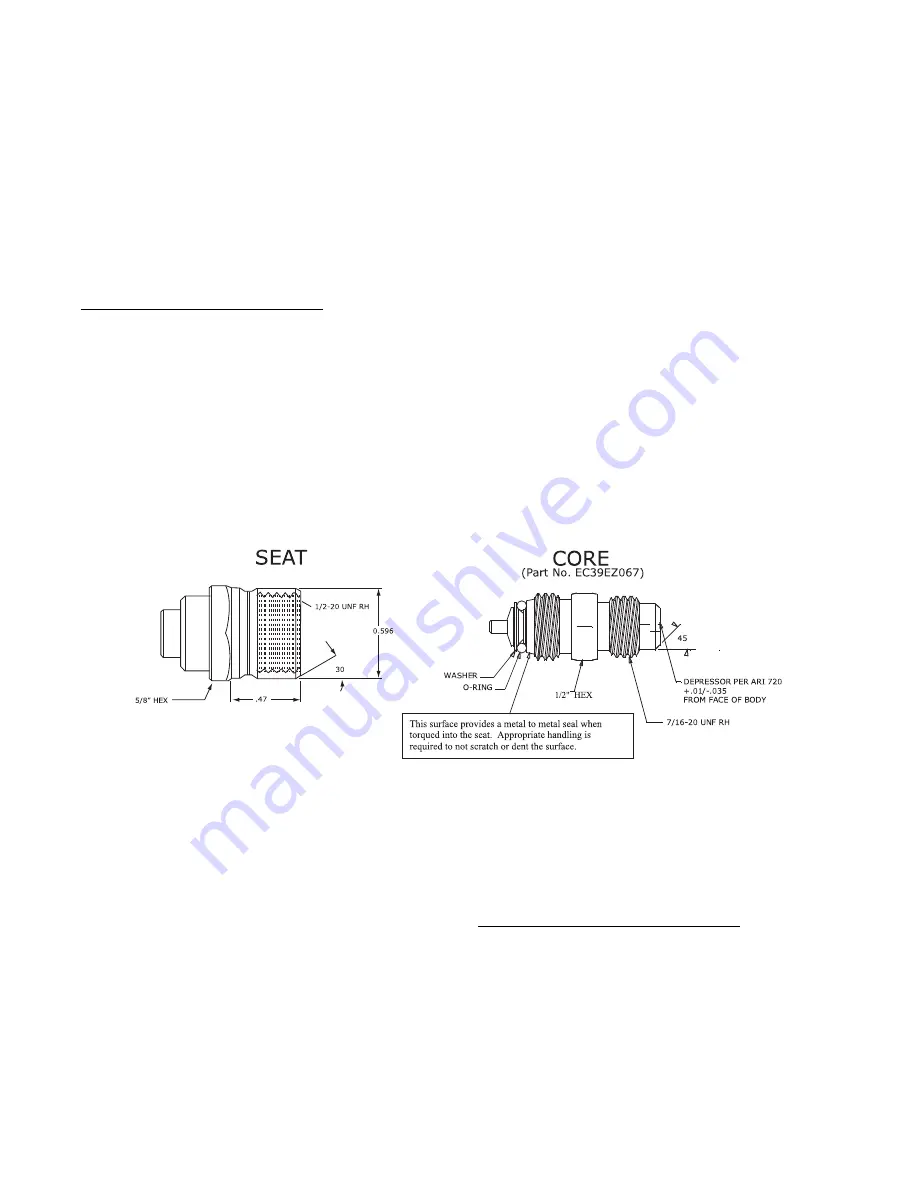
The brass fittings are two
−
piece High Flow valves, with a
receptacle base brazed to the tubing and an integral
spring
−
closed check valve core screwed into the base (See
Fig. 15). This schrader valve is permanently assembled
into this core body and cannot be serviced separately;
replace the entire core body if necessary. Service tools are
available from RCD (p/n P920
−
0010) that allow the
replacement of the schrader valve core without having to
recover the entire system refrigerant charge. Apply
compressor refrigerant oil to the schrader valve core’s
bottom o
−
ring. Install the fitting body with 96
±
10 in
−
lbs
(10.85
±
1.13 Nm) of torque; do not overtighten.
NOTE
: The High
−
Flow valve has a black plastic cap
with a rubber o
−
ring located inside the cap. This rubber
o
−
ring must be in place in the cap to prevent refrigerant
leaks.
o
o
C08453
Fig. 15
−
CoreMax Access Port Assembly
PERFECT HUMIDITY
]
DEHUMIDIFICATION SYSTEM
Units with the factory
−
equipped Perfect Humidity
™
option are capable of providing multiple modes of
improved dehumidification as a variation of the normal
cooling cycle. The design of the Perfect Humidity
™
system allows for two humidity control modes of
operation of the rooftop unit, utilizing a common
subcooling/reheat dehumidification coil located
downstream of the standard evaporator coil. This allows
the rooftop unit to operate in both a dehumidification
(Subcooling) mode and a hot gas Reheat Mode for
maximum system flexibility. The Perfect Humidity
™
package is factory
−
installed and will operate whenever
there is a dehumidification requirement present.
The Perfect Humidity
™
system is initiated based on an
input from a discrete input from a mechanical space or
return air humidistat.
Perfect Humidity
]
Modes
Dehumidification Mode (Subcooling)
This mode will be engaged to satisfy part
−−
load type
conditions when there is a space call for cooling and
dehumidification. Although the temperature could have
dropped, decreasing levels of the sensible load in the
space, the outdoor and/or space humidity levels can be
higher. A typical scenario could be when the outside air is
85
F (29
C) with 70% to 80% relative humidity (RH).
Desired sensible heat ratio (SHR) for equipment in this
scenario is typically from 0.4 to 0.7. The Perfect
Humidity
™
unit will initiate Dehumidification mode
Содержание 580J D17
Страница 80: ...80 APPENDIX IV WIRING DIAGRAMS cont C160041 Fig 72 580J D17 D28 Control Diagram 208 230 3 60 460 575 3 60 ...
Страница 81: ...81 APPENDIX IV WIRING DIAGRAMS cont C160042 Fig 73 580J D17 D28 Power Diagram 208 230 3 60 ...
Страница 82: ...82 APPENDIX IV WIRING DIAGRAMS cont C160043 Fig 74 580J D17 D28 Power Diagram 460 3 60 ...
Страница 83: ...83 APPENDIX IV WIRING DIAGRAMS cont C160044 Fig 75 580J D17 D28 Power Diagram 575 3 60 ...
Страница 84: ...84 APPENDIX IV WIRING DIAGRAMS cont C160050 Fig 76 580J D17 D28 Control Diagram with Perfect Humidity ...
Страница 86: ...86 APPENDIX IV WIRING DIAGRAMS cont C160047 Fig 78 580J D17 D28 Power Diagram 460 3 60 with Perfect Humidity ...
Страница 87: ...87 APPENDIX IV WIRING DIAGRAMS cont C160048 Fig 79 580J D17 D28 Power Diagram 575 3 60 with Perfect Humidity ...
Страница 88: ...88 APPENDIX IV WIRING DIAGRAMS cont C160049 Fig 80 RTU OPEN Wiring Diagram ...
Страница 89: ...89 APPENDIX IV WIRING DIAGRAMS cont C160045 Fig 81 RTU OPEN Wiring Diagram with Perfect Humidity ...


