24
GENERAL INSPECTION AND CARE FOR YOUR FURNACE
Periodic inspections need to made on your furnace. Inspect for loose hardware, damaged or worn parts
and bad seals on joint areas.
Keep all fasteners tight or properly adjusted.
Replace any damaged or worn parts.
All joints need to be properly sealed to keep moisture out of unit.
Paint any rusted parts.
Wipe unit down with a light film of oil.
20-1 OILING BLOWER MOTOR
1. Unplug unit from electrical supply.
2. Remove blower cover.
3. Clean and inspect blower area.
4. Place a few drops of oil into holes. (Holes are marked on motor.)
Note: Some blowers will need to be removed.from unit to access oil holes.
Note: Some commercial blowers have sealed bearings and do not require lubrication.
5. Install blower cover.
6. Plug unit in and test.
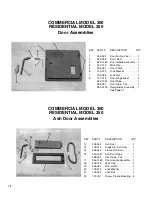
20-1 ADJUSTING DOOR HANDLE
Important: All doors must seal tightly for safe operation.
Periodic adjustments will need to be made with the door handle. As rope seats in and wears it will be nec-
essary to tighten the door handle.
This is done simply by tightening the nut on the back side of latch catch.
If all adjustment has been taken out it may be necessary to remove door catch from handle and rotate
catch 180 degrees. This ear is thicker than the other side and will allow for a tighter fit.
20-1 REPLACING DOOR ROPES
1. Remove door from unit.
2. Remove old rope from rope channel.
3. Clean all old glue and rust out of rope channel.
4. Apply an even film of high temperature glue all the way around rope channel.
5. Start with one end of rope and push into rope channel. Work all the way around the rope channel.
Note: Do not start rope on the corner.
Note: The rope may need to be pulled or pushed back up to make fit. Make sure the rope is even all
the way around door.
6. Apply glue to each end of rope and glue together.
7. Turn door over and leave until glue has set up.
8. Re-assemble door to furnace.
20-2 RE-SEALING DOOR FRAME
1. Remove door from unit.
2. Remove door frame. (Remove all screws in frame)
3. Clean all old cement from frame and shelter assembly.
4. Apply refractory cement generously to frame. Fill corner joints in the shelter assembly.
5. Place frame into shelter assembly and clamp in place.
6. Install screws and tighten.
Note: If screws will not tighten up, it will be necessary to drill holes out and install 1/4” bolts with nuts.
7. Remove clamps and clean any excess cement up.
8. Install door on furnace.
Содержание 300
Страница 8: ...6 ...
Страница 14: ...12 ...
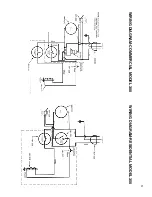
Страница 23: ...21 WIRING DIAGRAM COMMERCIAL MODEL 300 WIRING DIAGRAM RESIDENTIAL MODEL 350 ...

