COPY RIGHTS ©2004
QWIK-Fix
-
Publications
™
At no time does QWIK-Fix-Publications or its licensees permit the copying in any format written or electronic of any of the data provided in any of their
publications
QWIK-Fix
-
Publications
™
5:1
Brother TZ1 B651
IMPORTANT !!!
SWITCH THE MACHINE OFF BEFORE PROCEEDING WITH THE ADJUSTMENTS
Hook Timing
1. Remove the needle plate, feed dog and presser foot.
2. Insert a new needle(Long groove to the front. facing you)
3. Set the needle bar alignment to the central position
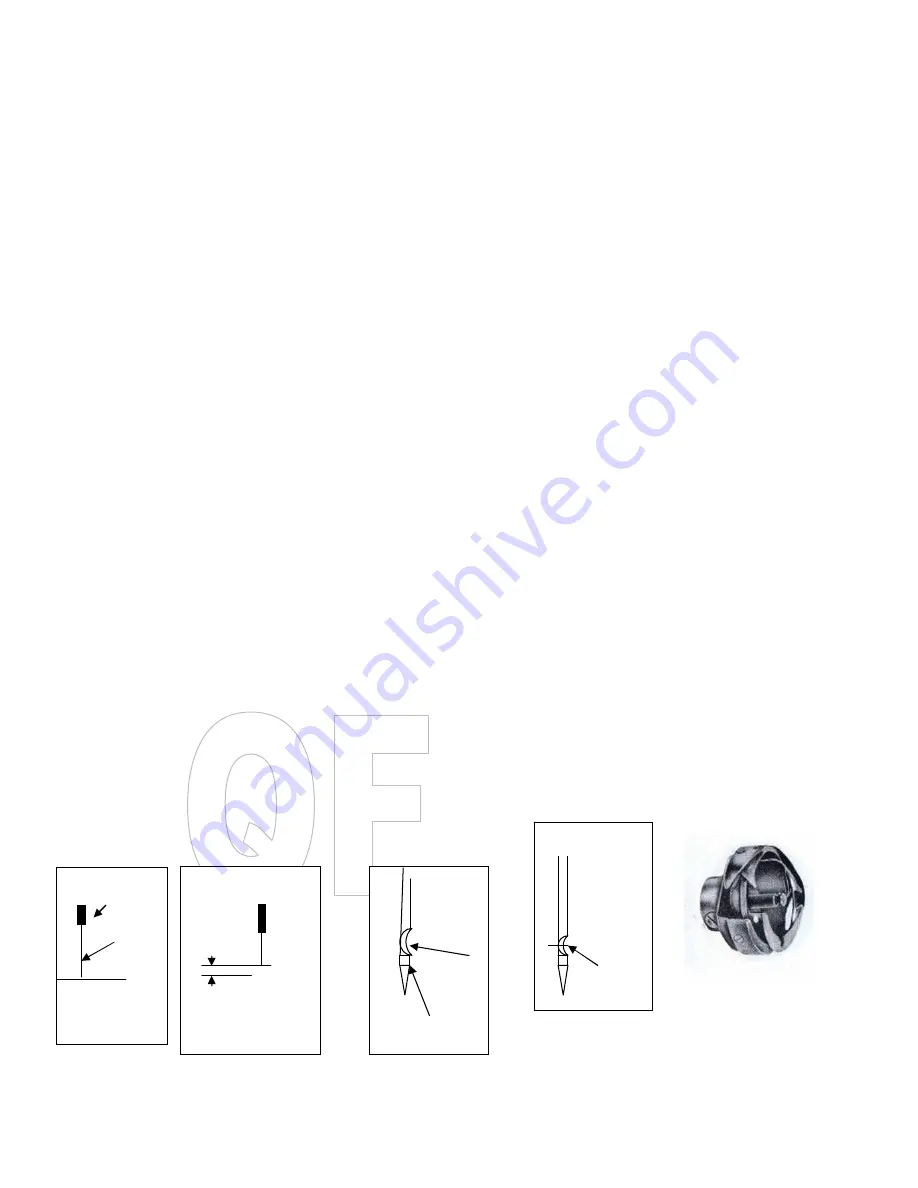
4. Turn the hand wheel towards you(NEVER AWAY FROM YOU) until the needle reaches the bottom of its stroke. Fig
1STOP!
5. Continue turning the hand wheel towards you until the needle has lifted approximately 2/3mm from the bottom of its
stroke. Fig 2.STOP!
6. At this point the hook point should be in line with the centre of the needle Fig 3.If it is the hook timing is correct and
proceed to the next section 5:2 lateral hook adjustment. If the timing is incorrect continue as follows.
7. Slacken the screws that hold the hook to the drive shaft and “PINCH TIGHTEN” one screw.
8. Turn the hand wheel towards you until the needle reaches the bottom of its stroke Fig 1.STOP!
9. Continue turning the hand wheel towards you until the needle has risen 2/3mm from the bottom of its stroke Fig 2.STOP!
10. Rotate the hook so that the point aligns centrally to the needle Fig 3..ENSURE THAT THE AIR GAP BETWEEN THE
HOOK POINT AND THE NEEDLE IS NO MORE THAN 0.02mm Fig 4 (paper thickness) Tighten all screws. That’s how
easy the hook timing is….
11. Proceed to section 6:2 needle bar height adjustment.
Fig 1
Fig 2
Fig 3
(side view)
Fig 4
(side view)
Needle bar
Needle
Bottom Of
Needle
bar Stroke
2/3mm Lift
Bottom
Timed
Hook
Eye of
Needle
Air Gap
Max
0.2mm
Hook
Point


