background image

[Chain Print]

Use this setting when printing several labels with 
minimum margins.

1.

Enter text.

2.

Press 

, then [Copies: ] appears.

3.

Press

/

 or enter a number with 

number keys to select the number of copies.

4.

Press 

. Printing starts, and then the 

message "Feed OK?" appears.

5.

Press 

 to enter more text.

6.

Clear the text, enter the text for the next label, 

and then press 

.

7.

When the message "Feed OK?" appears after 

the last label is printed, press 

.

8.

After the tape is fed, press the cutter lever to 
cut off the chain of labels.

NOTE

• When you set [Chain Print], feed the tape before 

using the cutter otherwise a part of the text may 
be cut off. 

• When you set [Half] or [Narrow], the displayed 

label length is the length from the printed dots 
( ) to the end of the label. Cut along the printed 
dots (:) with scissors.

• To print more than one copy of a label with 

minimum margins, set the margin to [Narrow].

• Do not pull the tape since this may damage the 

tape cassette.

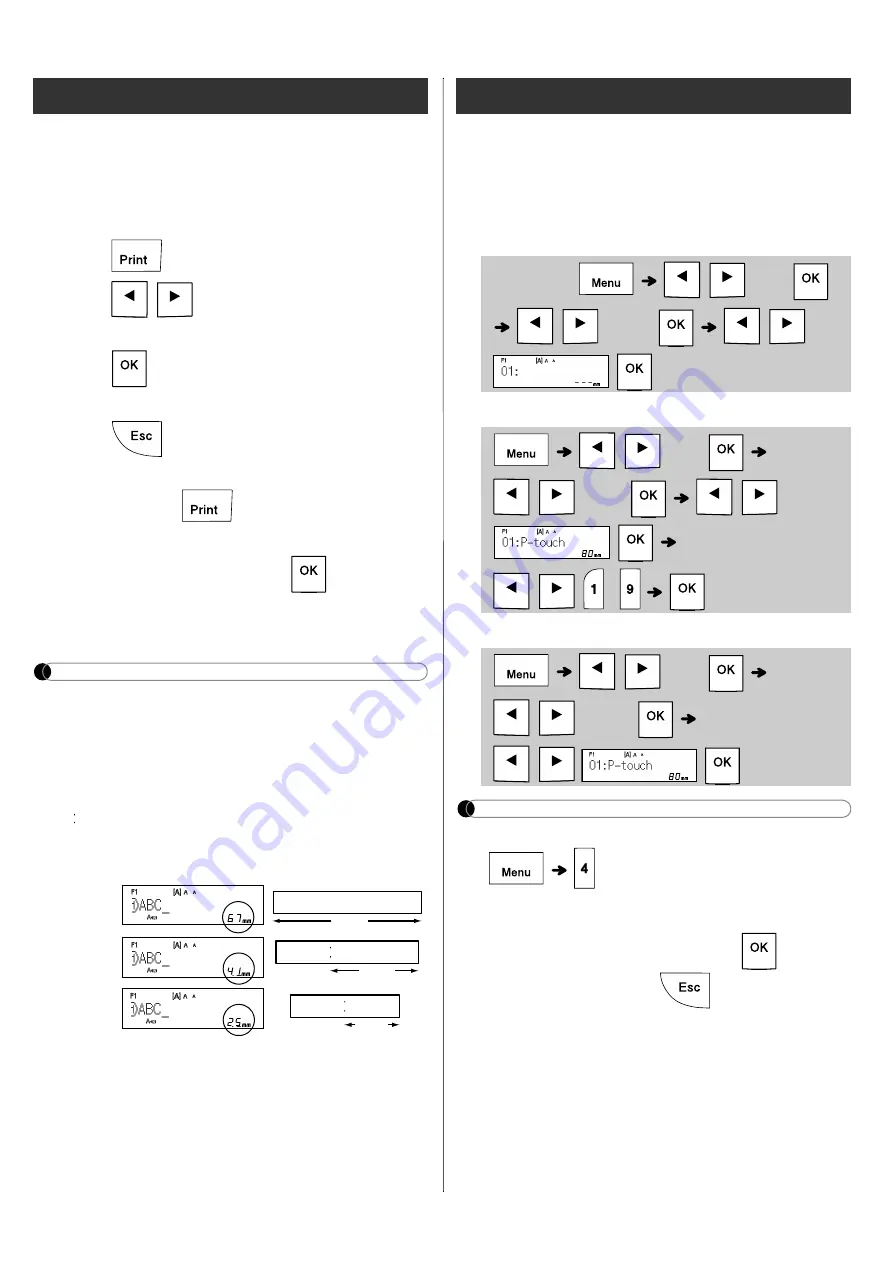
You can save up to 15 labels and recall them for 
printing at a later date. A maximum of 80 
characters can be saved per file, a maximum of 
1200 characters can be saved in total memory. 
You can also edit and overwrite the stored labels.

X

Save

X

Print

X

Open

NOTE

• You can also enter the File menu by pressing 


.

• If you try to store a label when there is already a 

label stored to that number, a message 

“Overwrite OK?” appears. Press 

 to save 

your new label. Press 

 to cancel.

• You must type text before starting the save 

function.

Printing Labels (continued)

LCD

Label image

Full

Half

Narrow

67 mm

ABC

41 mm

ABC

25 mm

ABC

 Saving Label Files

Enter Text 


/

 [File] 


/

 [Save] 


/

/

 [File] 


/

 [Print] 


/


[Copies: 

]

/

/

 - 


/

 [File] 


/

 [Open] 


/

Содержание P-TOUCH H110

Страница 1: ...English User s Guide H110 ...

Страница 2: ...elling machine you can createa widevariety of custom self adhesive labels This machine uses Brother TZe tapes from 3 5 mm to 12 mm widths TZe tape cassettes are available in many colours and sizes Visit www brother com for a complete list of tapes that work with your machine Read this manual carefully before starting and keep it in a handy place for future reference Printed in China LAK038001 Engl...

Страница 3: ...aline batteries Always replace all six batteries at the same time with brand new ones Users of Ni MH batteries Always replace all six batteries at the same time with fully charged ones 1 Insert the two hooks at the bottom of the cassette cover into the slots on the machine 2 Securely close the cassette cover making sure it snaps into place 3 AC adapter socket 4 ...

Страница 4: ...batteries or the optional AC adapter AD 24ES AD 5000ES For Australia New Zealand only and then press to turn the power on 2 Set the language The default setting is English 3 Set the unit of measurement The default setting is mm NOTE The machine automatically turns off if no keys are pressed within five minutes To cancel any operation press After pressing the machine displays Accepted to confirm yo...

Страница 5: ... Left Use with the Shift key to go to the top of the text 4 Escape key 5 OK key 6 Size key 7 Font key 8 Character key 9 Shift key 10 Caps key 11 Accent key 12 Tape cutter lever 13 Clear key 14 Print key 15 Preview key 16 Cursor key Right Use with the Shift key to go to the end of the text 17 Style key 18 Frame key 19 Cable key 20 Backspace key 21 Enter key 22 Symbol key 23 Space key 1 2 3 4 7 5 6 ...

Страница 6: ...els Move the cursor to where you want to start the next line and press Use either 9 mm or 12 mm wide tape for two line printing NOTE The return symbol is displayed when you press the Enter key indicating you have chosen to input a second line of text X Entering Accented Characters Press to add an accented character See the table ofaccented characters included in this guide To cancel an operation p...

Страница 7: ...ing Text NOTE X Preview You can preview the text before printing Pressing the Preview key displays a generated image of the label and may differ from the actual label when printed When the LCD cannot display all the text at once press to display the hidden text Press to leave the preview mode X Feeding Tape Feed This function feeds approximately 25 mm of blank tape Entering Text continued Width No...

Страница 8: ...abels you can print at one time depend on the initial number Example To print copies of a label containing a serial number 0123 0124 and 0125 Select the highest number you want to be printed when setting the number Mirror Example Follow the instructions below after entering J SMITH if you want to Mirror Print J SMITH Use clear tape in Mirror so you can read the labels correctly from the opposite s...

Страница 9: ...printed dots to the end of the label Cut along the printed dots with scissors To print more than one copy of a label with minimum margins set the margin to Narrow Do not pull the tape since this may damage the tape cassette You can save up to 15 labels and recall them for printing at a later date A maximum of 80 characters can be saved per file a maximum of 1200 characters can be saved in total me...

Страница 10: ...ted graphic NOTE Press the Space key to return to the initial setting for Label Length mode The initial setting is Auto To clear the text move the cursor to the right side where you want to clear and then press To clear all text press then All Clear appears Press to clear Press to cancel You cannot set the Font Size Style and Frame while entering text If you set the longer label length than the de...

Страница 11: ...ing Pattern Label templates Example NOTE Press the Space key to return to the initial setting for Label Length mode The initial setting is 100 mm These templates are available when using 12 mm wide tape cassettes You cannot edit the templates To exit templates and return to the text input screen do one of following a Press b Press to select Exit and then press when Print appears To preview labels ...

Страница 12: ...s on the tape width number of characters and number of input lines When characters reach a minimum size the selected font defaults to a custom font based on the Helsinki style This allows you to print labels using the smallest text possible on narrow or multi line labels 4 Font Key Select the settings Font Helsinki Brussels Florida Size Key Select the settings Size Large Medium Small Style Key Sel...

Страница 13: ...nit green in the direction of the arrows shown in the illustration 2 2 Install the new cutter unit Push it in until it snaps into place Symbol key History 1 Basic Pictograph Select category Select a symbol Punctuation Space key Unit Mathematics Greek Letter Brackets Number Arrows Shape Fun Space key Kitchen Smiley Garden Clothing DIY Vehicle School Sports Office Animal Signs Holiday Datacom AV Foo...

Страница 14: ...ys blank after you have turned on the machine Check that you installed the batteries with the positive and negative ends in the correct position If the batteries are low replace them with six new AAA alkaline batteries Do not use old and new batteries together or mix alkaline batteries with other battery types Check that you connected the AD 24ES AD 5000ES For Australia New Zealand only adapter co...

Страница 15: ...duct please see the details listed below Product Support Centre Australia Brother International Aust Pty Ltd Phone 02 8875 6000 Fax 02 9870 7223 Solutions Site support brother com Web Site www brother com au E mail To submit an e mail enquiry visit www brother com au go to Service and Support area and follow the prompts Our Technical Support Consultants are available 5 days a week by phone during ...

Страница 16: ...Smiley Holiday Food Drink ...

Страница 17: ... Images are only for illustrative purposes ...

Отзывы: