


•
If you configure your machine using EAP-TLS authentication, you must install the client certificate
issued by a CA before you start configuration. Contact your network administrator about the client
certificate. If you have installed more than one certificate, we recommend writing down the certificate
name you want to use.
•
If you verify your machine using the common name of the server certificate, we recommend writing
down the common name before you start configuration. Contact your network administrator about the
common name of the server certificate.
2. Press
.
3. Press
a
or
b
to select the
[Find Wi-Fi Network]
option, and then press
OK
.
4. When
[Enable WLAN?]
appears, press
c
.
The wireless setup wizard starts. To cancel, press
d
.
5. The machine will search for your network and display a list of available SSIDs. Press
a
or
b
to select the
[<New SSID>]
option, and then press
OK
.
6. Enter the SSID name, and then press
OK
.
For more information about how to enter text, see
Related Information
.
7. Select the Authentication Method, and then press
OK
.
8. Do one of the following:
•
If you selected the
[EAP-FAST]
,
[PEAP]
or
[EAP-TTLS]
option, select the Inner Authentication method
[NONE]
,
[CHAP]
,
[MS-CHAP]
,
[MS-CHAPv2]
,
[GTC]
or
[PAP]
, and then press
OK
.
Depending on your Authentication method, the Inner Authentication method selections differ.
Select the encryption type
[TKIP+AES]
or
[AES]
, and then press
OK
.
Select the verification method
[No Verification]
,
[CA]
or
[CA + Server ID]
, and then press
OK
.
-
If you selected the
[CA + Server ID]
option, enter the server ID, user ID and password (if
required), and then press
OK
for each option.
-
For other selections, enter the user ID and Password, and then press
OK
for each option.
If you have not imported a CA certificate into your machine, the machine displays
[No Verification]
.
•
If you selected the
[EAP-TLS]
option, select the encryption type
[TKIP+AES]
or
[AES]
, and then press
OK
.
The machine will display a list of available Client Certificates, and then select the certificate.
Select the verification method
[No Verification]
,
[CA]
or
[CA + Server ID]
, and then press
OK
.
-
If you selected the
[CA + Server ID]
option, enter the server ID and user ID, and then press
OK
for each option.
-
For other selections, enter the user ID, and then press
OK
.
9. The machine attempts to connect to the wireless device you have selected.
If your wireless device is connected successfully, the machine's LCD displays
[Connected]
.
You have completed the wireless network setup. To install the drivers and software necessary to use your
machine, go to your model's
Downloads
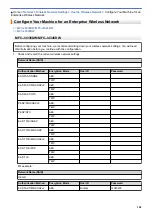
MFC-J4535DW
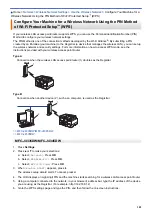
Before configuring your machine, we recommend writing down your wireless network settings. You will need
this information before you continue with the configuration.
1. Check and record the current wireless network settings.
309
Содержание MFC-J4335DW
Страница 35: ...Home Paper Handling Paper Handling Load Paper Load Documents 28 ...
Страница 58: ...Related Topics Load Envelopes in the Paper Tray 1 51 ...
Страница 87: ...Home Print Print from Your Computer Mac Print from Your Computer Mac Print Using AirPrint 80 ...
Страница 158: ... WIA Driver Settings Windows 151 ...
Страница 161: ...Home Scan Scan from Your Computer Mac Scan from Your Computer Mac Scan Using AirPrint macOS 154 ...
Страница 243: ...Related Information Store Fax Numbers 236 ...
Страница 275: ...Home Fax PC FAX PC FAX PC FAX for Windows PC FAX for Mac 268 ...
Страница 285: ...Related Information Configure your PC Fax Address Book Windows 278 ...
Страница 294: ...Related Information Receive Faxes Using PC FAX Receive Windows 287 ...
Страница 295: ...Home Fax PC FAX PC FAX for Mac PC FAX for Mac Send a Fax Using AirPrint macOS 288 ...
Страница 322: ...Related Topics Wi Fi Direct Overview Configure a Wi Fi Direct Network Manually 315 ...
Страница 333: ...Related Topics Access Web Based Management Synchronize Time with the SNTP Server Using Web Based Management 326 ...
Страница 368: ...Home Security Use SNMPv3 Use SNMPv3 Manage Your Network Machine Securely Using SNMPv3 361 ...
Страница 370: ...Related Topics Access Web Based Management 363 ...
Страница 374: ...Related Topics Access Web Based Management Configure Certificates for Device Security 367 ...
Страница 380: ...Related Information Configure an IPsec Template Using Web Based Management 373 ...
Страница 394: ...Related Information Use Active Directory Authentication Related Topics Access Web Based Management 387 ...
Страница 425: ...Related Information Set Up Brother Web Connect 418 ...
Страница 469: ... Paper Handling and Printing Problems Clean the Paper Pick up Rollers for Paper Tray 2 462 ...
Страница 527: ...Related Topics Telephone and Fax Problems Other Problems 520 ...
Страница 532: ... Clean the Print Head Using Web Based Management 525 ...
Страница 540: ...Related Information Clean Your Brother Machine Related Topics Paper Handling and Printing Problems 533 ...
Страница 542: ...Related Topics Error and Maintenance Messages Paper Handling and Printing Problems 535 ...
Страница 588: ...Related Information Assign a Shortcut to an IC Card Related Topics Access Web Based Management 581 ...
Страница 623: ...Home Appendix Appendix Specifications Supply Specifications Brother Help and Customer Support 616 ...
Страница 634: ...Related Information Appendix 627 ...


