Brother MFC-9750 Скачать руководство пользователя страница 38

32

C H A P T E R   F O U R

Connecting the Brother MFC-9750 to
a PC Using a Parallel Cable

1

Make sure you have an IEEE 1284 compliant, bi-directional parallel
interface cable.

2

Unplug the machine power cord from the electrical outlet before
connecting the parallel interface cable.

3

Make sure your computer is off and unplugged from electrical power
before you connect the interface cable.
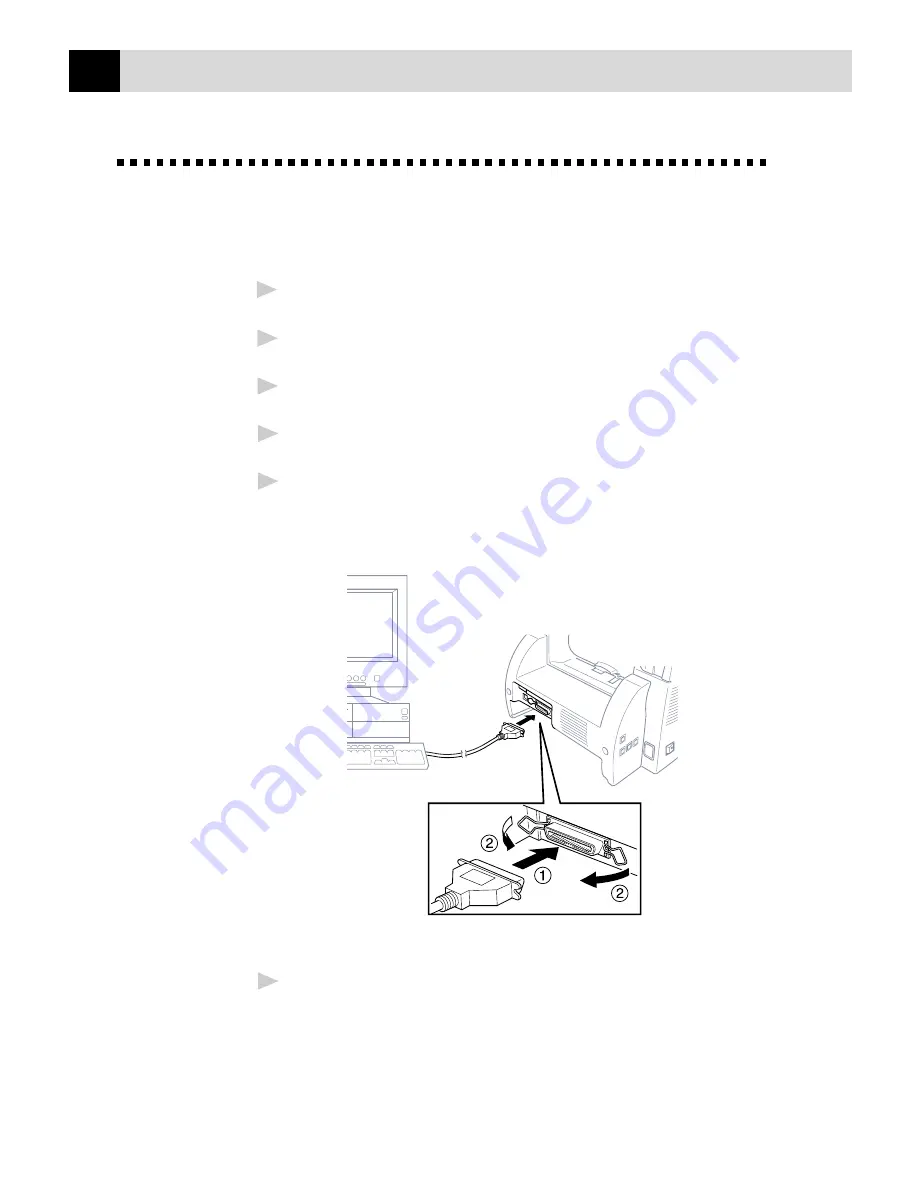
4

Connect the interface cable to the parallel interface port on the back
of the machine, and secure with the wire clips.

5

Connect the interface cable to the printer port of your computer, and
secure with the two screws. (To locate your computer’s printer port,
see your computer’s user guide.)

6

Ensure the machine is switched on before you plug the PC into the
electric socket, then switch on the PC.

Содержание MFC-9750

Страница 1: ... 2in1 Copier Printer MFC 9750 OWNER S MANUAL ...

Страница 2: ... 1999 Brother Industries Ltd ...

Страница 3: ... 10 Acceptable Paper 10 Connect the Power Cord 11 Initial Setup 12 Setting the Beeper Volume 12 Setting the Sleep Mode 12 Setting the Print Density 13 Toner Save 13 Checking the Drum Life 13 Printing a System Set up List 14 Optional Lower Tray 14 Turning On Lower Tray 14 Setting Paper Size 14 Setting Tray Usage 15 3 Making Copies Inserting Originals for Copying 17 Using the ADF Automatic Document ...

Страница 4: ...or Windows 95 98 and Windows NT Workstation Version 4 0 30 For Windows 3 1x 31 Software for your MFC 9750 31 Software Drivers 31 Connecting the Brother MFC 9750 to a PC Using a Parallel Cable 32 Installing MFC 9750 Printer Driver 33 If you are using Windows NT Workstation Version 4 0 33 If you are using Windows 3 1 or 3 11 34 If you are using Windows 95 or 98 34 Installing the Maintenance Utility ...

Страница 5: ... Feed Slot 45 Output Tray 45 6 Optional Accessories Memory Board 47 Optional Memory for the Printing 47 Optional Paper Tray 47 7 Important Information Important Safety Instructions 49 IEC 825 Specification 51 For Your Safety 52 IEC 825 Laser Class 52 Disconnect device 52 IMPORTANT 52 8 Troubleshooting and Maintenance Troubleshooting 53 Error Messages 53 Document Jams and Paper Jams 55 Document Jam...

Страница 6: ...he Document is Printed 65 Regular Maintenance 65 Cleaning the Scanner 65 Cleaning the Printer 66 Cleaning the Drum Unit 67 Replacing the Toner Cartridge 68 Toner Empty Indicator 68 Steps for Replacing Toner Cartridge 69 Drum Life Considerations for Your Brother Machine 72 Replacing the Drum Unit 73 Packing and Shipping the MFC 76 9 Specifications Printer Specifications 79 Electrical and Environmen...

Страница 7: ... able to find information about a specific feature or function by checking the Index at the back of this manual Also throughout this manual you will see special symbols alerting you to important information cross references and warnings Illustrations of some screen displays also help you choose the correct key presses Symbols Used InThis Manual Note or additional information The MFC may be damaged...

Страница 8: ...orary Setting Press to illuminate the LED that suits the type of original Auto Select when the original contains both text and photographs Text Select when the original contains only text Photo Select when the original is a picture 7 Option and Indicators Temporary Setting You can change the layout of copies on the print media Press this key until the Option Indicator you want is lit 4in1 Save pap...

Страница 9: ...ted paper size 10 Paper Size Press this key to identify the size of paper in the paper cassette that should be used for copying 11 Contrast Temporary Setting Each key press changes the contrast setting Choose from seven degrees of light to dark Print 12 Job Cancel Terminates a print job in process and ejects the printout 13 Menu Lets you access the function and programing mode LCD Liquid Crystal D...

Страница 10: ...OW 2 SLEEP MODE 05 MIN 3 PRINT DENSITY 1 LOW2 MID3 HIGH 4 TONER SAVE 1 ON 2 OFF 2 OFF 5 PAGE COUNTER 6 DRUM LIFE REMAINING 100 7 LOWER TRAY 1 ON 2 OFF 2 OFF 8 SYSTEM SETUP 2 PRINT OPTIONS 1 INTERNAL FONT 2 CONFIGURATION 3 TEST PRINT 3 RESET PRINTER 1 FACTORY RESET 2 HEX DUMP MODE Paper Size Sub Menu Options Factory Setting 1 UPPER LETTER EXECUTIVE A4 A4 A5 A6 B5 B6 2 LOWER LETTER EXECUTIVE A4 A4 A...

Страница 11: ... Paper Cassette Owner s Manual Drum Unit Assembly TN 6300 Power Cord IEEE 1284 Compliant Bi directioned Cable CD ROM 2 C H A P T E R T W O Assembly Whenever you transport the MFC use the packing materials that came with your MFC and pack the MFC correctly ...

Страница 12: ...cked Do not place near heaters air conditioners water chemicals or refrigerators Do not expose the MFC to direct sunlight excessive heat moisture or dust Do not connect your MFC to electrical outlets on the same circuit as large appliances or other equipment that might disrupt the power supply Avoid interference sources such as speakers or the base units of cordless phones Ensure the airflow from ...

Страница 13: ...Lock Lever Caution If CHECK SCAN LOCK appears on the LCD immediately release the scanner lock lever If you see MACHINE ERROR AF or AE stop operation and contact your Brother dealer for service Install the Drum Unit Assembly withToner Cartridge 1 Unpack the drum unit assembly including the toner cartridge and gently rock it from side to side five or six times To prevent damage to the drum do not ex...

Страница 14: ...8 C H A P T E R T W O 2 Open the front cover of the machine 3 Insert the drum unit assembly into the machine 4 Close the front cover ...

Страница 15: ...e the paper width and length adjusters to the position for the paper size you are using 3 Fan the paper well Load paper in the paper cassette Press down on the paper to flatten it in all four corners keeping the paper level below the guide The cassette can hold up to 250 sheets of 75 g m2 20 lb paper Maximum Paper Height Guide ...

Страница 16: ...0 13 mm Manual Feed Slot The manual feed slot is above the multi purpose paper cassette Load paper or an envelope one at a time You do not have to remove paper from the paper cassette Use the manual feed slot to print or copy on an envelope label card stock or thicker paper Manual Feed Slot Acceptable Paper Size 70 x 116 mm 216 x 356 mm Weight 64 g m2 158 g m2 Thickness 0 08 0 20 mm ...

Страница 17: ...READY 100 Power Cord NOTICE The MFC must only be used with the AC cord supplied which is fitted with an earthed plug Do not touch any parts that are moving Lightning and power surges may damage this product We recommend that you use a quality surge protection device or unplug the power cord during a lightning storm ...

Страница 18: ...LOW3 HIGH 6 Press Stop to exit Setting the Sleep Mode Setting the Sleep Mode reduces power consumption while the machine is idle You can choose how long the machine is idle from 00 to 15 minutes before it drops into sleep mode The timer automatically resets when the machine receives PC data or makes a copy The default setting is 05 minutes 1 Press Menu until you see 1 INITIAL SETUP 2 Press 1 on th...

Страница 19: ...ve to ON print appears somewhat lighter The default setting is OFF 1 Press Menu until you see 1 INITIAL SETUP 2 Press 1 on the numeric keys to select it 3 Press Menu repeatedly until you see 4 TONER SAVE 4 Press 4 on the numeric keys to select it 5 Press a numeric key to select the option you want 1 ON 2 OFF 6 Press Stop to exit Checking the Drum Life You can see the percentage of the drum s life ...

Страница 20: ...tched ON you can set the paper size for each cassette 1 Press Menu until you see 1 INITIAL SETUP 2 Press 1 on the numeric keys to select it 3 Press Menu repeatedly until you see 7 LOWER TRAY 4 Press 7 on the numeric keys to select it 5 Press 1 on the numeric keys to select ON 1 ON 2 OFF 6 Press Stop to exit Setting Paper Size You can use a variety of sizes of paper in the paper cassette s letter A...

Страница 21: ...tte Choose 1 UPPER ONLY if you want to keep special paper in Lower Tray and control when it is used From the Windows Printer Driver you can override this setting and print on the paper in Lower Tray if necessary When paper is out in Upper Tray the LCD displays CHECK PAPER 1 and will wait for paper to be replaced in Upper Tray before printing Choose 2 LOWER ONLY to reverse this process 1 Press Pape...

Страница 22: ...16 C H A P T E R T W O ...

Страница 23: ...hen using the ADF Always fan the pages well before placing them in the feeder DO NOT use curled wrinkled folded or ripped paper or paper with staples paper clips paste or tape attached DO NOT use cardboard newspaper or fabric To copy or scan this kind of document see Using the Glass Platten in this chapter Make sure documents written with ink are completely dry Documents must be from 14 7 to 21 6 ...

Страница 24: ...at a time or pages of a book Documents can be letter or A4 size 21 6 cm to 29 7 cm To use the glass platten the ADF must be empty You can make multiple copies however if you want them sorted you must use the ADF Documents are Face Down 1 Lift the document cover 2 Using the document guidelines on the left center the document FACE DOWN on the glass platten 3 Close the document cover If the document ...

Страница 25: ...st to make copies darker or lighter There are seven degrees of contrast The default setting is normal To lighten or darken the contrast press Contrast repeatedly until you see the setting you want 100 100 100 Lightest Ratio Contrast Ratio Contrast Ratio Contrast Normal Darkest Paper Size Use Paper Size to identify the size of the paper in the paper cassette You can select LETTER A4 B5 B6 A5 A6 or ...

Страница 26: ... to use the numenric keys to enter any percentage between 99 and 25 78 Ratio Contrast 4 Press Copy Selecting Recomended Ratio A4 B5 87 A4 A5 A5 A6 71 B5 B6 Enlarge Temporary Setting 1 Place the document s face up in the feeder or face down on the glass platten 2 Using the numeric keys enter the number of copies 3 Press Enlarge repeatedly until you see the enlargement ratio you want 100 120 125 141...

Страница 27: ...up in the feeder or face down on the glass platten 2 Press Copy Mode until the Photo LED is illuminated 3 Using the numeric keys enter the number of copies you want up to 99 4 Press Copy Basic Copy Operations Copying One Page 1 Insert the document face up in the feeder or face down on the glass platten 2 If necessary use the Copy keys to change the setting 3 Press Copy Do NOT pull on the paper whi...

Страница 28: ...ace up in the feeder 2 Press Sort 3 Using the numeric keys enter the number of copies you want up to 99 4 If necessary use the Copy keys to change the settings 5 Press Copy Single or Multiple Copies Using the Glass Platten If you want to sort multiple copies use the ADF See Sorting Multiple Copies Using the ADF in this chapter 1 Lift the Document Cover Document Cover White Film Glass Platten 2 Usi...

Страница 29: ... I E S Special Copy Options You can save paper by copying either two or four pages onto one page 4in1 Press Option repeatedly until the 4in1 LED is illuminated 2in1 Press Option repeatedly until the 2in1 LED is illuminated ...

Страница 30: ...ocument face up in the feeder or face down on the glass platten 2 Using the numeric keys enter the number of copies 3 Press Option repeatedly to select 4in1 2in1 or POSTER 4 Press Copy IfYou Get a Memory Full Message If the memory becomes full while you are scanning a document to be copied the screen displays MEMORY FULL P 01 PRESS STOP KEY If you were scanning the first page to be copied press St...

Страница 31: ... MFC 9750 to a PC With a USB Cable in this chapter If you don t have a USB cable see Connecting the Brother MFC 9750 to a PC Using a Parallel Cable in this chapter Computer Requirements Recommended system requirements for the communication software suite provided are Windows 3 1 3 11 95 98 NT Workstation Version 4 0 IBM PC Pentium 120 200 recommended or higher 16 MB Ram 32 MB Highly Recommeded 50 ...

Страница 32: ... standard USB cable Or to set up the parallel interface instead please see Connecting the Brother MFC 9750 to a PC Using a Parallel Cable in this chapter 1 After you have set up the MFC 9750 and checked that it is working properly make sure the machine is turned on and the PC is turned off 2 Connect the USB cable to both the machine and PC 3 Turn on your PC When the Add New Hardware Wizard appears...

Страница 33: ... U T E R T O W O R K T O G E T H E R 4 Select Recommended and click Next Installing Brother Printer Driver Using USB Cable 1 Insert the Printer driver CD ROM 2 Select Specify a location and remove the other check marks then click Browse to locate the file ...

Страница 34: ...28 C H A P T E R F O U R 3 Double click on the CD icon and click on the Win98usb folder then click OK 4 Click Next 5 Select Recommended and click Next ...

Страница 35: ... E A N D C O M P U T E R T O W O R K T O G E T H E R 6 Confirm the choice is Brother MFL Pro Printer II and click Next 7 Select BRUSB USB Printer Port and click Next 8 Type Brother MFL Pro Printer II as the name of printer and click Finish ...

Страница 36: ...e Fonts more types of fonts will be available for Windows applications ForWindows 95 98 andWindows NT Workstation Version 4 0 1 Insert the Brother CD ROM drive for True Type Fonts 2 Click on Start then Settings and select Control Panel 3 In the Control Panel window double click on the Fonts folder 4 In the Fonts window select Install New Font from the File menu 5 Select your CD ROM drive and selec...

Страница 37: ...e is provided to optimize the use of your MFC 9750 the Brother printer driver is provided The software can run under Windows 3 1 3 11 and 95 98 and Windows NT Workstation Version 4 0 Printer Driver The printer driver creates print data from the applications controls transmission and makes settings for printing It is necessary to install the MFC 9750 printer driver into your PC for printing Mainten...

Страница 38: ...e your computer is off and unplugged from electrical power before you connect the interface cable 4 Connect the interface cable to the parallel interface port on the back of the machine and secure with the wire clips 5 Connect the interface cable to the printer port of your computer and secure with the two screws To locate your computer s printer port see your computer s user guide 6 Ensure the ma...

Страница 39: ...ou see Update Device Driver Wizard Click Next to bypass the Windows Plug and Play Printer Driver screens followed by Finish If you are using Windows 98 you may see the Add New Hardware Wizard during startup follow the instructions from the installer then click Next Click Finish when it appears on the screen Installing MFC 9750 Printer Driver If you are usingWindows NT WorkstationVersion 4 0 1 Inse...

Страница 40: ... ROM Drive 2 From the Program Manager click on File then Run 3 Enter X win31 setup where X is your CD ROM Drive If you are usingWindows 95 or 98 1 Insert the CD ROM for the MFC 9750 printer driver into your CD ROM Drive 2 Click the Start button in the Task bar 3 Select Run 4 Enter X win9598 setup where X is your CD ROM Drive ...

Страница 41: ...our application software the remote printer console program HP LaserJet IIP HP LaserJet IIP emulation mode HP LaserJet II Auto emulation selection Be sure to choose the proper printer driver in your application software Be sure the printing resolution is set to 300 dpi in your DOS application software What Does the Remote Printer Console Do The Remote Printer Console RPC is a utility program that ...

Страница 42: ...s to install the remote printer console program 1 Make sure your machine is connected to your computer and it is set to Online 2 Start your computer and go to the DOS prompt If you are in Windows exit and return to the DOS prompt 3 Insert the Brother CD ROM into your CD ROM drive substitute your appropriate drive letter for X 4 At the DOS prompt C type X X is the letter of your CD ROM drive and pr...

Страница 43: ...mulation mode When you use DOS application software or Windows 3 0 or earlier you can use the emulation mode of HP LaserJet IIP to operate the printer Use the Remote Printer Console program to control the emulation settings Remote Printer Console Program for DOS The CD ROM supplied with your machine provides you with Remote Printer Console RPC a utility program When you operate your computer in th...

Страница 44: ...he paper should be inserted into the cassette with the printable side face down Select the print command from your PC Your PC sends a print command and data to the machine The printer screen displays RECEIVING DATA If there are more pages the machine begins to print the next page automatically When the machine finishes printing all data it returns to online status You may select the proper paper s...

Страница 45: ... is possible that a paper jam may occur more frequently and the printer quality may be reduced Manual Feed Slot Your machine has a manual feed slot above the paper cassette You can load an envelope or special print media one at a time into this slot You do not have to remove paper from the paper cassette For information about acceptable paper see Printing on Envelops Thicker Paper and Card Stock i...

Страница 46: ...chine pulls it into position Manual Feed Slot Loading more than One Sheet of Paper 1 Open the Setup dialog box of the Windows printer driver and select Manual Feed in the Paper Source section Follow Steps 1 and 2 above to load the first page The machine starts printing automatically 2 After the first page is printed the screen displays MANUAL FEEDING Insert the next sheet of paper to resume printi...

Страница 47: ...ngle sheet of paper into the manual feed slot until the front edge touches the paper feed rollers Let go of the paper as the machine pulls it into position 4 Select manual feed mode in the printer driver 5 Send the print data as usual 6 After the machine ejects the printed page return to Step 3 to insert the next sheet of paper The machine will wait until you insert the next sheet of paper Repeat ...

Страница 48: ...in extension to support the printed pages To prevent the possibility of transparencies smudging as they stack in the output bin remove each transparency after it exits Print Operations from the Control Panel There are two Print keys on the control panel Job Cancel and Menu Job Cancel To stop and cancel a print job in progress press Job Cancel The printout will be ejected ...

Страница 49: ...keys to select it The MFC prints the list 5 Press Stop to exit Printing a Configuration List You can print a list of current settings for the printer 1 Press Menu repeatedly until you see 2 PRINT OPTIONS 2 Press 2 on the numeric keys to select it 3 Press Menu repeatedly until you see 2 CONFIGURATION 4 Press 2 on the numeric keys to select it The MFC prints the list 5 Press Stop to exit Printing aT...

Страница 50: ...ase choose 1 to restore the factory setting OR Press 2 to exit without making a change 6 Press Stop to exit Printing PC Data in Hexadecimal You can print data as hexadecimal values so that you can check data errors and problems If you select HEX DUMP MODE all PC data is printed hexadecimal 1 Press Menu repeatedly until you see 3 RESET PRINTER 2 Press 3 on the numeric keys to select it 3 Press Menu...

Страница 51: ... m2 20 lb Letter A4 paper 10 transparencies Manual Feed Slot Paper Type Paper Size cut sheet Letter A4 A5 B5 Executive 70 216 x 116 356 mm 2 75 8 5 x 4 57 14 inches envelopes COM 10 Monarch C5 DL post cards 70 216 x 116 356 mm 2 75 8 5 x 4 57 14 inches organizer Day Timer J K L 70 216 x 116 356 mm 2 75 8 5 x 4 57 14 inches labels and 70 216 x 116 356 mm 2 75 8 5 x 4 57 14 inches transparencies Rec...

Страница 52: ...46 C H A P T E R F I V E ...

Страница 53: ...ds Optional Memory for the Printing The MFC has 4 MB of memory Additional memory is useful and may be necessary if you want to download many different fonts or want to print a very complex document 8 MB ME8000 or 16 MB ME16000 of Optional Memory is available Standard Memory Optional Memory Total 8 MB 11 MB 3 MB or or 16 MB 19 MB Optional PaperTray You can purchase the Paper Tray accessory LT400 to...

Страница 54: ...48 C H A P T E R S I X ...

Страница 55: ...duct should never be placed near or over a radiator or heater This product should not be placed in a built in installation 7 This product should be operated from the type of power source indicated on the label If you are not sure of the type of power available consult with your dealer or local power company 8 This product is equipped with a 3 wire earthed plug This plug will fit into only an earth...

Страница 56: ...cing to qualified service personnel under the following conditions A When the power cord is damaged or frayed B If liquid has been spilled into the product C If the product has been exposed to rain or water D If the product does not operate normally when the operating instructions are followed Adjust only those controls that are covered by the operating instructions Improper adjustment of other co...

Страница 57: ...EN AND INTERLOCK OEFEATED AVOID DIRECT EXPOSURE TO BEAM CLASS 3B LASER PRODUCT USYNLIG LASER STRÅLING NÅR KABINETLÅGET STÅR ÅBENT UNGDÅ DIREKTE UDSÆTTELSE FOR STRÅLING KLASSE 3B LASER OSYNLIG LASERSTRÅLNING HÄR DENNA DEL ÄR ÖPPNAD OCH SPÄRRAR ÄR URKOPPLADE STRÅLEN ÄR FARLIG KLASS 3B LASER APPARAT AVATTAESSA JA SUOJALUKITUS OHITETTAESSA OLET ALTTIINA NÄKYMÄTTÖMÄLLE LASERSÄTEILYLLE ÄLÄ KATSO SÄTEESE...

Страница 58: ...ible IMPORTANT If the socket outlet is not compatible with the mains plug as fitted then remove the plug from the mains cord and fit an appropriate three pin plug If the replacement plug is intended to take a fuse then fit with the same fuse rating as the original If a moulded plug is severed from the power cord then it should be destroyed because a plug with cut wires is dangerous if plugged into...

Страница 59: ...APER The machine is out of paper or paper is not Refill the paper or remove the paper CHECK PAPER 1 properly loaded in the paper cassette and load it again CHECK PAPER 2 CHECK CASSETTE MFC cassette is not installed properly Install cassette properly CHECK LOWER CHECK UPPER CHECK SCAN LOCK The scanner lock is locked Release the scanner lock lever and press Stop If you see MACHINE ERROR AF or AE sto...

Страница 60: ... see any may be jammed inside the machine jammed paper or other item gently pull it out then close the front cover If the error message remains open and close the front cover again If the machine cannot reset itself and return to the ready prompt it will display MACHINE ERROR XX Please call your Brother dealer for service PRINTER JAM The recording paper is jammed in the MFC See Printer Jam in this...

Страница 61: ...te set of instructions to remove it Document Jam in theTop of the ADF Unit 1 Remove any paper from the document feeder that is not jammed ADF Cover 2 Lift the ADF cover 3 Pull the jammed document out to the left 4 Close the ADF cover 5 Press Stop Document Jam inside the ADF Unit 1 Remove any paper from the document feeder that is not jammed 2 Open the document cover ADF Unit ...

Страница 62: ...ou must find out where the paper is stuck WARNING Do not force the jammed paper from the paper tray because you may damage the machine and cause toner to scatter After you have used the machine some internal parts of the machine are extremely HOT When you open the top cover of the machine never touch the shaded parts shown in the following diagram Front view HOT HOT Rear view ...

Страница 63: ...ust the guides to fit 4 Press down the paper to flatten it in the paper cassette 5 Reinstall the paper cassette Paper is Jammed near the Drum Unit 1 Open the front cover 2 Remove the drum unit but do not force it if it cannot be removed easily Instead pull the edge of the jammed paper from the paper cassette 3 Gently pull out the jammed paper 4 Reinstall the drum unit 5 Close the front cover ...

Страница 64: ... rear cover 2 Pull out jammed paper When you have to pull paper out the back of the machine the fuser may get dirty with toner powder causing the next few printed page s to look messy Print a few copies of the test page until the pages print clearly 3 Close the rear cover ...

Страница 65: ... your document or reduce print resolution The machine prints the first couple of Your computer is not recognizing the printer s input buffer full signal pages correctly then some pages Please make sure you connect the printer cable correctly have text missing The machine cannot print full pages of Reduce the printer resolution Reduce the complexity of your document a document A MEMORY FULL and try...

Страница 66: ...ette may be out of paper or not properly installed LCD shows CHECK PAPER or If it is empty load a new stack of paper into the cassette If there is PRINTER JAM paper in the paper cassette make sure it is straight If the paper is curled you should straighten it Sometimes it is helpful to remove the paper turn the stack over and put it back into the paper cassette Reduce the amount of paper in the pa...

Страница 67: ...s referring to Regular Maintenance and Cleaning the Drum Unit in this chapter Make sure that a torn piece of paper does not remain on the scanner window Printed pages are marked regular Markings may disappear by themselves Try copying at multiple pages intervals to clear this problem Markings may occur if the machine has not been used for a long time A possible cause is that the surface of the dru...

Страница 68: ...ies their own bi directional device driver which will be installed into Windows 3 xx If you install two or more different bi directional device drivers into Windows they might conflict with each other and cause some problems Please make sure you have installed the machine driver by running SETUP EXE from your CD ROM drive as instructed on the CD ROM label The bi directional communication may be di...

Страница 69: ...pooler QP LPT1 wpsljqp dll To disable this function put a semicolon at the start of the sentence as follows spooler QP LPT1 wpsljqp dll Then open the file system ini by using the Notepad application You can find the following statement in the 386Enh section 386Enh device wpsljvpd 386 WPSLPT1 1 To disable this function put a semicolon at the start of the sentences as follows device wpsljvpd 386 WPS...

Страница 70: ...ut a semicolon at the start of the sentence as follows windows run C WINDOWS SYSTEM WPSIOMON Also you can find the following statement in the spooler section spooler QP LPT1 wpslbq dll To disable this function put a semicolon at the start of the sentence as follows spooler QP LPT1 wpslbq dll Then open the file system ini by using the Notepad application You can find the following statement in the ...

Страница 71: ...our reseller or Microsoft Support if you need help modifying your Windows Display selection or installing new Display Driver software Regular Maintenance Cleaning the Scanner Unplug the MFC and lift the document cover Clean the glass platten and white film with methylated spirit on a lint free cloth Document Cover White Film Glass Platten Lift the ADF unit Clean the white roller and the glass stri...

Страница 72: ...ly as it contains toner If toner scatters and your hands or clothes get dirty immediately wipe or wash it off with cold water 1 Open the front cover 2 Remove the drum unit assembly WARNING After you have used the machine some internal parts of the machine are extremely HOT When you open the top cover of the machine never touch the shaded parts shown in the diagram below Front view HOT 3 Gently cle...

Страница 73: ...e inside the drum unit by gently sliding the tab from right to left several times 2 Return the tab to the home position mark position before reinstalling the drum unit Home Position Tab Corona Wire CAUTION If you do not position the tab at the home position printed pages may have vertical stripes 3 Install the drum unit into the machine See the section Replacing the Drum Unit in this chapter 4 Clo...

Страница 74: ...ulations If you are not sure of them consult with Brother dealer for service Be sure to seal the toner cartridge tightly so toner powder does not spill out of the cartridge When discarding used toner cartridges keep them separate from domestic waste It is recommended that you clean the machine when you replace the toner Toner Empty Indicator When the toner cartridge is running low the display show...

Страница 75: ...e will be extremely HOT So never touch the shaded parts shown in the illustration below Front view HOT 1 Open the front cover and pull out the drum unit Place the drum unit on a drop cloth or large piece of disposable paper to avoid spilling and scattering the toner 2 Hold down the lock lever on the right and pull the toner cartridge out of the drum unit assembly Lock Lever ...

Страница 76: ...idge into the aluminium bag and discard it according to local regulations WARNING Wait to unpack the toner cartridge until immediately before you install it into the machine If a toner cartridge is left unpacked for a long period of time the toner life is shortened Using another brand of toner cartridge may void your warranty 4 Gently rock the toner cartridge from side to side five or six times 5 ...

Страница 77: ...to place Drum Unit Toner Cartridge 7 Clean the primary corona wire inside the drum unit by gently sliding the blue tab from right to left several times Return the blue tab to the home position before reinstalling the drum unit assembly Home Position Tab Corona Wire 8 Reinstall the drum unit into the machine and close the front cover ...

Страница 78: ...acing the drum will return the printing quality to its optimum level In order to maintain optimum print quality we also recommend that the drum is replaced after 18 months service To assist you the machine will advise when approximately 5 15 of the drum life remains by showing the message CHANGE DRUM SOON on the display This indication takes the number of pages printed and the total printing time ...

Страница 79: ...lays CHANGE DRUM SOON the drum unit is nearly at the end of its life Prepare a new drum unit to replace the current one You may need to order one from your Brother dealer Even if the display shows CHANGE DRUM SOON you may be able to continue to print without replacing the drum unit for a while However if there is a noticeable deterioration in the output print quality even before CHANGE DRUM SOON i...

Страница 80: ...al parts of the machine are extremely HOT So please be careful Front view HOT Follow these steps to replace the drum unit 1 Open the front cover 2 Remove the old drum unit Place the drum unit on a drop cloth or large piece of disposable paper to avoid spilling and scattering the toner ...

Страница 81: ... and discard it according to local regulations If an unpacked drum unit is subjected to excessive direct sunlight or room light the unit may be damaged Handle the toner cartridge and the drum unit carefully because they contain toner If toner scatters and your hands or clothes get dirty immediately wipe or wash with cold water Do not touch the scanner window with your finger 5 Reinstall the toner ...

Страница 82: ...let 2 Lock the scanner lock lever The blue scanner lock lever is on the left side of the MFC Press it backward to lock it Lock Unlock Scanner Lock Lever Damage caused to your MFC by failure to lock the scanner lock lever before moving and shipping will void your warranty 3 Open the front cover 4 Remove the drum unit assembly WARNING Remove the drum unit and toner cartridge assembly Leave the toner...

Страница 83: ...he drum unit and toner cartridge assembly into the plastic bag and seal the bag completely 6 Close the front cover Put the front output bin extension into position 7 Wrap the machine in the plastic bag and place it in the original carton with the original packing material ...

Страница 84: ...78 C H A P T E R E I G H T 8 Place documents manual and printed material and the cables drum unit and toner cartridge assembly into the carton as shown below 9 Close the carton and tape it shut ...

Страница 85: ...ing Windows 98 Only Memory 4 MB Printer Method Electrophotography by semiconductor laser beam scanning Resolution 600 dots inch Print Quality Normal printing mode Economy printing mode saves up to 50 of the normal toner usage Print Speed 12 pages minute when loading letter size or A4 paper from the multi purpose paper cassette Print Media Toner cartridge Life Expectancy Up to 6 000 pages high yiel...

Страница 86: ...lowable 10 32 5 C 50 90 5 F Storage 0 40 C 32 104 F Warm Up Max 45 seconds at 23 C 73 4 F First Print 15 seconds when loading A4 size paper for the paper cassette Power Source 220 240V AC 50 60Hz Power Consumption Average Operating Copying 330 W Peak 850 W 25 C Sleep 14 W or less Stand by 60 W or less Noise Operating 50 dB A or less Stand by 39 dB A or less Humidity Operating 20 to 80 without cond...

Страница 87: ...4 DATA 3 Input 22 0V S G 5 DATA 4 Input 23 0V S G 6 DATA 5 Input 24 0V S G 7 DATA 6 Input 25 0V S G 8 DATA 7 Input 26 0V S G 9 DATA 8 Input 27 0V S G 10 ACKNLG Output 28 0V S G 11 BUSY Output 29 0V S G 12 PE Output 30 0V S G 13 SLCT Output 31 INPUT PRIME Input 14 AUTO FEED Input 32 FAULT Output 15 N C 33 N C 16 0V S G 34 N C 17 0V S G 35 N C 18 5V 36 SLCT IN Input Resident Fonts The following bitm...

Страница 88: ...se ISO Latin 1 ISO11 Swedish ECMA 94 HP Spanish ISO60 Norwegian 1 ISO17 Spanish ISO61 Norwegian 2 ISO10 Swedish ISO4 UK ISO16 Portuguese ISO25 French ISO84 Portuguese ISO69 French ISO85 Spanish HP German PC 8 ISO21 German PC 8 D N ISO15 Italian PC 8 Turkish ISO6 ASCII PC 850 Legal PC 852 ISO2 IRV PC 860 PC 863 PC 865 If you want to know which characters are in each symbol character set print the C...

Страница 89: ... table shows characters available only in the corresponding character set The numbers at the top of the table are code values with which characters are to be replaced in the Roman 8 character set For other characters see character set of Roman 8 ...

Страница 90: ...84 C H A P T E R N I N E ...

Страница 91: ...Copy Enlarge 20 Copy Multiple 22 Copy Paper Size 19 Copy Reduce 20 Copy Setting 19 Copy Sort 22 Copy Mode 21 D Default Settings 44 Difficulties 59 Document Jam 55 Drum Life 13 72 Drum Unit Cleaning 67 Drum Unit Installing 7 Drum Unit Replacing 73 E Error Messages 53 G Glass Platten 18 H Hexadecimal 44 I Internal Font List 43 J Job Cancel 42 L Loading Paper 9 Lower Tray 14 M MACHINE ERROR AF or AE ...

Страница 92: ...er 45 Paper Cassette 38 Paper Size 4 14 Power Cord 11 Print Density 13 Print Operations 42 Printer Driver 33 PRINTER JAM 60 Printer Jam 56 S Scanner Lock Lever 7 Sleep Mode 12 Software Drivers 31 T Table of Options 4 Test Page 43 Toner Cartridge Replacing 68 Toner Empty Indicator 68 Toner Save 13 Tray Usage 15 U USB Cable 26 ...

Страница 93: ...87 AccessoryList Description Model Name TN 6300 Laser Toner Cartridge TN 6600 Laser Toner Cartridge DR 6000 Laser Drum Unit ME 8000 8MB memory Board ME 16000 16MB memory Board LT 400 Optional Paper Tray ...

Страница 94: ...88 A C C E S S O R Y L I S T ...

Страница 95: ...oduct is in conformity with the following normative documents Safety IEC 60950 2nd Edition 1991 Amd 1 1992 Amd 2 1993 Amd 3 1995 Amd 4 1996 EMC EN55022 1998 EN55024 1998 EN61000 3 2 EN61000 3 3 following the provisions of the Low Voltage Directive 73 23 EEC and the Electromagnetic Compatibility Directive 89 336 EEC as amended by 91 263 EEC and 92 31 EEC ...

Страница 96: ...UK IRE LE1488004 Printed in U K Manufactured by Brother Industries UK Ltd whose quality system is registered by BSI BSI Certificate of registration No FM24218 ...

Отзывы: