background image

Routine maintenance 

27

A

Cleaning the corona wires

A

If you have print quality problems or the 
Touchscreen shows 

Drum !

, clean the 

corona wires as follows:

a

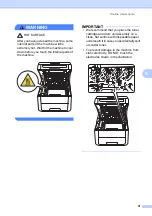
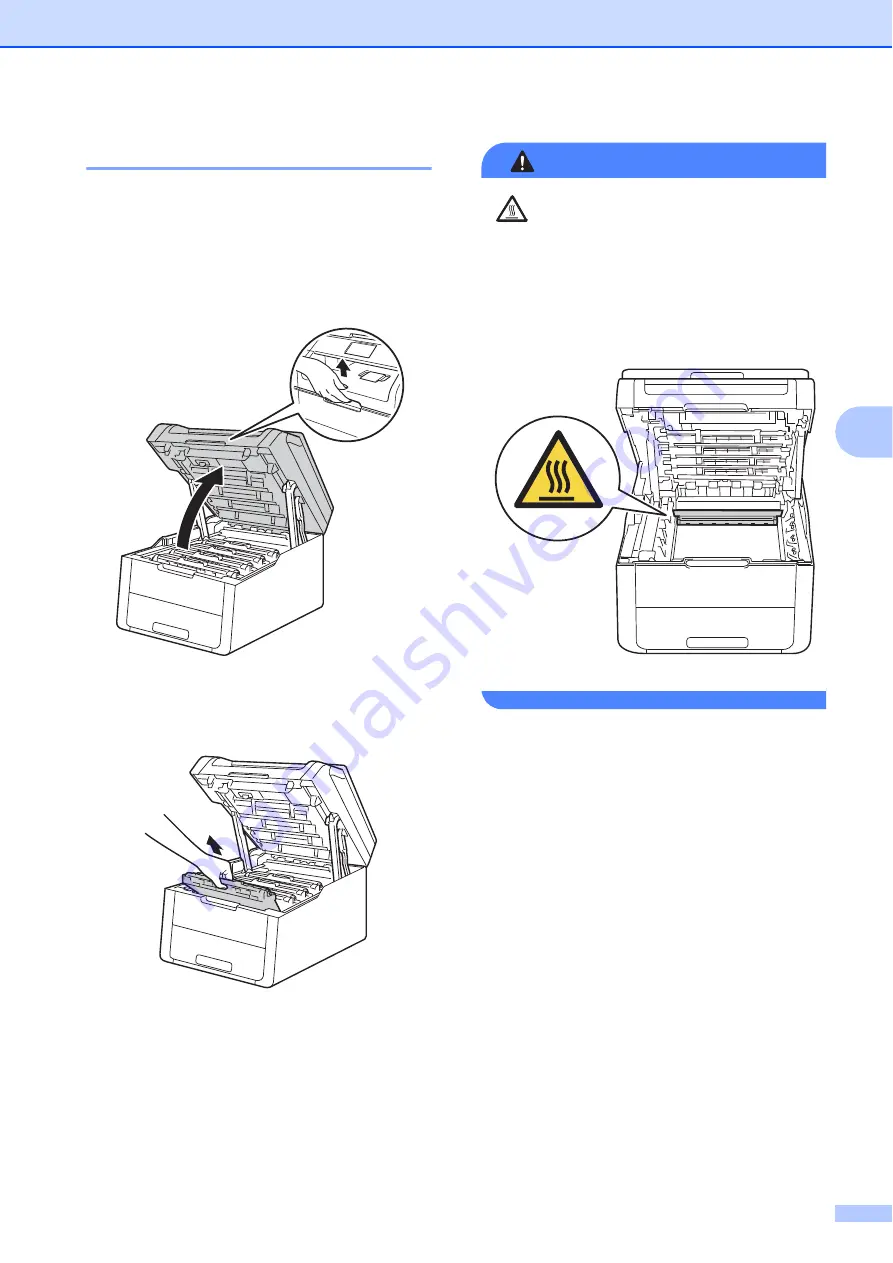
Open the top cover until it locks in the 
open position.


b

Remove the toner cartridge and drum 
unit assembly.


WARNING


 HOT SURFACE

After you have just used the machine, some 
internal parts of the machine will be 
extremely hot. Wait for the machine to cool 
down before you touch the internal parts of 
the machine.


Содержание HL-3180CDW

Страница 1: ...Advanced User s Guide HL 3180CDW Version 0 USA CAN ...

Страница 2: ... USA HTML file Brother Solutions Center 1 For Other Countries HTML file CD ROM In the Box Network User s Guide This Guide provides useful information about wireless network settings and security settings using the Brother machine You can also find supported protocol information for your machine and detailed troubleshooting tips For USA PDF file Brother Solutions Center 1 For Other Countries PDF fi...

Страница 3: ... files on certain Web sites that provide these services PDF file Brother Solutions Center 1 AirPrint Guide This Guide provides information for using AirPrint to print from OS X v10 7 x 10 8 x and your iPhone iPod touch iPad or other iOS device to your Brother machine without installing a printer driver PDF file Brother Solutions Center 1 Which Guide What s in it Where is it ...

Страница 4: ...ted users 8 Setting up and changing the Public user mode 8 Turning Secure Function Lock on off 9 Switching Users 10 Setting Lock 11 Setting up the administrator password 11 Changing the Setting Lock administrator password 12 Turning Setting Lock on off 12 3 Printing reports 13 Reports 13 How to print a report 13 4 Making copies 14 Copy settings 14 Stop copying 14 Improving copy quality 14 Enlargin...

Страница 5: ...27 Cleaning the drum unit 30 Cleaning the paper pick up rollers 35 Calibration 36 Auto Registration 37 Frequency Color Correction 38 Printing the test print 38 Checking the Page Counters 39 Checking the remaining life of toner cartridges 39 Checking the remaining life of parts 40 Replacing periodic maintenance parts 40 Packing and shipping the machine 41 B Glossary 43 C Index 44 ...

Страница 6: ...v ...

Страница 7: ...60 hours Volume setting 1 Beeper volume 1 When the beeper is on the machine will make a sound when you press the Touchscreen or Touchpanel or make a mistake You can choose from a range of sound levels from High to Off a Press b Press All Settings c Swipe up or down or press a or b to display General Setup d Press General Setup e Swipe up or down or press a or b to display Volume f Press Volume g P...

Страница 8: ...s Auto Daylight e Press On or Off f Press Ecology features 1 Toner Save 1 You can save toner using this feature When you set Toner Save to On print appears lighter The factory setting is Off a Press b Press All Settings c Swipe up or down or press a or b to display General Setup d Press General Setup e Swipe up or down or press a or b to display Ecology f Press Ecology g Press Toner Save h Press O...

Страница 9: ...rns off a Press b Press All Settings c Swipe up or down or press a or b to display General Setup d Press General Setup e Swipe up or down or press a or b to display Ecology f Press Ecology g Press Sleep Time h Using the keyboard on the Touchscreen enter the length of time 0 50 minutes the machine will remain idle before entering Sleep mode Press OK i Press Deep Sleep mode 1 If the machine is in Sl...

Страница 10: ...down or press a or b to display General Setup d Press General Setup e Swipe up or down or press a or b to display Ecology f Press Ecology g Press Auto Power Off h Swipe up or down or press a or b to display a option you want Press Off 1hour 2hours 4hours or 8hours i Press Touchscreen 1 Setting the backlight brightness 1 You can adjust the brightness of the Touchscreen LCD backlight If you are havi...

Страница 11: ...klight stays on after you go back to your Home screen a Press b Press All Settings c Swipe up or down or press a or b to display General Setup d Press General Setup e Swipe up or down or press a or b to display LCD Settings f Press LCD Settings g Press Dim Timer h Press Off 10Secs 20Secs or 30Secs i Press ...

Страница 12: ...tings Before using the security features you must first enter an administrator password The administrator can set up restrictions for individual users along with a user password Make a careful note of your password If you forget it you will have to reset the password stored in the machine For information about how to reset the password call Brother Customer Service NOTE Secure Function Lock can be...

Страница 13: ...figure the machine s settings for the first time set a password 1 Click Please configure the password 2 Type a password up to 32 characters 3 Retype the password in the Confirm New Password field 4 Click Submit Setting and changing the Administrator Password 2 You can configure these settings using a web browser To set up the web page see Before you begin to use Secure Function Lock 2 0 on page 7 ...

Страница 14: ... in the PIN field d Clear the functions that you want to restrict in the Print check box and Others check box To configure the maximum page count select the On check box in Page Limit and then type the number in the Max field e Click Submit Setting up and changing the Public user mode 2 Public user mode restricts the functions that are available for all users who do not have a password When you se...

Страница 15: ...press a or b to display General Setup d Press General Setup e Swipe up or down or press a or b to display Security f Press Security g Press Function Lock h Press Lock OffiOn i Enter the registered four digit administrator password using the keyboard on the Touchscreen Press OK NOTE The Secure Function Lock icon is displayed in the More screen Turning Secure Function Lock off 2 a Press b Press Lock...

Страница 16: ...ictions and has already reached the maximum number of pages the Touchscreen will show Limit Exceeded or Access Denied when you try to print Call your administrator to check your Secure Function Lock Settings Changing to the Public mode 2 a Press b Press Go to Public NOTE After a restricted user has finished using the machine it will return to Public mode after one minute If the function you want i...

Страница 17: ...stomer Service While Setting Lock is On you cannot access the machine settings Setting up the administrator password 2 a Press b Press All Settings c Swipe up or down or press a or b to display General Setup d Press General Setup e Swipe up or down or press a or b to display Security f Press Security g Press Setting Lock h Enter a four digit number for the new password using the keyboard on the To...

Страница 18: ...rd when the Touchscreen shows Verify Press OK l Press Turning Setting Lock on off 2 If you enter the wrong password the Touchscreen will show Wrong Password Enter the correct password Turning Setting Lock on 2 a Press b Press All Settings c Swipe up or down or press a or b to display General Setup d Press General Setup e Swipe up or down or press a or b to display Security f Press Security g Press...

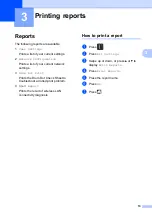
Страница 19: ...ork settings 3 Drum Dot Print Prints the Drum Dot Check Sheet to troubleshoot a dotted print problem 4 WLAN Report Prints the result of wireless LAN connectivity diagnosis How to print a report 3 a Press b Press All Settings c Swipe up or down or press a or b to display Print Reports d Press Print Reports e Press the report name f Press OK g Press Printing reports 3 ...

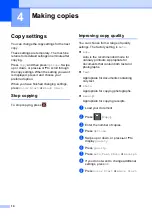
Страница 20: ... press Improving copy quality 4 You can choose from a range of quality settings The factory setting is Auto Auto Auto is the recommended mode for ordinary printouts Appropriate for documents that contain both text and photographs Text Appropriate for documents containing only text Photo Appropriate for copying photographs Receipt Appropriate for copying receipts a Load your document b Press Copy c...

Страница 21: ...r b to display the reduction ratio you want and press it If you chose Custom 25 400 press to erase the displayed percentage or press d to move the cursor and then enter an enlargement or reduction ratio from 25 to 400 in 1 increments Press OK If you chose 100 go to step i 1 Custom 25 400 allows you to enter a ratio from 25 to 400 in 1 increments i If you do not want to change additional settings p...

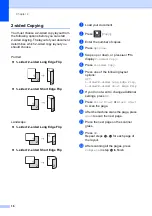
Страница 22: ...the number of copies d Press Options e Swipe up or down or press a or b to display 2 sided Copy f Press 2 sided Copy g Press one of the following layout options Off 1 sidedi2 sided Long Edge Flip 1 sidedi2 sided Short Edge Flip h If you do not want to change additional settings press OK i Press Color Start or Black Start to scan the page j After the machine scans the page press Scan to scan the ne...

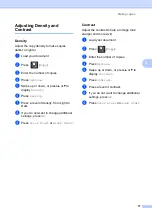
Страница 23: ...level of density from Light to Dark h If you do not want to change additional settings press OK i Press Color Start or Black Start Contrast 4 Adjust the contrast to help an image look sharper and more vivid a Load your document b Press Copy c Enter the number of copies d Press Options e Swipe up or down or press a or b to display Contrast f Press Contrast g Press a level of contrast h If you do no...

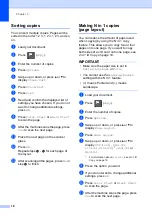
Страница 24: ...You can reduce the amount of paper used when copying by using the N in 1 copy feature This allows you to copy two or four pages onto one page If you want to copy both sides of an ID card onto one page see 2 in 1 ID Copy on page 19 IMPORTANT Make sure the paper size is set to Letter A4 Legal or Folio You cannot use the Enlarge Reduce setting with the N in 1 feature P means Portrait and L means Land...

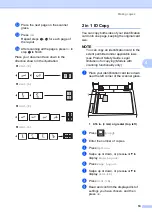
Страница 25: ... NOTE You can copy an identification card to the extent permitted under applicable laws see Product Safety Guide Legal limitations for copying Models with scanning functionality only a Place your identification card face down near the left corner of the scanner glass 1 0 16 in 4 mm or greater top left b Press Copy c Enter the number of copies d Press Options e Swipe up or down or press a or b to d...

Страница 26: ... the quality to Photo and the contrast to 2 l Press Adjusting the Color Saturation 4 You can change the default setting for color saturation a Load your document b Press Copy c Enter the number of copies d Press Options e Swipe up or down or press a or b to display Color Adjust f Press Color Adjust g Press Red Green or Blue h Press a level of color saturation i Repeat steps g and h if you want to ...

Страница 27: ...u can store the copy options you use most often by saving them as a Shortcut a Press Copy b Press Options c Swipe up or down or press a or b to display Quality Enlarge Reduce 2 sided Copy Density Contrast Stack Sort Page Layout Color Adjust or Remove Background Color and then press the setting you want d Swipe up or down or press a or b to display the available options and then press your new opti...

Страница 28: ...mber of copies f Do one of the following To change more settings go to step g When you have finished changing settings go to step j g Press Options h Swipe up or down or press a or b to display the available settings and then press the setting you want i Swipe up or down or press a or b to display the available options and then press your new option Repeat steps h and i for each setting you want W...

Страница 29: ...could explode resulting in injuries DO NOT use flammable substances any type of spray or an organic solvent liquid containing alcohol or ammonia to clean the inside or outside of the product Doing so could cause a fire or electrical shock Instead use only a dry lint free cloth See Product Safety Guide To use the product safely IMPORTANT Use neutral detergents Cleaning with volatile liquids such as...

Страница 30: ...he Touchscreen with a dry soft lint free cloth c Press to turn on the machine Clean the outside of the machine as follows a Press and hold down to turn off the machine b Wipe the outside of the machine with a dry lint free cloth to remove dust c Pull the paper tray completely out of the machine d If paper is loaded in the paper tray remove it e Remove anything that is stuck inside the paper tray ...

Страница 31: ...n the machine h Press to turn on the machine Cleaning the LED heads A If there is a problem with the print quality such as light or faded colors or white streaks or bands down the page clean the LED heads IMPORTANT DO NOT touch the windows of the LED heads with your fingers a Press and hold down to turn off the machine b Open the top cover until it locks in the open position ...

Страница 32: ...white plastic surface 2 and scanner glass 3 underneath it with a soft lint free cloth moistened with water NOTE In addition to cleaning the scanner glass with a soft lint free cloth moistened with water run your finger tip over the glass to see if you can feel anything on it If you feel dirt or debris clean the glass again concentrating on that area You may have to repeat the cleaning process thre...

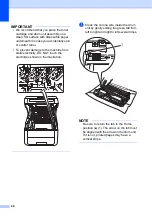
Страница 33: ...orona wires as follows a Open the top cover until it locks in the open position b Remove the toner cartridge and drum unit assembly WARNING HOT SURFACE After you have just used the machine some internal parts of the machine will be extremely hot Wait for the machine to cool down before you touch the internal parts of the machine ...

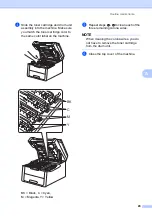
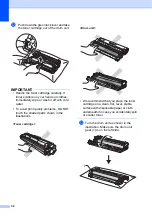
Страница 34: ...mage to the machine from static electricity DO NOT touch the electrodes shown in the illustration c Clean the corona wire inside the drum unit by gently sliding the green tab from left to right and right to left several times NOTE Be sure to return the tab to the Home position a 1 The arrow on the tab must be aligned with the arrow on the drum unit If it is not printed pages may have a vertical st...

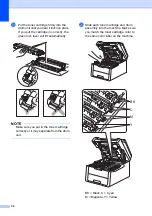
Страница 35: ...the toner cartridge color to the same color label on the machine BK Black C Cyan M Magenta Y Yellow e Repeat steps b d to clean each of the three remaining corona wires NOTE When cleaning the corona wires you do not have to remove the toner cartridge from the drum unit f Close the top cover of the machine BK C M Y ...

Страница 36: ... Press c Press All Settings d Swipe up or down or press a or b to display Print Reports e Press Print Reports f Press Drum Dot Print g The Touchscreen will show Press OK Press OK h The machine will print the Drum Dot Check Sheet Then press i Press and hold down to turn off the machine j Open the top cover until it locks in the open position k The color of printed dots is the color of the drum you ...

Страница 37: ...o cool down before you touch the internal parts of the machine IMPORTANT We recommend that you place the toner cartridge and drum unit assembly on a clean flat surface with disposable paper underneath it in case you accidentally spill or scatter toner To prevent damage to the machine from static electricity DO NOT touch the electrodes shown in the illustration ...

Страница 38: ...ith cold water To avoid print quality problems DO NOT touch the shaded parts shown in the illustrations We recommend that you place the toner cartridge on a clean flat level stable surface with disposable paper or cloth underneath it in case you accidentally spill or scatter toner m Turn the drum unit as shown in the illustration Make sure the drum unit gear 1 is on the left side Toner cartridge D...

Страница 39: ...ould mean that there is a mark in the 2 region of the drum p Turn the edge of the drum unit toward you by hand while looking at the surface of the suspected area NOTE DO NOT touch the drum s surface To avoid print quality problems hold the edges of the drum unit q When you find the mark on the drum that matches the Drum Dot Check Sheet wipe the surface of the drum gently with a dry cotton swab unt...

Страница 40: ...he green lock lever will lift automatically NOTE Make sure you put in the toner cartridge correctly or it may separate from the drum unit t Slide each toner cartridge and drum assembly into the machine Make sure you match the toner cartridge color to the same color label on the machine BK Black C Cyan M Magenta Y Yellow BK C M Y ...

Страница 41: ...leaning the paper pick up roller periodically may prevent paper jams by insuring the proper feeding of paper If you have paper feed problems clean the pick up rollers as follows a Press and hold down to turn off the machine b Pull the paper tray completely out of the machine c If paper is loaded or something is stuck inside in the paper tray remove it ...

Страница 42: ...e machine Calibration A The output density for each color may vary depending on the machine s environment such as temperature and humidity Calibration helps you to improve the color density a Press b Press Calibration c Press Calibrate d Press Yes to confirm e Touchscreen will show Completed f Press You can reset the calibration parameters back to those set at the factory a Press b Press Calibrati...

Страница 43: ...selected The factory settings are on see Software User s Guide If you are using the Macintosh printer driver you must perform the calibration using the Status Monitor Turn on the Status Monitor and then select Color Calibration from the Control menu see Software User s Guide Auto Registration A If solid areas of color or images have cyan magenta or yellow fringes you can use the auto registration ...

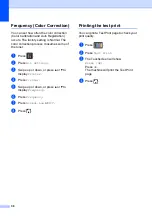
Страница 44: ...ress b Press All Settings c Swipe up or down or press a or b to display Printer d Press Printer e Swipe up or down or press a or b to display Frequency f Press Frequency g Press Normal Low or Off h Press Printing the test print A You can print a Test Print page to check your print quality a Press b Press Test Print c The Touchscreen will show Press OK Press OK The machine will print the Test Print...

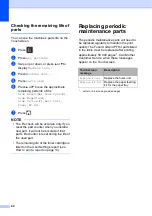
Страница 45: ...ress a or b to display Machine Info d Press Machine Info e Press Page Counter The Touchscreen shows number of pages for Total List Copy and Print f Press Checking the remaining life of toner cartridges A You can see the approximate remaining life of the toner cartridges a Press b Press Toner Life The Touchscreen will show the approximate remaining life of the toner cartridges in a bar chart c Pres...

Страница 46: ...e accurate if that part s life counter is reset during the life of the used part The remaining life of the toner cartridge is listed on the User Settings report see How to print a report on page 13 Replacing periodic maintenance parts A The periodic maintenance parts will need to be replaced regularly to maintain the print quality The Fuser Unit and PF Kit parts listed in the table must be replace...

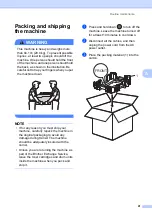
Страница 47: ...reason you must ship your machine carefully repack the machine in the original packaging to avoid any damage during transit The machine should be adequately insured with the carrier Unless you are returning the machine as part of the Brother Exchange Service leave the toner cartridges and drum units inside the machine when you pack and ship it a Press and hold down to turn off the machine Leave th...

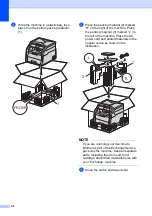
Страница 48: ...the left of the machine Place the AC power cord and printed materials in the original carton as shown in the illustration NOTE If you are returning your machine to Brother as part of the Exchange Service pack only the machine Keep all separate parts including the drum unit toner cartridge and printed materials to use with your Exchange machine f Close the carton and tape it shut FRONT 1 2 3 R L ...

Страница 49: ...ontrast Setting to compensate for dark or light documents by making copies of dark documents lighter and light documents darker Density Changing the Density makes the whole image lighter or darker Gray Scale The shades of gray available for copying photographs OCR optical character recognition Nuance PaperPort 12SE or Presto PageManager software application converts an image of text to text you ca...

Страница 50: ...aining life 40 cleaning 27 30 E Enlarge Reduce 15 M Machine information checking remaining life of parts 40 page counts 39 Macintosh See Software User s Guide Maintenance routine 23 checking the remaining life of parts 40 Memory storage 1 N N in 1 page layout 18 Network printing See Network User s Guide scanning See Software User s Guide Nuance PaperPort 12SE See Software User s Guide and Help in ...

Страница 51: ... Software User s Guide Security Secure function lock administrator password 7 Setting lock 11 Sleep mode 3 Sort 18 T Temporary copy settings 14 Toner Save 2 Touchscreen backlight brightness 4 V Volume setting beeper 1 W Warranties are in the box Windows See Software User s Guide Wireless Network See Quick Setup Guide and Network User s Guide ...

Страница 52: ... Brother International Corporation Canada Ltd 1 rue Hôtel de Ville Dollard des Ormeaux QC Canada H9B 3H6 Visit us on the World Wide Web http www brother com This machine is approved for use in the country of purchase only Local Brother companies or their dealers will only support machines purchased in their own countries ...

Отзывы: