background image

Installing the Printer Driver

43

Macintosh

®

M

acint

osh

®

Wir

e

less

Network

20

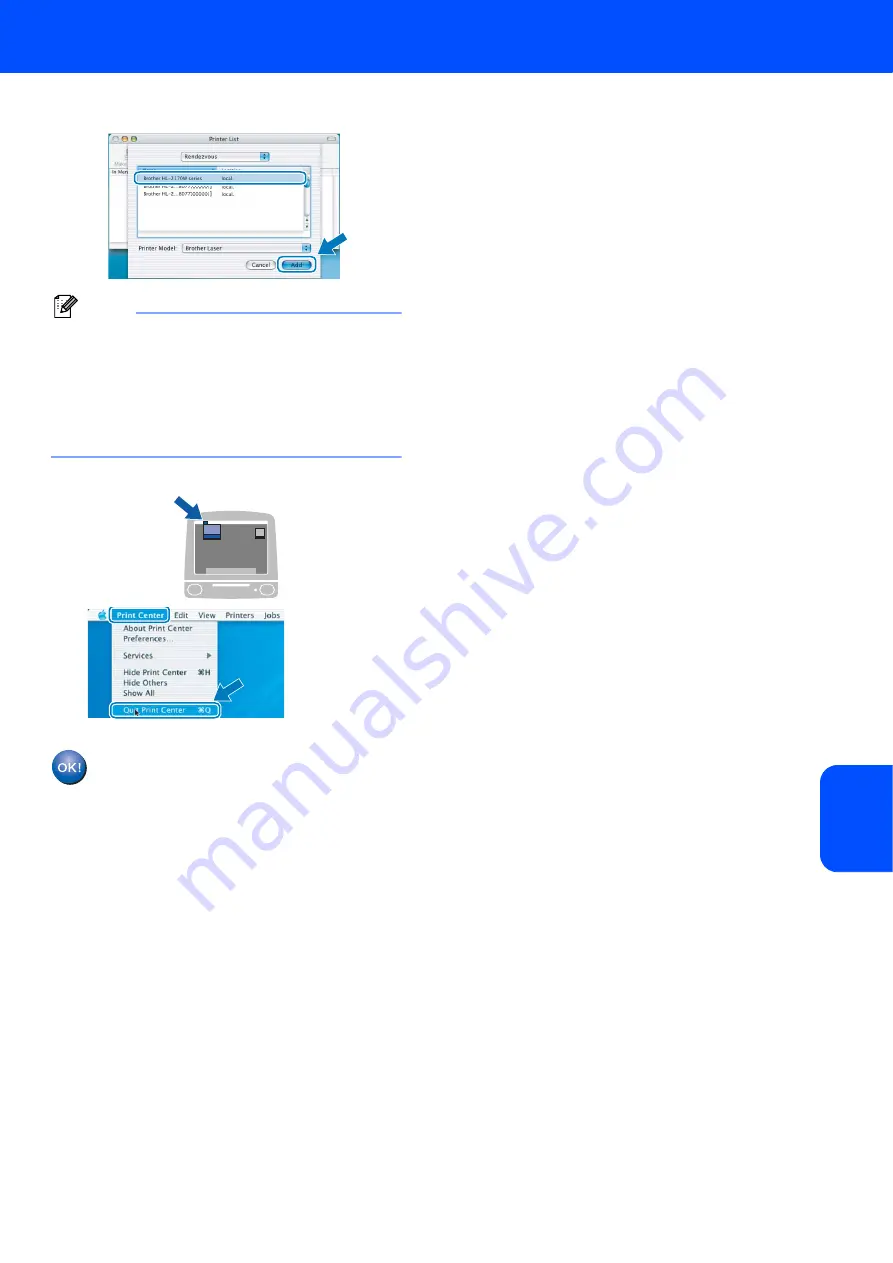
Choose your printer, and then click 

Add

.


Note

• If there is more than one of the same printer model 

connected on your network, the Ethernet address 
(MAC address) will be displayed after the model 
name.

• You can find your printer’s Ethernet address (MAC 

address) by printing out the Printer Settings Page. 
See Print the Printer Settings Page on page 46.


21

Click 

Print Center

, then 

Quit Print Center

.


For Mac OS

®

 X 10.2.4 to 10.2.8 users:

Setup is now complete.

Содержание HL-2170W

Страница 1: ...0W Before you can use the printer you must set up the hardware and install the driver Please read this Quick Setup Guide for proper set up and installation instructions Keep this Quick Setup Guide and the supplied CD ROM in a convenient place for quick and easy reference at all times To view the Quick Setup Guide in other languages please visit http solutions brother com Version 1 ...

Страница 2: ... procedures you must follow or avoid to prevent possible damage to the printer or other objects Improper Setup Note User s Guide Network User s Guide Improper Setup icons alert you to devices and operations that are not compatible with the printer Notes tell you how you should respond to a situation that may arise or give tips about how the current operation works with other features Indicates ref...

Страница 3: ... users 14 For wired network interface cable users 16 For Peer to Peer network printer users 16 For shared network printer users 18 For wireless network users 20 Macintosh For USB interface cable users 30 For wired network interface cable users 32 For wireless network users 34 For Network Users BRAdmin Light utility For Windows users 44 BRAdmin Light utility For Mac OS X users 45 Web Based Manageme...

Страница 4: ...r some internal parts of the printer will be extremely hot DO NOT touch the shaded parts shown in the illustration when you open the front or back cover of the printer DO NOT remove or damage the caution labels located on or around the fuser DO NOT use a vacuum cleaner to clean up scattered toner Doing this might cause the toner dust to ignite inside the vacuum cleaner potentially starting a fire ...

Страница 5: ...cautions 3 DO NOT use flammable substances or any type of spray to clean the inside or outside of the machine Doing this may cause a fire or electrical shock Refer to the User s Guide for how to clean the machine ...

Страница 6: ...ception which can be determined by turning the equipment off and on the user is encouraged to try to correct the interference by one or more of the following measures Reorient or relocate the receiving antenna Increase the separation between the equipment and receiver Connect the equipment into an outlet on a circuit different from that to which the receiver is connected Consult the dealer or an e...

Страница 7: ...side the printer is completely confined within protective housings and external covers the laser beam cannot escape from the machine during any phase of user operation FDA Regulations 110 to 120 volt Model Only The U S Food and Drug Administration FDA has implemented regulations for laser products manufactured on and after August 2 1976 Compliance is mandatory for products marketed in the United S...

Страница 8: ...safety if in any doubt about the effective grounding of the power call a qualified electrician This product should be connected to an AC power source within the range indicated on the rating label DO NOT connect it to a DC power source If you are not sure contact a qualified electrician Maschinenlärminformations Verordnung 3 GPSGV For Germany only Der höchste Schalldruckpegel beträgt 70 dB A oder ...

Страница 9: ... a USB port on a keyboard or non powered USB hub Network cable Use a straight through Category5 or greater twisted pair cable for 10BASE T or 100BASE TX Fast Ethernet Network 2 Control panel For the details of the control panel see Chapter 4 of the User s Guide on the CD ROM 1 Face down output tray support flap 1 Support flap 1 2 Control panel 3 Manual feed paper guide 4 Manual feed slot 5 Manual ...

Страница 10: ...alf a second This pattern will repeat 20 times Blinking ON OFF Printer LED OFF Sleep Warming up Cooling down 1 Ready Receiving data 2 Print Data remaining 2 Toner Drum Error Ready Blue Dimmed Printer LED Toner low 3 Toner life end Drum near end of life 3 Cover open Paper jam 2 No paper Drum Error 2 Service call 2 Toner Yellow Drum Yellow Error Red Ready Blue User s Guide Chapter 5 Chapter 5 Chapte...

Страница 11: ... http solutions brother com is a one stop resource for all your printer support needs Download the latest drivers and utilities for your printers read FAQs and troubleshooting tips or learn about printer solutions Supplies Information Visit our web site for original genuine Brother supplies at http www brother com original Macintosh Install Printer Driver Install the printer driver Documentation V...

Страница 12: ...e Connecting the interface cable is done when installing the driver 1 Open the front cover 2 Unpack the drum unit and toner cartridge assembly 3 Rock it from side to side several times to distribute the toner evenly inside the assembly 4 Put the drum unit and toner cartridge assembly into the printer 5 Close the front cover of the printer ...

Страница 13: ... the guides are firmly in the slots Note For Legal size paper press the release button in the bottom of the paper tray and then pull out the back of the paper tray 3 Fan the stack of paper well to avoid paper jams and misfeeds 4 Put paper in the paper tray Make sure that the paper is flat in the tray and below the maximum paper mark 1 5 Put the paper tray firmly back into the printer Make sure tha...

Страница 14: ...ug the AC power cord into an AC power outlet Turn on the printer power switch 3 Unfold support flap 1 4 After the printer has finished warming up the Ready LED Go button 1 stops blinking and stays blue 5 Press the Go button The printer prints a test page Check that the test page has printed correctly Note This function will not be available after the first print job you send from your computer 1 ...

Страница 15: ...tion Center directly from the CD ROM Driver or visit http solutions brother com The screens for Windows in this Quick Setup Guide are based on Windows XP The screens for Mac OS X in this Quick Setup Guide are based on Mac OS X 10 4 For USB interface cable users 14 For wired network interface cable users 16 For wireless network users 20 For USB interface cable users 30 For wired network interface c...

Страница 16: ...to the printer and then begin installing the driver If you have already connected the cable remove it 3 Turn on your computer You must be logged on with Administrator rights 4 Put the supplied CD ROM into your CD ROM drive The opening screen will appear automatically Choose your printer model and the language Note If the opening screen does not appear use Windows Explorer to run the start exe prog...

Страница 17: ... then connect it to the printer Click Next 9 Click Finish Note If you want to register your product on line check On Line Registration If you do not want to set your printer as Default printer uncheck Set as Default Printer Setup is now complete Note XML Paper Specification Printer Driver The XML Paper Specification Printer Driver is the most suitable driver when printing from the applications tha...

Страница 18: ...cting the printer to your network and installing the driver 1 Connect the network interface cable to the printer and then connect it to a free port on your hub 2 Make sure the printer power switch is on 3 Turn on your computer You must be logged on with Administrator rights 4 Put the supplied CD ROM into your CD ROM drive The opening screen will appear automatically Choose your printer model and t...

Страница 19: ...your printer s IP address and the node name by printing out the Printer Settings Page See Print the Printer Settings Page on page 46 10 Choose your printer and then click Next 11 Click Finish Note If you want to register your product on line check On Line Registration If you do not want to set your printer as Default printer uncheck Set as Default Printer Setup is now complete Note XML Paper Speci...

Страница 20: ... You must be logged on with Administrator rights 2 Put the supplied CD ROM into your CD ROM drive The opening screen will appear automatically Choose your printer model and the language Note If the opening screen does not appear use Windows Explorer to run the start exe program from the root folder of the Brother CD ROM 3 Click Install Printer Driver on the menu screen Note Choose the Install Prin...

Страница 21: ...e If you want to register your product on line check On Line Registration If you do not want to set your printer as Default printer uncheck Set as Default Printer Setup is now complete Note XML Paper Specification Printer Driver The XML Paper Specification Printer Driver is the most suitable driver when printing from the applications that use the XML Paper Specification documents Please download t...

Страница 22: ... or USB for the fastest throughput speed Although Brother HL 2170W can be used in a both wired and wireless network only one of the connection methods can be used at a time Important The following instructions will offer two methods for installing your Brother machine in a wireless network environment Both methods are for infrastructure mode using a wireless router or access point that uses DHCP t...

Страница 23: ...work For instructions go to Configuration in Infrastructure mode using a network cable temporarily on page 22 Configuration using the automatic wireless one push method If your wireless access point A supports either SecureEasySetup Wi Fi Protected Setup PBC 1 or AOSS you do not need to use a computer to configure the wireless settings The access point router and your printer can automatically neg...

Страница 24: ...e sure the printer power switch is on 2 Turn on your computer You must be logged on with Administrator rights 3 Put the supplied CD ROM into your CD ROM drive The opening screen will appear automatically Choose your printer model and the language Note If the opening screen does not appear use Windows Explorer to run the start exe program from the root folder of the Brother CD ROM 4 Click Install P...

Страница 25: ...Node name is BRNxxxxxxxxxxxx 11 The wizard will search for wireless networks available from your printer Choose the access point you wish to associate the printer with and then click Next Note SETUP is the default SSID of the printer Do not choose this SSID If the list is blank check that the access point has power and is broadcasting the SSID and then see if the printer and the access point are w...

Страница 26: ...de is set to WEP an error indication will NOT appear if the Network key is incorrect 14 Click Next The settings will be sent to your printer The settings will remain unchanged if you click Cancel Note If you want to manually enter the IP address settings of your printer click Change IP Address and enter the necessary IP address settings for your network 15 Disconnect the network cable between your...

Страница 27: ...fresh If your printer still fails to appear reset the print server back to the default factory settings see page 46 and go back to step 4 and try the wireless setup again 20 Click Finish Note If you want to register your product on line check On Line Registration If you do not want to set your printer as Default printer uncheck Set as Default Printer Turn your Personal Firewall back on Setup is no...

Страница 28: ... Note Routers or access points that support SecureEasySetup Wi Fi Protected Setup or AOSS have the symbols shown below Configure the wireless settings 1 Make sure the printer power switch is on 2 Turn on your computer You must be logged on with Administrator rights 3 Put the supplied CD ROM into your CD ROM drive The opening screen will appear automatically Choose your printer model and the langua...

Страница 29: ... on what is supported by your access point Please refer to the instruction manual that came with your access point 12 Wait for the Ready LED Go button of your printer to indicate connection succeeded The Ready LED will turn on for 5 minutes See the table LED indications when using the one push wireless setting mode on page 8 This indication means the machine has successfully connected to your rout...

Страница 30: ...is failure please go back to step 4 and setup the wireless connection again 15 When the License Agreement window appears click Yes if you agree to the License Agreement 16 Choose Standard Installation and then click Next 17 Choose Search the network for devices and choose from a list of discovered devices Recommended Or enter your printer s IP address or its node name Click Next Note You can find ...

Страница 31: ...ault printer uncheck Set as Default Printer Turn your Personal Firewall back on Setup is now complete Note XML Paper Specification Printer Driver The XML Paper Specification Printer Driver is the most suitable driver when printing from the applications that use the XML Paper Specification documents Please download the latest driver by accessing the Brother Solutions Center at http solutions brothe...

Страница 32: ...cintosh Put the supplied CD ROM into your CD ROM drive 4 Double click the HL2100 icon on your desktop Double click the Start Here icon Follow the on screen instructions 5 Click Install Printer Driver on the menu screen 6 Click USB cable users and follow the on screen instructions Then restart your Macintosh For Mac OS X 10 2 4 to 10 2 8 users Go to step 9 For Mac OS X 10 3 or greater users Go to s...

Страница 33: ...iver 31 Macintosh Macintosh USB 9 When this screen appears click Add 10 Choose USB 11 Choose your printer and then click Add 12 Click Print Center then Quit Print Center For Mac OS X 10 2 4 to 10 2 8 users Setup is now complete ...

Страница 34: ...r on the menu screen 6 Click Network cable users and follow the on screen instructions Then restart your Macintosh For Mac OS X 10 2 4 to 10 2 8 users Go to step 9 For Mac OS X 10 3 or greater users Go to step 7 7 The Brother software will search for the Brother printer During this time the following screen will appear Note If more than one printer is available the following list appears Choose th...

Страница 35: ...se your printer and then click Add Note If there is more than one of the same printer model connected on your network the Ethernet address MAC address will be displayed after the model name You can find your printer s Ethernet address MAC address by printing out the Printer Settings Page See Print the Printer Settings Page on page 46 12 Click Print Center then Quit Print Center For Mac OS X 10 2 4...

Страница 36: ...ata transfer or USB for the fastest throughput speed Although Brother HL 2170W can be used in a both wired and wireless network only one of the connection methods can be used at a time Important The following instructions will offer two methods for installing your Brother machine in a wireless network environment Both methods are for infrastructure mode using a wireless router or access point that...

Страница 37: ...etwork For instructions go to Configuration in Infrastructure mode using a network cable temporarily on page 36 Configuration using the automatic wireless one push method If your wireless access point A supports either SecureEasySetup Wi Fi Protected Setup PBC 1 or AOSS you do not need to use a computer to configure the wireless settings The access point router and your printer can automatically n...

Страница 38: ...ings before you proceed with this installation You need to temporarily use an Ethernet cable during configuration Configure the wireless settings 1 Make sure the printer power switch is on 2 Turn on your Macintosh Put the supplied CD ROM into your CD ROM drive 3 Double click the HL2100 icon on your desktop Double click the Start Here icon Follow the on screen instructions 4 Click Install Printer D...

Страница 39: ...t Node name is BRNxxxxxxxxxxxx 11 The wizard will search for wireless networks available from your printer Choose the access point you wish to associate the printer with and then click Next Note SETUP is the default SSID of the printer Do not choose this SSID If the list is blank check that the access point has power and is broadcasting the SSID and then see if the printer and the access point are...

Страница 40: ...or indication will NOT appear if the Network key is incorrect 14 Click Next The settings will be sent to your printer The settings will remain unchanged if you click Cancel Note If you want to manually enter the IP address settings of your printer click Change IP Address and enter the necessary IP address settings for your network 15 Disconnect the network cable between your access point hub or ro...

Страница 41: ...o the default factory settings see page 46 and go back to step 4 and try the wireless setup again 18 When this screen appears click OK For Mac OS X 10 3 or greater users Setup is now complete 19 When this screen appears click Add 20 Make the following selection 21 Choose your printer and then click Add Note If there is more than one of the same printer model connected on your network the Ethernet ...

Страница 42: ... your wireless LAN router access point for instructions on how to access one push mode 1 Push Button Configuration Note Routers or access points that support SecureEasySetup Wi Fi Protected Setup or AOSS have the symbols shown below Configure the wireless settings 1 Make sure the printer power switch is on 2 Turn on your Macintosh Put the supplied CD ROM into your CD ROM drive 3 Double click the H...

Страница 43: ... Please refer to the instruction manual that came with your access point 12 Wait for the Ready LED Go button of your printer to indicate connection succeeded The Ready LED will turn on for 5 minutes See the table LED indications when using the one push wireless setting mode on page 8 This indication means the machine has successfully connected to your router or access point You can now use your pr...

Страница 44: ... your Macintosh For Mac OS X 10 2 4 to 10 2 8 users Go to step 18 For Mac OS X 10 3 or greater users Go to step 16 16 The Brother software will search for the Brother printer During this time the following screen will appear Note If more than one printer is available the following list appears Choose the printer you wish to connect and then click OK If there is more than one of the same printer mo...

Страница 45: ...inter model connected on your network the Ethernet address MAC address will be displayed after the model name You can find your printer s Ethernet address MAC address by printing out the Printer Settings Page See Print the Printer Settings Page on page 46 21 Click Print Center then Quit Print Center For Mac OS X 10 2 4 to 10 2 8 users Setup is now complete ...

Страница 46: ...Re start your Personal Firewall software after the address information is set Installing the BRAdmin Light configuration utility Note The default password for the print server is access You can use BRAdmin Light to change this password 1 Click Install Other Drivers or Utilities on the menu screen 2 Click BRAdmin Light and follow the on screen instructions Note For Windows Vista when the User Accou...

Страница 47: ...sk and Gateway using BRAdmin Light Note If you have a DHCP BOOTP RARP server in your network you don t have to do the following operation The print server will automatically obtain its own IP address Make sure that version 1 4 1_07 or later of Java client software is installed on your computer The default password for the print server is access You can use BRAdmin Light to change this password 1 D...

Страница 48: ...1 2 if the printer s IP address is 192 168 1 2 See Chapter 13 of the Network User s Guide 4 Network default settings To restore all network settings of the internal print server to default follow the steps below 1 Turn off the printer 2 Make sure that the front cover is closed and the power cord is plugged in 3 Hold down the Go button as you turn on the power switch Keep the Go button pressed down...

Страница 49: ...ems an error will be indicated by the LED s on the control panel For more information about the consumables for your printer visit us at http solutions brother com or contact your local Brother reseller See Chapter 5 of the User s Guide on the CD ROM Toner cartridge Drum unit ...

Страница 50: ...e carrier Caution When shipping the printer the DRUM UNIT and TONER CARTRIDGE assembly must be removed from the printer and put in a plastic bag Failure to remove the unit and put it in a plastic bag before shipping may cause severe damage to the printer and may VOID THE WARRANTY 1 Turn off the printer power switch and then unplug the AC power cord 2 Remove the drum unit and toner cartridge assemb...

Страница 51: ...oduct names mentioned in this Quick Setup Guide are registered trademarks of their respective companies Compilation and Publication This manual has been compiled and published under the supervision of Brother Industries Ltd covering the latest product descriptions and specifications The contents of this manual and the specifications of this product are subject to change without notice Brother rese...

Страница 52: ...ENG ...

Отзывы: