


Chapter 8 Standard Adjustment
BES-961BC
•
BES-1261BC
147
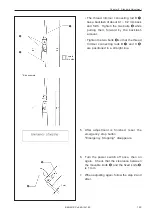
6.
After timing adjustment the is finished for each
head, set the pulley B
q
to the stop position
(at 100˚ of the scale) and press
E S C
E S C
. The
machine enters the standby state.
The adjustment of the rotary hook is completed
and the timing is stored. The rotary hook
returns to the stop position accordingly.
↓
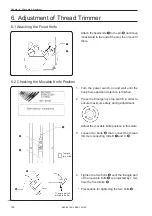
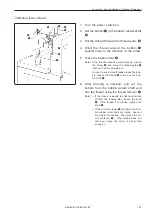
5. Adjustment of Presser Foot Height
1.
Turn the power switch off.
2.
Select the needle bar No. 1.
3.
Loosen the screw
w
of the presser foot
q
, and adjust the presser foot
q
until it comes
above the cloth top surface when it is at the alignment position (where the pulley B indication
mark "3" and the cover indication mark "3" are aligned).
w
q
material
Содержание BES-1261BC
Страница 7: ...5 BES 961BC BES 1261BC 2 1 7 1 6 3 4 5 7 3 2 Belt cover Finger guard BES 961BC ...
Страница 13: ...11 BES 961BC BES 1261BC Setting of thread breakage sensor page 93 Setting of Machine page 96 ...
Страница 18: ...16 BES 961BC BES 1261BC ...
Страница 19: ...Chapter 1 Preparation of Embroidery Machine ...
Страница 60: ...BES 961BC BES 1261BC 58 Chapter 2 Embroidering Procedures ...
Страница 78: ...BES 961BC BES 1261BC 76 Chapter 3 Selection of Data and Embroidering ...
Страница 118: ...BES 961BC BES 1261BC 116 Chapter 5 Setting ...
Страница 119: ...Chapter 6 Operation of Machine ...
Страница 130: ...Chapter 6 Operation of Machine BES 961BC BES 1261BC 128 ...
Страница 131: ...Chapter 7 Maintenance ...
Страница 140: ...Chapter 7 Maintenance BES 961BC BES 1261BC 138 ...
Страница 141: ...Chapter 8 Standard Adjustment ...
Страница 153: ...Chapter 9 List of Error Messages ...
Страница 161: ...Connection and Installation of Optional Equipment ...
Страница 164: ...INSTRUCTION MANUAL BROTHER INDUSTRIES LTD NAGOYA JAPAN Printed in Japan 155 961BC C61 S93961 102 1998 08 B 1 ...