background image

8. MAINTENANCE


51 

KE-430D, BE-438D

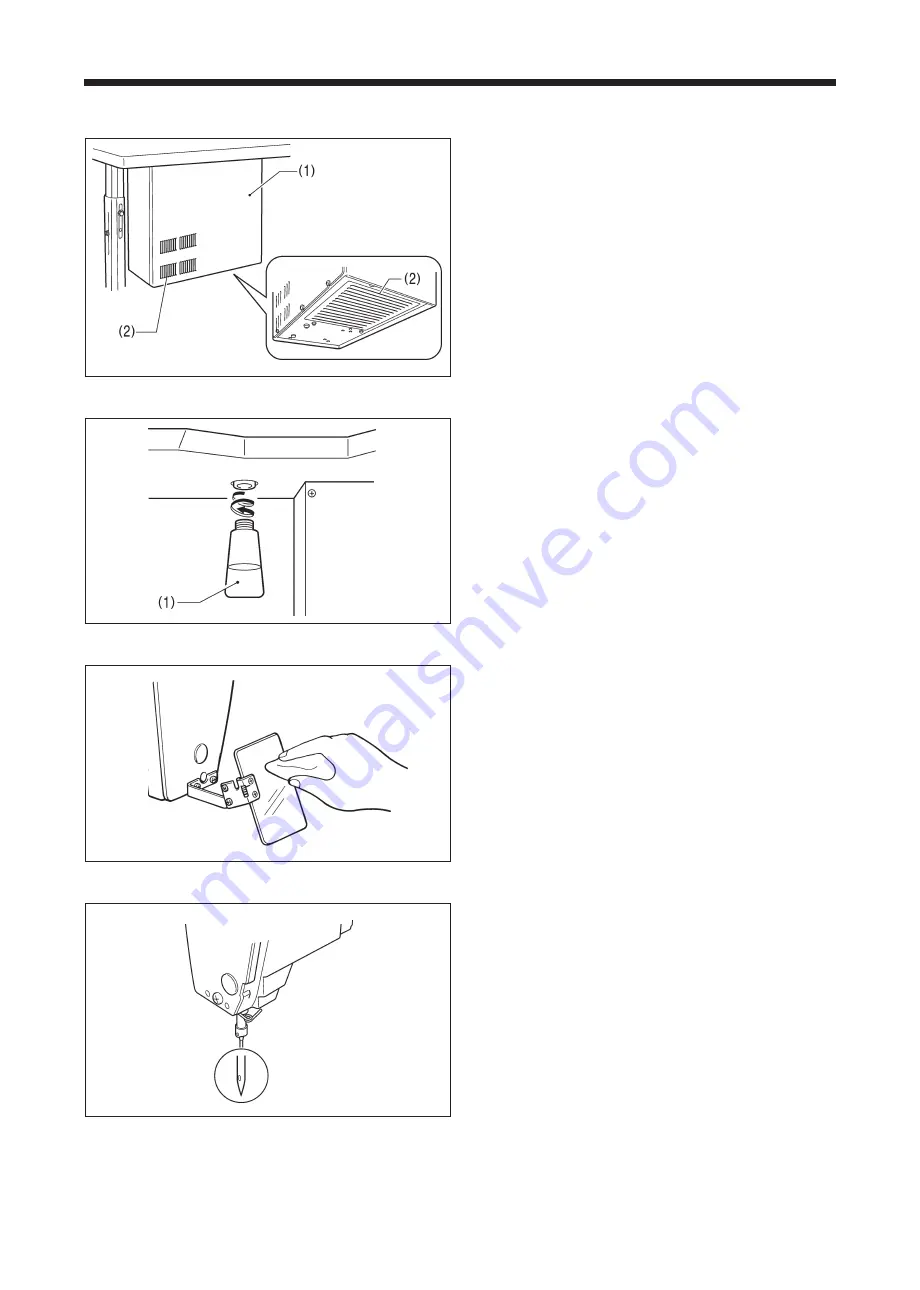
8-2. Cleaning the control box air inlet ports 


Use a vacuum cleaner to clean the filter in the air inlet ports 

(2) of the control box (1) at least once a month. 

8-3. Draining the oil 


1.  Remove and empty the waste oil container (1) whenever 

it is full. 

2.  After emptying the waste oil container (1), screw it back 

into its original position. 

8-4. Cleaning the eye guard 


Wipe the eye guard clean with a soft cloth. 

Note: 

Do not use solvents such as kerosene or thinner to clean 

the eye guard. 

8-5. Checking the needle 


Always check that the tip of the needle is not broken and 

also the needle is not bent before starting sewing. 

8-6. Lubrication 

Carry out the lubrication referring to “3-13. Lubrication”. 


 2550Q 

 0128Q 

4484Q

 4483Q 

Содержание BE-438D

Страница 1: ...KE 430D ELECTRONIC DIRECT DRIVE LOCKSTITCH BAR TACKER BE 438D ELECTRONIC DIRECT DRIVE LOCKSTITCH BUTTON SEWER ...

Страница 2: ...KE 430D BE 438D ...

Страница 3: ... to ensure safe operation of this machine and to prevent accidents and injury to yourself or other people The meanings of these indications and symbols are given below Indications DANGER The instructions which follow this term indicate situations where failure to follow the instructions will result in death or serious injury CAUTION The instructions which follow this term indicate situations where...

Страница 4: ...ine installation should only be carried out by a qualified technician Contact your Brother dealer or a qualified electrician for any electrical work that may need to be done The sewing machine weighs approximately 56 kg The installation should be carried out by two or more people Do not connect the power cord until installation is complete otherwise the machine may operate if the foot switch is de...

Страница 5: ...ld result in injury Be sure to wear protective goggles and gloves when handling the lubricating oil and grease so that they do not get into your eyes or onto your skin otherwise inflammation can result Furthermore do not drink the oil or eat the grease under any circumstances as they can cause vomiting and diarrhoea Keep the oil out of the reach of children Maintenance and inspection Maintenance a...

Страница 6: ... Brother dealer 1 2 3 Be sure to connect the ground If the ground connection is not secure you run a high risk of receiving a serious electric shock and problems with correct operation may also occur Safety devices 4 Direction of operation Eye guard Finger guard Tension release solenoid cover Thread take up cover Frame side cover Back cover etc 4399Q 4467Q Thread take up cover Finger guard Eye gua...

Страница 7: ...Inserting the button BE 438D 30 4 8 Adjusting the button clamp BE 438D 30 4 9 Installing the accessory spring BE 438D 30 5 USING THE OPERATION PANEL BASIC OPERATIONS 31 5 1 Name and function of each operation panel item 31 5 2 Setting the program number 33 5 3 Setting the X scale and Y scale 33 5 4 Setting the sewing speed 33 5 5 Checking the sewing pattern KE 430D 34 5 6 Checking the sewing patte...

Страница 8: ...Control box 10 Finger guard 3 CF slot 11 Eye guard 4 Operation panel 12 Thread take up cover 5 Foot switch 13 Back cover 6 Work clamp KE 430D 14 Frame side cover 7 Button clamp BE 438D 15 Tension release solenoid cover 8 Pulley 9 Cotton stand CF TM is a trademark of SanDisk Corporation 4400Q 4401Q ...

Страница 9: ...k clamp lifter Pulse motor driven mechanism Work clamp height Button clamp height 17 mm max 13 mm max Rotary hook Shuttle hook shuttle hook 2 optional Shuttle hook Wiper device Standard equipment Thread trimmer device Standard equipment Thread nipper device Standard equipment Data storage method Flash memory Any sewing pattern can be added using CF card 2 Number of user programs 50 Number of cycle...

Страница 10: ...ion ratio is 100 For ordinary materials 01 Tacking size mm Tacking size mm No Sewing pattern No of stitches Length Width No Sewing pattern No of stitches Length Width 1 42 16 2 65 43 16 2 4 31 16 2 66 32 16 2 5 29 10 2 67 30 10 2 8 21 7 2 68 22 7 2 13 35 10 2 69 36 10 2 15 42 10 2 70 43 10 2 20 28 7 2 71 29 7 2 21 35 7 2 72 36 7 2 64 30 16 2 89 90 24 3 For denim 02 Tacking size mm Tacking size mm ...

Страница 11: ...ing pattern No of stitches Length Width No Sewing pattern No of stitches Length Width 7 28 8 2 73 29 8 2 9 21 7 2 74 22 7 2 22 14 7 2 75 15 7 2 31 28 8 2 76 29 8 2 32 22 8 2 77 23 8 2 33 15 8 2 The sewing start and sewing end are in the middle of the pattern Straight bar tacking Vertical zigzag stitching Tacking size mm Tacking size mm No Sewing pattern No of stitches Length Width No Sewing patter...

Страница 12: ...ight bar tacking Tacking size mm Tacking size mm No Sewing pattern No of stitches Length Width No Sewing pattern No of stitches Length Width 26 28 3 10 28 19 0 3 10 27 35 3 10 29 21 0 3 10 40 32 3 16 30 28 0 3 10 41 36 3 16 46 27 0 3 20 42 44 3 20 47 44 0 3 25 43 68 3 24 ...

Страница 13: ...h Width No Sewing pattern No of stitches Length Width 34 35 12 7 37 57 7 12 35 58 12 7 38 53 7 10 36 57 7 12 39 53 7 10 Crossed stitching Crossed tacking Tacking size mm Tacking size mm No Sewing pattern No of stitches Length Width No Sewing pattern No of stitches Length Width 48 70 10 10 50 84 16 16 49 93 9 6 9 6 51 105 30 26 ...

Страница 14: ...6 9 9 59 104 10 10 57 116 9 9 60 114 10 10 58 127 9 9 61 124 10 10 For eyelet buttonhole Tacking size mm No Sewing pattern No of stitches Length Width 86 21 6 2 87 28 6 2 88 35 6 2 If you want to sew a pattern other than standard patterns you can create your original pattern using the PS 3000 Consult with your local Brother sales Office for details Note when creating additional data program nos 20...

Страница 15: ...ide is completed and then the other side is sewn Sewing size mm No No of button holes Sewing pattern No of threads No of crossover stitches No of stitches X Y 1 6 12 2 8 14 3 10 16 4 12 18 1 5 16 22 1 6 20 26 3 4 0 2 7 6 12 2 23 10 16 2 8 2 12 18 0 3 4 2 9 5 5 5 21 2 24 7 7 7 27 2 25 5 5 5 21 2 26 3 7 7 7 27 2 6 2 4 10 6 6 1 19 11 8 8 1 23 12 8 8 3 25 13 10 10 1 27 27 4 12 12 1 31 3 4 3 4 1 Check ...

Страница 16: ...9 19 8 8 1 23 31 10 10 1 27 45 12 12 1 31 3 20 6 6 0 24 4 40 6 6 0 24 3 32 8 8 0 28 4 41 8 8 0 28 3 33 10 10 0 32 4 42 4 10 10 0 32 3 4 3 4 3 When sewing of one side is completed the button clamp rises and the thread is trimmed To finish sewing press the foot switch until sewing of the other side starts or press the foot switch again after sewing of the other side is completed 4 When sewing of one...

Страница 17: ...inish sewing press the foot switch until sewing of the other side starts or press the foot switch again after sewing of the other side is completed 4 When sewing of one side is completed the thread will be trimmed without the button clamp rising and then the other side will be sewn For shank button Sewing size mm No Sewing pattern No of threads No of stitches X Y 50 6 12 51 8 14 52 10 16 53 12 18 ...

Страница 18: ...h may result in personal injury or damage to the machine All cords should be secured at least 25 mm away from any moving parts Furthermore do not excessively bend the cable or secure it too firmly staples otherwise there is the danger that fire or electric shocks could occur Be sure to connect the ground If the ground connection is not secure you run the risk of receiving a serious electric shock ...

Страница 19: ...pcs 5 Spacers 4 pcs 6 Plain washers 4 pcs 7 Nuts 8 pcs The recommended tightening torque for the nuts 7 is 4 0 0 1N m 8 Power switch 9 Wood screws 2 pcs 10 Staples 4 pcs 3 3 Installing the oil pan 1 Oil pan 2 Bolts 3 pcs 3 Plain washers 3 pcs 4 Spring washers 3 pcs 5 Nuts 3 pcs 6 Rubber caps 2 pcs 7 Rubber cushion 2 pcs 8 Oiler 4404Q Operator 4403Q 4405Q ...

Страница 20: ... between the machine head and the oil pan When holding the machine head do not hold it by the pulse motor otherwise it may damage the pulse motor 4 Hinge holders 2 pcs 5 Bolts 4 pcs 6 Plain washers 4 pcs 7 Spring washers 4 pcs 8 Nuts 4 pcs 9 Head spring 10 Head rest Note Check that the machine head switch is turned on as shown in Figure 1 Tap the head rest 10 securely into the table hole 4406Q Pul...

Страница 21: ...d through the hole in the table and then insert it into the control box through the hole in the side of the control box 3 Staples 3 pcs 3 6 Installing the treadle unit 1 Treadle unit 2 Bolts 3 pcs 3 Plain washers 3 pcs 4 Spring washers 3 pcs 5 Nuts 3 pcs Use a commercially available foot switch and connecting rod 4409Q 4408Q ...

Страница 22: ...es not move 3 8 Installing the button tray BE 438D Install the button tray at a place convenient for operation 1 Button tray holder 2 Wood screws 2 pcs 3 Button tray 4 Set screw 3 9 Installing the eye guard CAUTION Attach all safety devices before using the sewing machine If the machine is used without these devices attached injury may result 1 Eye guard assembly 2 Screws 2 pcs 3 Plain washers 2 p...

Страница 23: ... the connector is facing the correct way and then insert it firmly until it locks into place Secure the cables with cable ties and cord clamps while being careful not to pull on the connector Main P C board Connectors Connection location on main P C board Cord clamps X pulse motor encoder 5 pin White P2 X ENC 3 Y pulse motor encoder 5 pin Blue P3 Y ENC 3 Work clamp encoder 5 pin Black P4 P ENC 3 F...

Страница 24: ... XPM 6 7 Note Route the X Y and work clamp pulse motor harnesses so that they do not touch the PMD P C board 5 Close the cord presser plate 2 in the direction of the white arrow and secure it by tightening the two screws 1 Note Close the cord presser plate 2 securely so that no foreign objects insects or small animals can get inside the control box 6 Check that the cords do not get pulled and then...

Страница 25: ...nd wire from upper shaft motor harness 2 Ground wire from the machine head 3 Ground wires from X Y and work clamp encoder harnesses 3 wires 4 Ground wire from operation panel harness The recommended tightening torque for the ground screws is 1 0 0 1 N m Note Make sure that the ground connections are secure in order to ensure safety 5 Tighten the control box cover with the eight screws Check that t...

Страница 26: ...3 INSTALLATION 19 KE 430D BE 438D 3 12 Installing the back cover 1 Back cover 2 Screws 4 pcs Note Be careful not to clamp the cords when installing the back cover 1 4417Q ...

Страница 27: ...y replenished before it is used for the first time and also after long periods of non use Use only the lubricating oil NIPPON OIL CORPORATION Sewing Lube 10N VG10 specified by Brother If this type of lubricating oil is difficult to obtain the recommended oil to use is Exxon Mobil Essotex SM10 VG10 1 Fill the oil tank with oil Note Fill the machine with oil when the oil level is down to about one t...

Страница 28: ... ground wire 2 Insert the power plug into a properly grounded AC power supply The inside of the control box uses single phase power NOTE If the ground connection is not secure electric shocks operating errors or damage to electronic components such as P C boards may occur Do not use extension cords They may cause problems with correct operation of the sewing machine 4114M Single phase specificatio...

Страница 29: ...eared if you turn the machine pulley to set the needle to the needle up stop position 1 Turn on the power switch The POWER indicator 3 will illuminate and the model name will appear in the program No display 4 and the specifications will appear in the menu display 5 Specifications Ordinary materials 01 Denim 02 Knitted materials 07 Foundation garments 0F After this the program number will flash in...

Страница 30: ... needle 2 in a straight line as far as it will go making sure that the long groove on the needle is at the front and then securely tighten the screw 1 4 2 Threading the upper thread Thread the upper thread correctly as shown in the illustration below When using threading mode for threading the tension discs 1 will open so that the thread can be threaded more easily Refer to following page 4424Q 44...

Страница 31: ...dicators switch off Press the THREAD CLAMP key The work clamp button clamp will lower The tension discs will open 3 Threading the thread When 5 minutes have passed the buzzer will sound and the tension discs will close 4 Ending threading mode THREAD CLAMP indicator switches off Press the THREAD CLAMP key The work clamp button clamp will return to where it was before threading mode was started 4421...

Страница 32: ...e the TENSION WIND key 3 after the machine starts operating and keep depressing the foot switch until the lower thread stops being wound onto the bobbin If you release the foot switch before winding is complete and then depress it again while pressing the TENSION WIND key 3 winding will start again 7 Once winding of the set amount of lower thread 80 90 of the bobbin capacity is completed the bobbi...

Страница 33: ...d through the slot 2 and pull it out from the thread hole 3 4 Check that the bobbin turns in the direction of the arrow when the thread is pulled 5 Pass the thread through the lever thread hole 4 and then pull out approximately 30 mm of thread 6 Hold the latch on the bobbin case and insert the bobbin case into the rotary hook 4 5 Thread tension 4 5 1 Lower thread tension Adjust the thread tension ...

Страница 34: ...valent 30 or equivalent 60 or equivalent Lower thread 60 or equivalent 80 or equivalent 60 or equivalent 50 or equivalent 60 or equivalent Upper thread tension N 0 8 1 2 1 6 2 0 1 0 1 8 Lower thread tension N 0 2 0 3 0 2 0 4 Pre tension N 0 05 0 3 0 1 0 4 Needle DP x 5 14 DP x 5 9 DPx17NY 19 DPx17NY 12 Guide to maximum sewing speed for KE 430D Max sewing speed rpm Use Standard hook Large hook 8 la...

Страница 35: ...he tension nut 1 sub tension to adjust the upper thread trailing length to 35 38 mm Adjust the upper thread trailing length to less than 40 mm after replacing the upper thread also 2 If the upper thread trailing length is 40 mm or more or if the upper thread tension is weak and the upper thread does not form a good seam at the first stitch the end of the thread that is being held by the thread nip...

Страница 36: ...ith the KE 430D the lower thread may poke out from the underside of the material on the 2nd stitch for some types of material and thread If this happens it is recommended that you use sewing patterns that are designed for use with the thread nipper device Refer to 2 2 Program list KE 430D for details of the sewing patterns Program No Reference Table Specifications Standard program No Program No fo...

Страница 37: ...utton clamp Confirm that the button is securely held by the clamp 2 Loosen the shoulder screw 1 while the button is held by the clamp Move the adjusting plate 2 so that the space between the adjusting plate 2 and screw 3 is approximately 0 5 1 0 mm then tighten the shoulder screw 1 4 9 Installing the accessory spring BE 438D If you would like the button to be raised up more after it is sewn instal...

Страница 38: ...N indicator Illuminates when an error occurs 3 RESET key Used to reset errors 4 TEST key Used to start test mode 5 TEST indicator Illuminates when the TEST key 4 has been pressed 6 THREAD CLAMP key Used to start threading mode or work clamp height setting mode 7 THREAD CLAMP indicator Illuminates when the THREAD CLAMP key 6 has been pressed 8 TENSION WIND key Used to wind the lower thread 9 TENSIO...

Страница 39: ... for specifying a pause while the program is running exists 15 SELECT key Used to select a menu X scale Y scale sewing speed and counter 16 Menu display Displays information such as menu setting values memory switch settings and error codes 17 Setting keys Used to change the value which is displayed in the menu display 16 18 PROGRAM No display Displays information such as program numbers 19 Settin...

Страница 40: ... setting or the Y SCALE indicator 3 for Y scale setting is illuminated The setting value will display in the menu display 4 When memory switch no 402 is set to ON the settings will be displayed in units of mm 2 Press the or key 5 to set the scale 20 200 The program number will flash in the PROGRAM No display 6 3 Depress the foot switch to the 2nd step The feed mechanism will move to the home posit...

Страница 41: ...If you depress the foot switch to the 1st step while the feed mechanism is moving the feeding speed will become faster while the foot switch is being depressed Sewing standby mode TEST indicator switches off If you would like sewing to start while test feeding is in progress press the TEST key to switch off the TEST indicator When you depress the foot switch to the 2nd step sewing will start If yo...

Страница 42: ...without touching the button If you turn the machine pulley one full rotation in the direction of sewing machine operation at this time the feed mechanism will move forward by one stitch when the needle bar is near the needle up position In addition if you depress the foot switch to the 2nd step again the feed mechanism will start moving continuously one stitch at a time Sewing standby mode TEST in...

Страница 43: ...s the THREAD CLAMP key to end setting mode and then repeat the procedure from step 1 Press the or key to set the work clamp height The work clamp button clamp will rise or drop to the height of the new value that has been set When memory switch no 003 is ON Press the key The sewing machine will switch to intermediate work clamp height setting mode 3 will appear in the PROGRAM No display and the wo...

Страница 44: ...witch setting mode Refer to 6 2 Setting memory switches 2 Lower thread counter setting mode Refer to 6 4 Using the lower thread counter 3 Production counter setting mode Refer to 6 5 Using the production counter 4 When the SPEED indicator lights Production counter temporary display function Refer to 6 5 Using the production counter 5 User program setting mode Refer to 6 6 Using user programs 4488Q...

Страница 45: ...s that have been changed from default settings While pressing the SELECT key press the or key The numbers of memory switches that have been changed from default settings will appear in order If no memory switches have been changed from their default settings the display will not change and the buzzer will beep twice 3 Ending setting mode TEST indicator switches off Press the TEST key The changes w...

Страница 46: ...st indicator is illuminated test feeding will move forward one stitch at a time when the machine pulley is turned by hand 2 Production counter display OFF Lower thread counter display 300 ON Production counter display OFF User programs OFF Disable 400 ON User program mode is enabled OFF Cycle programs OFF Disable 401 ON When sewing user programs the set programs are sewn in numeric order OFF Units...

Страница 47: ...tial value will be memorized Lower thread counter operation If you press the SELECT key 1 to select the counter display menu when memory switch no 300 is set to OFF the COUNTER indicator will illuminate and the lower thread counter will appear in the menu display 2 1 Each time the sewing of a single article is completed the value shown in the menu display 2 is reduced by 1 2 When the lower thread ...

Страница 48: ...set to ON the SPEED and COUNTER indicators will illuminate and the production counter will appear in the menu display 2 1 Each time the sewing of a sin gle article is completed the value shown in the menu display 2 is increase by 1 2 The first three digits will appear in the PROGRAM No display 4 while the key 3 is being pressed so that the total number of digits displayed will be 7 3 If you press ...

Страница 49: ... SELECT key Switch to user program recording mode Check that the menu indicators are flashing User program number will appear in the PROGRAM No display and P will appear in the menu display Press the or key to select a user program number 2 First set the program number Press the or key to set the program number that you would like to record 3 Next set the X scale X SCALE indicator flashes Press th...

Страница 50: ...T key Press the or key to set the desired intermediate work clamp height 8 TEST indicator lights Menu indicators flash Press the SELECT key If setting further user programs select the user program number and then repeat steps 2 to 8 9 End user program recording mode TEST indicator switches off Menu indicators light Press the TEST key This completes the recording of a user program The user program ...

Страница 51: ...ale Y scale and sewing speed Clearing a user program 1 TEST indicator lights Menu indicators flash While pressing the TEST key press the SELECT key Switch to user program recording mode Check that the menu indicators are flashing User program number will appear in the PROGRAM No display and the program number will appear in the menu display Press the or key to select the user program number which ...

Страница 52: ...e recorded in a cycle program 2 Switch to cycle program recording mode and select the cycle program number Menu indicators switch off Press a function key from F1 to F4 Cycle program number will appear in the PROGRAM No display and 1 will appear in the menu display Press a function key from F1 to F4 or press the or key to select a cycle program number 3 Set the step 1 Press the or key to set the p...

Страница 53: ...le program number The cycle program number can be selected directly by pressing function keys F1 to F4 2 Refer to 6 8 Direct selection 2 Check that the needle drop position is correct and then start sewing Refer to 5 5 5 6 Checking the sewing pattern 3 The recorded user program will be sewn step by step and when the final step is complete the menu display 3 will return to showing step 1 If you pre...

Страница 54: ...Switch to cycle program recording mode Press a function key from F1 to F4 or press the or key to select the cycle program number to be cleared 3 Press the RESET key The buzzer will sound and the cycle program with the number selected will be cleared Clearing all cycle programs Press and hold the RESET key for 2 seconds or more The buzzer will sound and the all cycle programs will be cleared Note I...

Страница 55: ...ave been formatted using the FAT16 method Cards that have been formatted using the FAT32 method cannot be used 1 With the power turned off insert the CF card into the CF slot Note Make sure the CF card is facing the correct way The cover should be closed at all times except when the CF card is inserted and removed otherwise dust may cause trouble 2 CF media indicator lights Turn on the power switc...

Страница 56: ...ot switch to the 2nd step The feed mechanism will move to the home position 4 Set the material under the work clamp 2 For the BE 438D insert the button and place the material under the button clamp 3 Refer to 4 7 Inserting the button 5 Depress the foot switch to the 1st step The work clamp 2 button clamp 3 will be lowered 6 Depress the foot switch to the 2nd step The sewing machine will start sewi...

Страница 57: ...rwise inflammation can result Furthermore do not drink the oil or eat the grease under any circumstances as they can cause vomiting and diarrhoea Keep the oil out of the reach of children 8 1 Cleaning the rotary hook 1 Pull the shuttle race cover downward to open it and then remove the bobbin case 2 Open the setting claw 1 in the direction indicated by the arrow and then remove the shuttle race ba...

Страница 58: ...is full 2 After emptying the waste oil container 1 screw it back into its original position 8 4 Cleaning the eye guard Wipe the eye guard clean with a soft cloth Note Do not use solvents such as kerosene or thinner to clean the eye guard 8 5 Checking the needle Always check that the tip of the needle is not broken and also the needle is not bent before starting sewing 8 6 Lubrication Carry out the...

Страница 59: ...continue sewing temporarily without applying grease 1 Press the RESET key 3 2 The PROGRAM No display 1 and the menu display 2 will change to the normal displays and sewing can be carried out by depressing the foot switch Note GrE and AS UP will continue to be displayed each time the power is turned on until grease is applied and the notification is reset by carrying out the procedure on page 54 If...

Страница 60: ...se a cloth to wipe away any excess grease from around the screw 2 7 Apply grease to all locations shown on the following page in the same way 8 After this carry out the reset procedure given on the following page Note Once the grease tube has been opened remove the nozzle from the tube attach the cap securely and store the tube in a cool dark place The grease should be used as quickly as possible ...

Страница 61: ...ll appear in the program No display 1 and the cumulative number of stitches until greasing is required will appear in the menu display 2 in units of 100 000 stitches The number of stitches will be displayed in all seven digits of the program No display 1 and menu display 2 in units of 100 stitches while the key 6 is being pressed 4 Press the key 7 The cumulative number of stitches will be reset to...

Страница 62: ...P notification appears without the grease being applied without the reset procedure being carried out Apply grease and then carry out the reset procedure Refer to the service manual for the reset procedure E110 Needle up stop position error Turn the pulley to align the index mark with the needle up stop position E111 Upper shaft did not stop at the needle up stop position when the sewing machine s...

Страница 63: ...uring test feeding Turn off the power and check that there is no problem with the Y feed direction Work clamp related errors Code Cause and remedy E300 Work clamp home position cannot be detected Problem with work clamp motor or poor work clamp home position sensor connection Turn off the power and then check that connector P3 on the PMD P C board and connector P4 on the main P C board are properl...

Страница 64: ...related errors Code Cause and remedy E690 Thread nipper home position error Turn off the power and then clean underneath the needle plate to remove any dust and thread scraps Check that connector P12 on the main P C board is properly connected E691 Thread nipper retract position error Check if the upper thread trailing length is too long Turn off the power and then clean underneath the needle plat...

Страница 65: ......

Страница 66: ...INSTRUCTION MANUAL KE 430D BE 438D SA3390 501 2007 12 B 1 http www brother com ...

Отзывы: