background image


Hotspur 5 & 9 Issue 2 December 2017   

24


Appropriate Fuels


Both the Hotspur 5 and the Hotspur 9 are designed tested and approved as wood 
burning appliances. However an optional coal kit can be purchased to allow the burning 
of certain coals. The kit consists of two refractory bricks which must be present in the 
stove at all times whilst burning coal. 
 

Product 

Suitable Fuel 

Hotspur 5 Standard (without coal kit) 

  Split Wood logs 


Hotspur 5 (with coal kit) 

  Split Wood logs  

  Coal suitable for a closed appliance


Hotspur 9 Standard (without coal kit) 

  Split Wood logs 


Hotspur 9 (with coal kit) 

  Split Wood logs  

  Coal suitable for a closed appliance


* Split Wood logs (not exceeding 350mm in length and 100mm in diameter) not 
exceeding 20% moisture content.


Approval does not cover the use of other fuels either alone or mixed with the suitable 
fuels listed above.


In the case of the Hotspur 5 with the coal kit added, you can find a list of approved coals 
on the HETAS website. 


Wood logs should be no longer than 25cms (dry, seasoned to under 20% moisture 
content).  


House coal should not be burned on any of our products regardless of a coal kit. 
You should not burn any other coals which are intended for use on open fires. 


Under NO circumstances burn “petroleum coke”

 or any other chemically enhanced 

fuel as it will burn out the internal grate and baffle plates in a very short period of time 
and may damage the stove beyond repair. 


Do NOT burn wet wood, 

This will give a poor heat output and will cause heavy 

deposits of soot and tar to accumulate on the glass and throughout the stove and flue. 
The coating of soot and tar in the chimney is volatile creating a high risk of chimney 
fires. A growing tree contains a high percentage of water, the wood needs to be dried 
out (seasoned) before it is suitable for burning (this can take several years). Wood logs 
are best stored in a stack, sheltered from the weather, in a well ventilated area and 
raised off the ground. This allows the air to circulate and prevents mildew.


Содержание Hotspur 5

Страница 1: ... 2017 1 Installation Operating Instructions Covering Models Hotspur 5 Hotspur 9 Wood Burning Stoves Optional Coal Kit Available Tested to EN 13240 These appliances must be installed and commissioned by a HETAS registered engineer ...

Страница 2: ...ification 21 Internal Component s 21 Controls Layout 22 Controls Explained 22 Appropriate Fuels 24 Lighting the Stove Kindling Stage 25 Burning Wood Burning Coal 26 Smoke Control Areas 27 Warning Notes 28 Maintenance Ash Removal 29 Cleaning the Stove 29 Glass Cleaning 29 Chimney Sweeping 29 Chimney Fires 29 Stove Servicing 29 Trouble shooting 30 Commissioning Form 31 Spare Parts 32 Annual Service ...

Страница 3: ...hey affect the installation of the stove It should be noted that the Building Regulations requirements may be met by adopting the relevant recommendations given in British Standards BS 8303 and BS EN 15287 1 2007 A1 2010 as an alternative means to achieve an equivalent level of performance to that obtained following the guidance given in Approved Document J Please note that it is a requirement und...

Страница 4: ... whenever a new or replacement fixed solid fuel or wood biomass appliance is installed in a dwelling an audible carbon monoxide alarm must be fitted in the same room as the appliance Further guidance on the installation of the carbon monoxide alarm is available in BS EN 50292 2002 and from the alarm manufacturer s instructions Provision of an alarm must not be considered a substitute for either in...

Страница 5: ... Flue Diameter mm 125 150 Flue Diameter Inches 5 6 Flue Draft Min Pa 12 12 Flue Draft Max Pa 18 18 Flue Temp Wood C 253 298 Flue Temp Coal C 205 328 CO Emission 13 O 2 Wood 0 08 0 09 CO Emission 13 O 2 Coal 0 40 0 09 Flue Mass Flow Wood g s 4 3 4 2 7 0 6 6 Flue Mass Flow Coal g s Fuel Consumption Per Hour Wood Fuel Consumption Per Hour Coal 1 10Kg 0 75Kg 2Kg 1 2Kg Please note the figures above are...

Страница 6: ...Hotspur 5 9 Issue 2 December 2017 6 Dimensions Hotspur 5 Hotspur 9 ...

Страница 7: ...250mm 800mm 800mm Non combustible 50mm 100mm 300mm 100mm Hotspur 9 Combustible 170mm 250mm 1200mm 1200mm Non combustible 50mm 100mm 300mm 100mm Please note that for non combustible materials the clearances are much lower These are minimum clearances and may not provide sufficient space in your installation to provide adequate access for maintenance Ideally you want as much space around the product...

Страница 8: ...Hotspur 5 9 Issue 2 December 2017 8 Hearth Requirements Clearances Installation options when fitting Hotspur 5 to Combustibles Installation options when fitting Hotspur 9 to Combustibles ...

Страница 9: ...al cowl to the top of the chimney e g anti down draft cowl to eliminate wind induced down draft The outlet from the chimney should be above the roof of the building in accordance with the provisions of Building Regulations Approved Document J If installation is into an existing chimney then it must be sound and have no cracks or other faults which might allow fumes into the house Older properties ...

Страница 10: ...ng vertical flue The code for ordering the rear flue spigot is S HOTSPUR5 RF for Hotspur5 To fit the rear flue spigot you will first need to lift off the lid of the stove and then remove the original top spigot The sequence below will guide you through this process Step 1 Remove the vermiculite baffle Step 2 Remove the square secondary metal baffle that is adjacent the fitted spigot Step 3 Loosen ...

Страница 11: ...t Calculation Hotspur 9 For new build properties you will need 9 x 550mm 4950mm Older properties you will need 4 x 550mm 2200mm There must not be an extractor fan fitted in the same room as the stove as this can cause the stove to emit fumes into the room It is necessary to install a wall vent to provide the necessary combustion air and to prevent the depletion of oxygen in the room Direct Externa...

Страница 12: ...lator O DEAS KIT 100 BROWN Brown coloured outside ventilator O DEAS KIT 100 BLACK Black coloured outside ventilator The kit contains the following 1 x 6x6 Louvre Ventilator available in White Terracotta Buff Sand Brown Black 1 x 6x6 Louvre Back plate with 97mm Diameter Spigot 1 x 1 5m of Semi Rigid Aluminium Duct 102mm 4 inches Diameter 2 x 100mm Diameter Jubilee Clips The minimum diameter of duct...

Страница 13: ...s the appliance eg open plan kitchen diner etc DEAS Kit can be used however a risk assessment and commission testing needs to be carried out in accordance with HETAS Technical Note HETAS_TN_0020 v1 0 Extra ventilation may be required If the property has mechanical heat recovery Do Not Fit the DEAS Between 1975 2008 Class 3 NO A large proportion of properties fall into this category and the energy ...

Страница 14: ...ciently and safely there should be an adequate air supply into the room in which the stove is installed to provide combustion air This is particularly necessary in modern houses where drafts have been almost eliminated by double glazing etc Fitting the appliance into such properties requires No possible means of air being taken from the room of the appliance eg Mechanical ventilation systems Measu...

Страница 15: ... mark andcut a 4 Inch 100mm diameter hole into the external wall Feed the semi rigid ducting through the hole as pictured right Step 2 Feed 1 x Jubilee Clip over the opposite end of the duct pipe just fitted through the external wall Attach the pipe to the DEAS spigot already assembled on the stove Tighten the jubilee clip so the duct pipe is secure and sealed When the connection is made manoeuvre...

Страница 16: ...ip is tightened in a position whereas it can be inserted into the hole in the wall cavity leaving the back panel flush with the outer wall Ensure unwanted bends are not made in the duct pipe connecting the stove to the back plate Step 4 Fix the back plate to the outside wall Screws and plugs to the external wall are not included It is the fitter s discretion in choosing screws and fixings suitable...

Страница 17: ...ting the DEAS KIT Step 5 Finally screw the grille ventilator to the back plate using the 4 x screws supplied As mentioned previously it is important to ensure the air duct ventilator does not become blocked from snow or debris and to prevent water and vermin ingress ...

Страница 18: ...d within manufacturer instructions A CO alarm has been fitted Step 1 Cold Spillage Test Appliance Door Shut 1 Close all external doors and windows internal doors to the room the appliance is located in and ensure all openable ventilators are closed and any devices that extract air from the dwelling are off 2 Preheat the flue by lighting a small fire using kindling a blow lamp or electric heater 3 ...

Страница 19: ...un the extract systems for ten minutes and then record the flue draught reading The reading should not be lower than the previous reading obtained with extracts running and not fall below the parameters specified by the appliance manufacturer 7 Once the tests confirm satisfactory operation remove the test device and seal any apertures in the flue way if required Note If at any stage during commiss...

Страница 20: ...lable or no draught reading is given you can test with smoke as a safety check but there is no substitute for using the correct tools and undertaking the correct tests Commissioning is the final stage of an installation and intended to evidence that the appliance works safely at the time the commissioning takes place All dedicated external air supply installations are subject to the relevant commi...

Страница 21: ... the stove with all internals taken out To take internals out of the stove follow the numbered sequence backwards from 10 down to 1 1 Top Rear Vermiculite Replace by removing Tertiary air bar 2 2 Tertiary Air Bar Remove by Loosening 10mm bolts 3 Bottom Rear Vermiculite 4 Right Side Vermiculite 5 Left Side Vermiculite 6 Baffle Remove by pulling towards the front of stove and drop on one side 7 Grat...

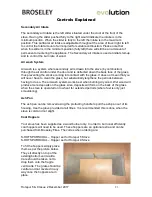
Страница 22: ...mary air intake is the right slider situated below the door at the front of the stove Having the slider fully to the left would indicate the intake is in the minimum position When the slider is fully to the right the intake is the maximum position This particular air intake is adjustable throughout the area of travel left to right to control the total amount of air required for suitable combustion...

Страница 23: ...oes not mean that you will never have to clean the glass but substantially lengthens the periods between having to do so The air wash system works best when burning dry wood Wet wood will produce more deposits on the glass Also deposits will form on the back of the glass when the stove is operated on low heat for extended periods where fuel is only just smouldering Ash Pan The ash pan can be remov...

Страница 24: ...ed you can find a list of approved coals on the HETAS website Wood logs should be no longer than 25cms dry seasoned to under 20 moisture content House coal should not be burned on any of our products regardless of a coal kit You should not burn any other coals which are intended for use on open fires Under NO circumstances burn petroleum coke or any other chemically enhanced fuel as it will burn o...

Страница 25: ...ur fire using scrunched up balls of newspaper Form a bed on the grate using the newspaper then add a generous amount of dry kindling in a criss cross pattern as shown below Stage 2 Ignite the paper underneath using a match or suitable fire lighter Allow the paper and kindling to burn until it reduces down into hot embers If the fire is dying during this stage the door can be closed but not latched...

Страница 26: ... want to keep the fire going simply allow it burn out Burning Coal Provided the coal kit is present With kindling complete you are now ready to add your approved coal Stage 4 Using the gloves and provided ash tool rake the hot embers evenly over the grate and add a small amount of coal Close the door and allow the coal to ignite then close the Secondary Air approximately half way The primary air c...

Страница 27: ...er in the devolved administrations The Hotspur 5 9 have both been recommended as suitable for use in smoke control areas when burning wood They have a modified secondary tertiary air control slide to prevent complete closure Further information on the requirements of the Clean Air Act can be found here https www gov uk smoke control area rules Your local authority is responsible for implementing t...

Страница 28: ...ill not emit fumes into the dwelling Occasional fumes may occur whilst de ashing and re fuelling However persistent fume emission is potentially dangerous and must not be tolerated If fume emission does persist the following immediate actions should be taken a Open doors and windows to ventilate the room b Let the fire go out or eject and safely dispose of fuel from the appliance c Check for flue ...

Страница 29: ...ng A damp lint free cloth is normally sufficient however for stubborn build ups we would recommend using a very fine wire wool Chimney Sweeping It is essential that your chimney flue is swept at least once a year by a registered professional chimney sweep Sweeping removes particles that could otherwise fuel a chimney fire it should also highlight any potential issues such as leaks and damage to th...

Страница 30: ...y to prevent heat being drawn up the chimney to waste Green or wet wood is being burnt The chimney has excessive draw this is unusual Seek installer advice with regard to installing a Flue Draught Stabiliser The stove has been recessed into the existing fireplace and a lot of heat is being absorbed by the surrounding fireplace walls rather than being radiated into the room Pull the stove forward F...

Страница 31: ..._____________________ Address _______________________________________________________________ Telephone Inc area code _________________________________________________ HETAS Registration Number ______________________________________________ Check list please indicate Yes or No by circling or ticking appropriately Is the flue system the correct length and diameter for stove Yes No Flue swept and ch...

Страница 32: ...Parts Steel Door Version 1 Grate 2 Vermiculite set 3 Door 4 Glass 5 Door Handle 6 Ash pan 7 Log Retainer 8 Tertiary Air Bar 9 Vermiculite Bracket 10 Top Flue Outlet Spigot 11 Lid 12 Side Panel L R 13 Front Panel 14 DEAS Air Stub 15 Steel Baffle ...

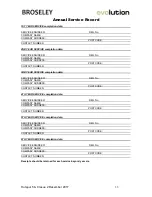
Страница 33: ...ERVICE completion date SERVICE ENGINEER REG No COMPANY NAME COMPANY ADDRESS POSTCODE CONTACT NUMBER 4TH YEAR SERVICE completion date SERVICE ENGINEER REG No COMPANY NAME COMPANY ADDRESS POSTCODE CONTACT NUMBER 5TH YEAR SERVICE completion date SERVICE ENGINEER REG No COMPANY NAME COMPANY ADDRESS POSTCODE CONTACT NUMBER 6TH YEAR SERVICE completion date SERVICE ENGINEER REG No COMPANY NAME COMPANY AD...

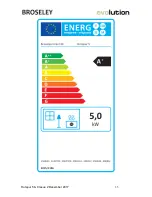
Страница 34: ...els supplied by the same manufacturer Comments Installer Hand Over Instruction Energy Efficiency Class A Nominal Heat Output to Room 5 0 Nominal Heat Output to Water 0 0 Product Fiche Energy Labelling Directive EU 2015 1187 for Solid Fuel Boilers and Packages of Solid Fuel Boilers Supplementary Heaters Temperature Controls and Solar Devices Manufacturer Name Broseley Fires Ltd Model Name Hotspur 5...

Страница 35: ...Hotspur 5 9 Issue 2 December 2017 35 ...

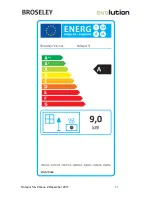
Страница 36: ...els supplied by the same manufacturer Comments Installer Hand Over Instruction Energy Efficiency Class A Nominal Heat Output to Room 9 0 Nominal Heat Output to Water 0 0 Product Fiche Energy Labelling Directive EU 2015 1187 for Solid Fuel Boilers and Packages of Solid Fuel Boilers Supplementary Heaters Temperature Controls and Solar Devices Manufacturer Name Broseley Fires Ltd Model Name Hotspur 9...

Страница 37: ...Hotspur 5 9 Issue 2 December 2017 37 ...

Страница 38: ...tioned units Replaced parts or components will become the property of Broseley Fires Should you wish to claim under the warranty please contact the supplier dealer from whom you purchased the appliance Do not claim directly to Broseley Fires as they are unable to process any direct claim from an end user Product design and any specifications are subject to change without notice This is due to our ...

Отзывы: