background image

Page 2

MODEL 757SNC 

TYPICAL INSTALLATIONS 
(continued)

SUSPENDED CEILINGS

Housing hung with wires - 3-point mount.

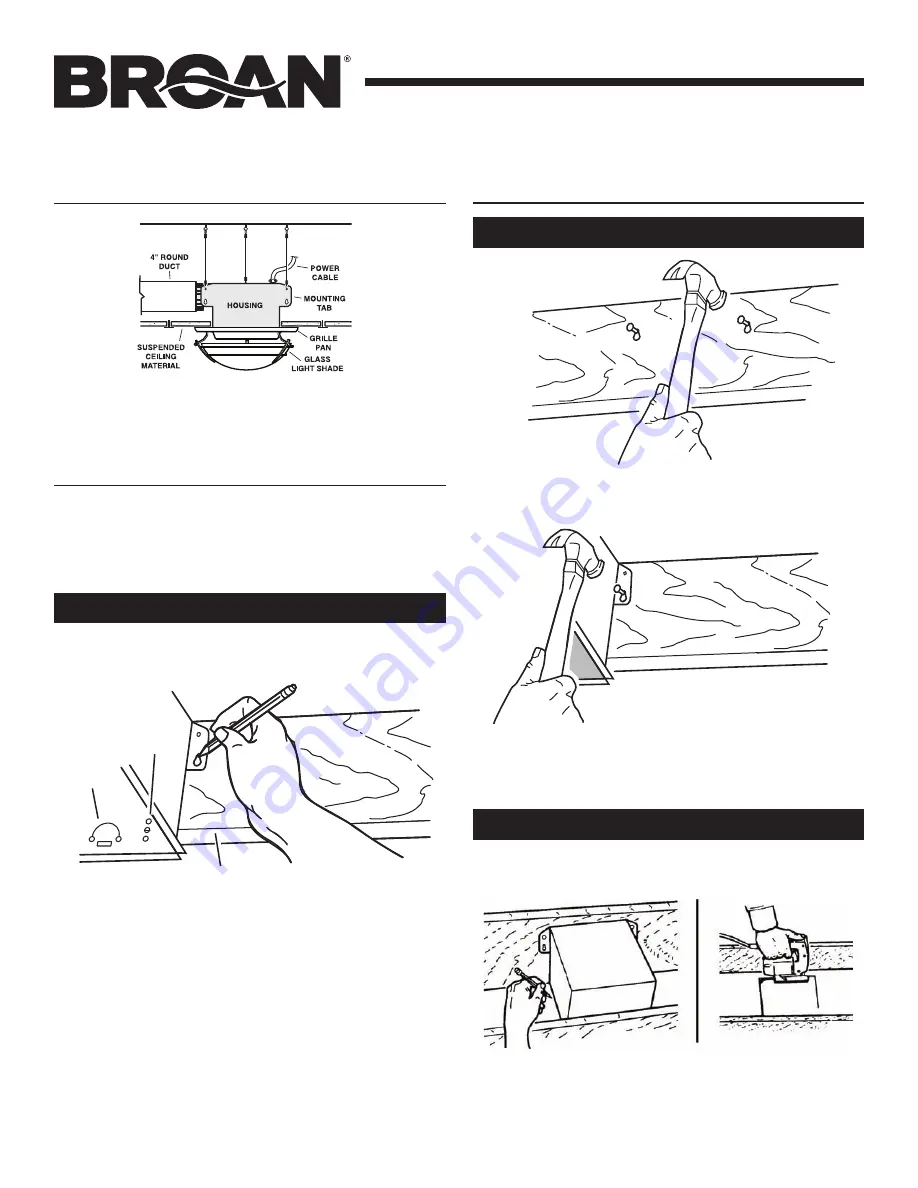
3. Set housing aside and drive nails partially into joist at the top of both 

keyhole marks.

4.  Hang housing from nails and pound nails tight. To ensure a noise-free 

mount, pound another nail through the top hole of each mounting tab.

INSTALL THE  HOUSING 
(continued)

New Construction

Existing Construction

2.  In attic, position mounting brackets against joist. Trace outline of housing 

on ceiling material.

1.  Choose the location for your fan/light in the ceiling. For best possible 

performance, use the shortest possible duct run and a minimum number 
of elbows.

3.  Set housing aside and cut ceiling opening slightly larger than marked.

INSTALL THE  HOUSING

1. Choose the location for your fan in the ceiling. For best possible 

performance, use the shortest possible duct run and a minimum number 
of elbows.

2.  Position mounting brackets against joist so that bottom edge of housing 

will be fl ush with fi nished ceiling.


Additional positioning feature for 5/8”, 1”, & 1

¼

” 

thick ceiling material:


Holes in corners of housing are labeled with various ceiling 
material thicknesses. Position housing so bottom edge of joist 
is visible through a matched set of holes. The housing is now in 
the proper position for that ceiling material thickness.


Additional positioning feature for 1/2” thick ceiling 
material:


Bend two tabs, on side of housing, 90° outward. Lift housing until 
tabs contact underside of joist.


Mark the keyhole slot on both mounting brackets.

New Construction

- PLEASE NOTE -

THE FOLLOWING INSTALLATION ILLUSTRATIONS SHOW 2 X 6 
JOISTS. IF YOU HAVE A TRUSS OR “

I

”-JOIST INSTALLATION, 

MOUNT THE VENTILATOR TO THE  ADDITIONAL  FRAMING 
IN THE SAME MANNER. (Additional framing must be a 2 x 6 
(minimum height), at least 9-inch long.)

BH0018A

BR0004

BR0005

BR0006

B

OTTOM


EDGE


OF


JOIST

5/8

1

1-1/4

BR0003

T

AB

H

OLES

Содержание 757SNC

Страница 1: ...tionand orcertificationrequirements the aforementioned requirements prevail on those of this document and the installer agrees to conform to these at his own expenses 11 When performing installation servicing or cleaning this unit it is recommended to wear safety glasses and gloves CAUTION 1 For general ventilating use only Do not use to exhaust hazardous or explosive materials and vapors 2 This p...

Страница 2: ... use the shortest possible duct run and a minimum number of elbows 2 Position mounting brackets against joist so that bottom edge of housing will be flush with finished ceiling Additional positioning feature for 5 8 1 1 thick ceiling material Holes in corners of housing are labeled with various ceiling material thicknesses Position housing so bottom edge of joist is visible through a matched set o...

Страница 3: ...lightest backdraft however will close the damper flap preventing air from entering unit or finished space 1 Snap the damper duct connector onto housing Make sure that tabs on the connector lock into slots in housing Top of damper duct connector should be flush with top of housing 2 Connect4 roundducttodamper ductconnectorandextendducttooutside through a roof or wall cap Check damper to make sure t...

Страница 4: ...SISTANCE OR SERVICE For the location of your nearest Broan Nutone Canada Incorporated dealer dial toll free 1 888 882 7626 Please be prepared to provide Product model number Date and Proof of Purchase The nature of the difficulty Broan NuTone Canada Inc 1140 Tristar Drive Mississauga ON L5T 1H9 USE AND CARE WARNING DISCONNECT ELECTRICAL POWER SUPPLY AND LOCK OUT SERVICE PANEL BEFORE CLEANING OR SE...

Страница 5: ...uit dans un mur 3 L ensemble du luminaire doit être assemblé au boîtier du ventilateur compris avec ce produit Ne pas assembler l ensemble du luminaire à un coffret de prise de courant 4 Afin d éviter tout dommage au roulement du moteur et dedébalancer ou de rendrebruyantelarouedumoteur gardez l appareil à l abri des poussières de gypse ou de construction rénovation etc 5 Nous vous recommandons de...

Страница 6: ... 1 po et 1 po d épaisseur Les trous dans les coins du boîtier sont identifiés selon différentes épaisseurs de matériau de plafond Positionner le boîtier de façon à ce que le rebord inférieur de la solive soit visible par les trous correspondant à l épaisseur du futur matériau de plafond Le boîtier est maintenant en position adéquate selon le matériau choisi Aide supplémentaire au positionnement po...

Страница 7: ...r de pénétrer dans l appareil et la pièce 1 Enclencher le raccord de conduit sur le boîtier S assurer que les pattes du raccord de conduit soient bien insérées dans les fentes du boîtier Le dessus du raccord de conduit doit être au même niveau que le dessus du boîtier 2 Relier un conduit rond de 4 po au raccord de conduit et acheminer le conduit vers l extérieur jusqu au capuchon de mur ou de toit...

Страница 8: ...imitée de un an de BROAN NUTONE CANADA INC Broan Nutone Canada garantit à l acheteur consommateur original de ses produits qu ils sont exempts de défauts dans les matières premières ou la main d œuvre pour une période de un an à compter de la date d achat originale IL N Y A PAS D AUTRES GARANTIES EXPRIMÉES OU IMPLICITES INCLUANT MAIS NON PAS LIMITÉ AUX GARANTIES IMPLICITES POUR FIN DE COMMERCIALIS...

Отзывы: