background image


CV355-10X Manual 


www.marshall-usa.com 


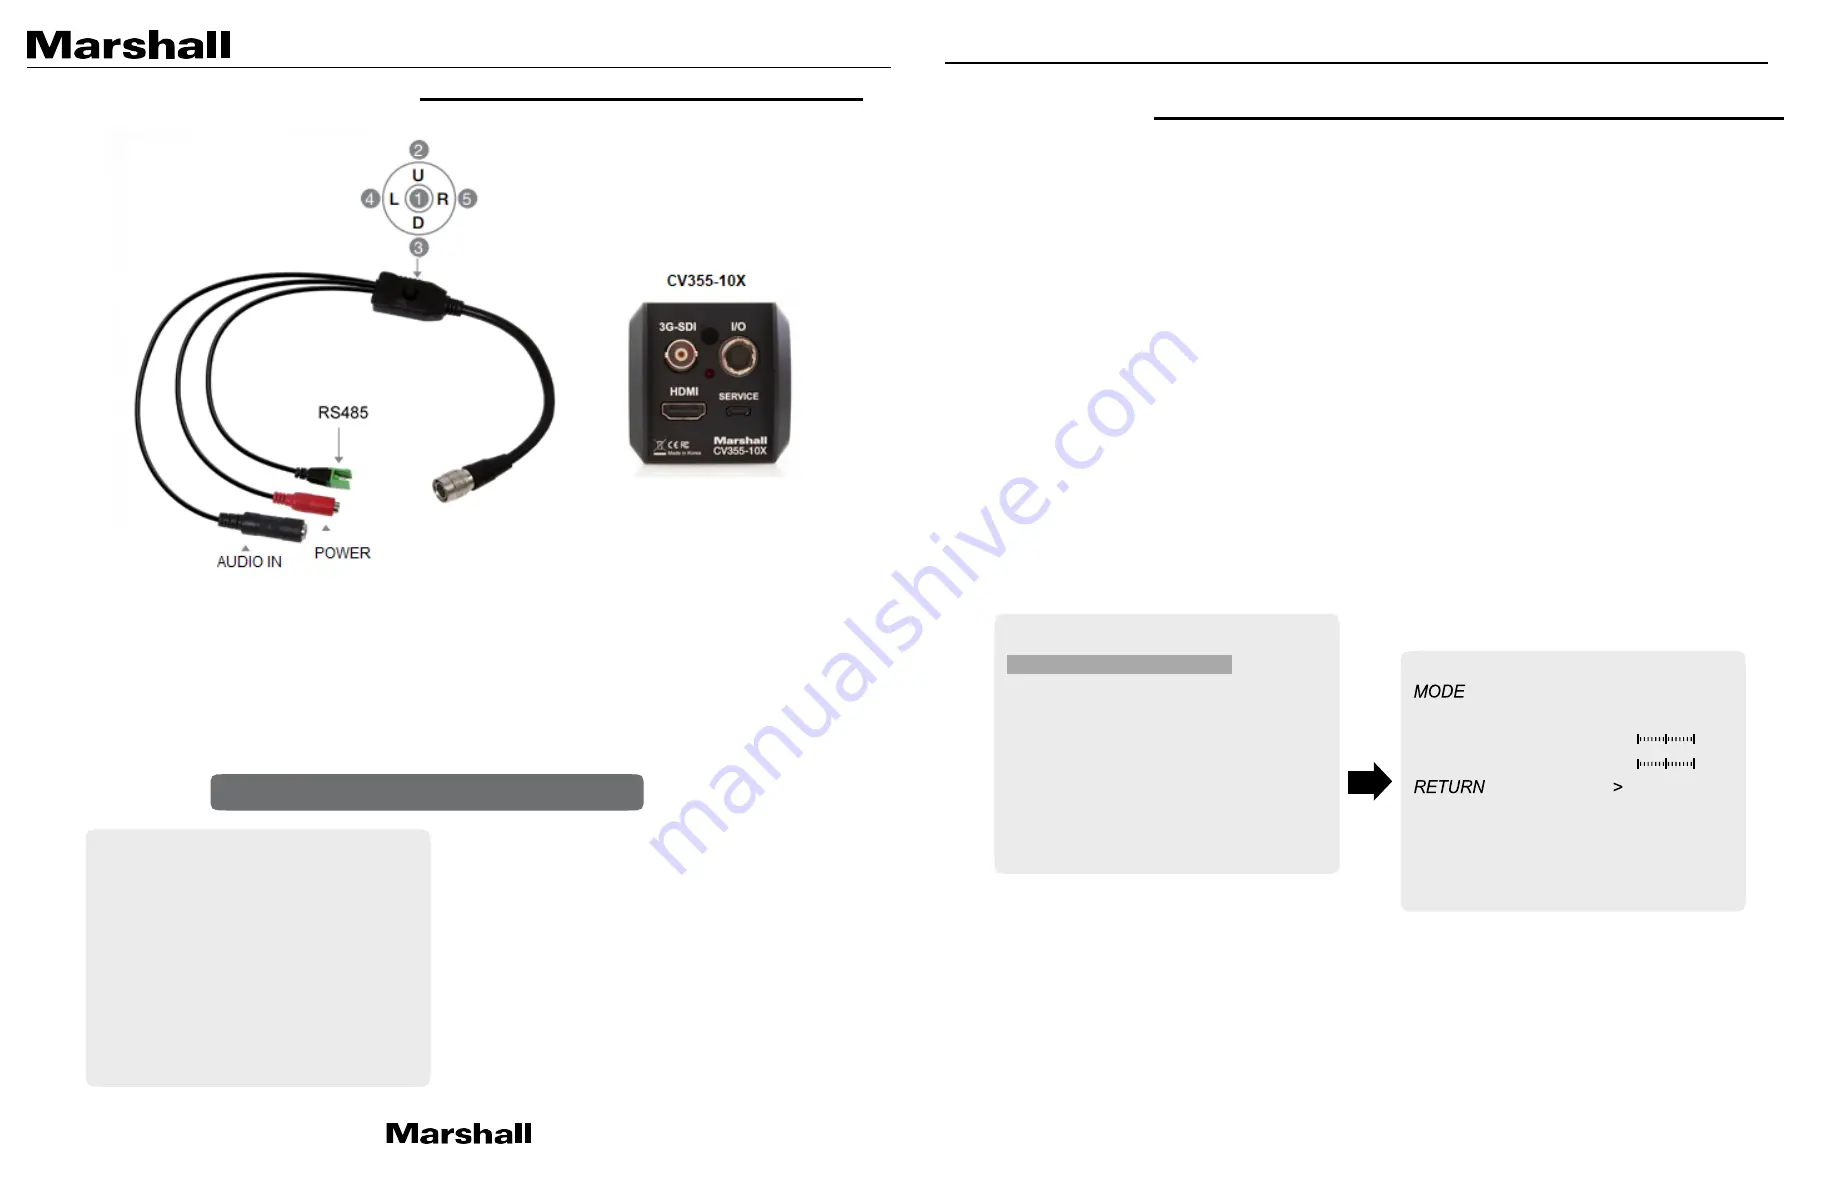
3.  OSD Joystick and Button  


I/O Cable (included in box) 

1.  SET 

Used to access the menu and confirm selection. 

2.  UP 

Used to move the cursor up. 

3.  DOWN  Used to move the cursor down. 

4.  LEFT 

Used to move the cursor left and change the value. 

5.  RIGHT  Used to move the cursor to the right and change the value.


Use the UP & DOWN buttons 

to select the desired item. 


Use the LEFT and RIGHT buttons 

to change the sub-item. 


4.  WB Control  

Select WB CONTROL using the UP or DOWN button. You can change between AWB, ATW, PUSH, 

and MANUAL using the LEFT or RIGHT buttons. 


•  AWB: 

Continuously adjusts camera color balance in accordance with any change in color 

temperature changes within the range of 3,000°K to 8,000°K.  

•  ATW: 

Continuously adjusts camera color balance in accordance with any change in color 

temperature. Compensates for  color temperature changes within the range of 1,900°K to 
11,000°K. 

•  ONE PUSH: 

Color temperature will be manually adjusted by pushing the OSD button. Place 

the white paper in front of the camera when OSD button is pressed to obtain optimum result. 

•  MANUAL: 

Select this to fine-tune White Balance manually. 

You can adjust the blue and red tone level manually. 

1.  BLUE: 

Adjust the Blue tone of the image. (0~255) 

2.  RED: 

Adjust the Red tone of the image. (0~255) 

• 

INDOOR: 

Select this to adjust white balance to indoor lighting condition. 

• 

OUTDOOR: 

Select this to adjust white balance to outdoor lighting condition. 


1.  Adjust White Balance first by using the AWB or ATW mode before switching to MANUAL 

mode. 

2.  White Balance may not work properly under the following conditions. In this case, select 

the ATW mode. 

•  When the ambient illumination of the subject is dim. 
•  If the camera is directed towards a fluorescent light or is installed in place where 

illumination changes dramatically, the White Balance operation may become 
unstable. 

Press SET button to access the 

Main Menu


PUSH 
BLUE 
RED 


WB CONTROL 

MANUAL 

50 
50 


MAIN MENU 


WB CONTROL 


AE CONTROL  


FOCUS CONTROL   

DAY/NIGHT   


AUDIO  


BACKLIGHT   


IMAGE CONTROL   

SPECIAL 


SETUP 


RESET 


EXIT 

MAIN MENU 


WB CONTROL 


AE CONTROL  


FOCUS CONTROL   

DAY/NIGHT   


AUDIO  


BACKLIGHT   


IMAGE CONTROL   

SPECIAL 


SETUP 


RESET 


EXIT 

Содержание Broadcast CV355-10X

Страница 1: ...Broadcast A V Division CV355 10X Compact 10x Zoom HD Camera 3G HDSDI HDMI User Manual...

Страница 2: ...g of on screen display OSD menus breakout cable operation settings adjustment explanation troubleshooting and other critical information Please carefully remove all contents of box which should includ...

Страница 3: ...F MODE DZOOM ZOOM SPEED NEAR LIMIT AF INTERVAL AF AREA SIZE DAY NIGHT DAY NIGHT NIGHT COLOR AUTO SETUP SUB MENU SUB MENU AUDIO MIC LINE AUDIO LEVEL MIC ATTENUCATOR SAMPLE BITS BACKLIGHT BACKLIGHT BLC...

Страница 4: ...OSD button Place the white paper in front of the camera when OSD button is pressed to obtain optimum result MANUAL Select this to fine tune White Balance manually You can adjust the blue and red tone...

Страница 5: ...equency to match the power frequency in order to minimize video flicker 6 Focus Control Select Focus Controlusing the UP or DOWN button You can change between AUTO and Manual focus modes FOCUS MODE Ad...

Страница 6: ...mode 3 N D LEVEL Adjust the level to switch from Night mode to Day mode 8 AUDIO Select AUDIO using the UP or DOWN button and enter ON using SEL button You can select one sub mode using the UP or DOWN...

Страница 7: ...in the image CONTRAST Adjust the image contrast level BRIGHTNESS Adjust the image brightness level SATURATION Adjust the image saturation level HUE Adjust the image hue level EDGE ENHANCE Adjust the...

Страница 8: ...be turned ON or OFF COMMUNICATION VISCA communication can be adjusted 1 CAM ID Camera ID can be setup 0 254 2 ID DISPLAY Camera ID display can be displayed 3 BAUDRATE Camera baudrate can be set 2400 4...

Страница 9: ...actory default setting is needed RESET Reset the camera to the mode set on RESET MODE SAVE AS USER Save the current camera settings as USER 14 EXIT Select EXIT using the UP or DOWN button SAVE Exit th...

Страница 10: ...izing with the reference signal a Make sure Tri Level reference signal is used b Locking takes up to 1 minute depending on the signal strength Make sure the sync LED is solidly lit c Check if the cabl...

Отзывы: