Briteq STAGE PAINTER 12 Скачать руководство пользователя страница 12


11- 


Содержание STAGE PAINTER 12

Страница 1: ...STAGE PAINTER 12 Preliminary User Guide Official version will follow soon on WWW BRITEQ LIGHTING COM ...

Страница 2: ...1 TABLE OF CONTENTS 1 Safety Instruction 2 Technical Specification 3 How To Set The Unit 4 How To Control The Unit 5 Troubleshooting 6 Fixture Cleaning ...

Страница 3: ...ng as it is fire hazard Use safety cable when fixes this unit Maximum ambient temperature is TA 40 Don t operate it where the temperature is higher than this In the event of serious operating problem stop using the unit immediately Never try to repair the unit by yourself Repairs carried out by unskilled people can lead to damage or malfunction Please contact the nearest authorized technical assis...

Страница 4: ...are attaching the unit is secure and is able to support a 10 times weight of the unit 2 Technical Specification 3 6 9 12 15 channels switchable Automatically switching between music trig and auto mode Great built in programs under Master Slave mode trigged by music Individual control of each LED cluster Sound sensitivity adjustable via the menu Auto fading show with 3 different speeds Specially de...

Страница 5: ... go forward in the selected functions ENTER To confirm the selected functions Microphone Receive the sound to control the unit Only for remote control By connect to the 1 4 microphone jack to control the unit for Stand by Function and Mode function Mains input Connect to supply mains power Mains output Connect to supply mains power for other units Fuse For over current protection DMX input output ...

Страница 6: ...w show will effect immediately If you change to show 1 8 or Auto Fade you can press ENTER button to choose speed The unit will run in the speed selected or it will run to the music The main functions are shown on the drawing DMX Address Press the MENU button up to when the DMX Address is showing on the display Press ENTER button and the display will blink Use DOWN and UP button to change the DMX51...

Страница 7: ...tting Color 1 or or Color 32 once selected press MENU button to store If you choose Maun press the ENTER button to confirm you can press DOWN and UP button to select Red or Green or Blue press ENTER button to confirm and press DOWN and UP button to adjust the value then press ENTER button to store Back to the main functions without any change press the MENU button or wait for 8 seconds Slave Mode ...

Страница 8: ...ing ENTER button and the display will show Test and the unit will run self test by built in program To go back to the functions press the MENU button Manual Test Press the MENU button up to when the Manual Test is showing on the display Press ENTER button and Red 1 will blink use UP and DOWN button to choose Green 1 or Blue 1 or Red2 or or Blue 4 or Dimmer or Strobe press ENTER button to enter the...

Страница 9: ... button Firmware Version Press the MENU button up to when the Firmware Version is blinking on the display Pressing ENTER button and the display will show the version of software of the unit To go back to the functions press the MENU button 4 How To Control The Unit You can operate the unit in three ways 1 By master slave built in preprogram function 2 By easy controller 3 By universal DMX controll...

Страница 10: ...d the display will blink Use DOWN and UP button to change the DMX512 address Once the address has been selected press and keep ENTER button to store To go back to the functions without any change press the MENU button or wait for 1 minute to exit menu mode Please refer to the following diagram to address your DMX512 channel for the first 4 units Channel Mode Unit 1 Unit 2 Unit 3 Unit 4 3 channels ...

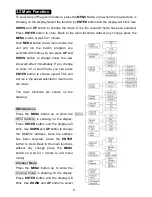
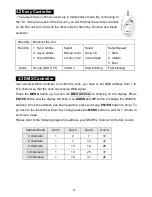
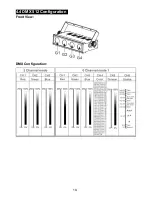
Страница 11: ...10 4 4 DMX 512 Configuration Front View DMX Configuration ...

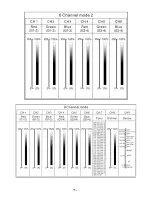
Страница 12: ...11 ...

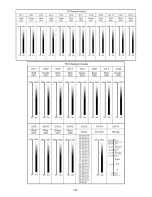
Страница 13: ...12 ...

Страница 14: ...ery high speed signal Inadequate or damaged cables soldered joints or corroded connectors can easily distort the signal and shut down the system 4 The DMX output and input connectors are pass through to maintain the DMX circuit when power is disconnected to the unit 5 Each lighting unit needs to have an address set to receive the data sent by the controller The address number is between 0 511 usua...

Страница 15: ...eck the address settings and DMX polarity 3 If you have intermittent DMX signal problems check the pins on connectors or on PCB of the unit or the previous one 4 Try to use another DMX controller 5 Check if the DMX cables run near or run alongside to high voltage cables that may cause damage or interference to DMX interface circuit C Some units don t respond to the easy controller 1 You may have a...

Страница 16: ...ully Clean the external optics at least every 20 days Clean the internal optics at least every 30 60 days EC Declaration of Conformity We declare that our products lighting equipments comply with the following specification and bears CE mark in accordance with the provision of the Electromagnetic Compatibility EMC Directive 89 336 EEC EN55103 1 199601 2 EN55103 2 1996 EN61000 3 2 2000 A2 2005 EN61...

Отзывы: